Introduction
When replacing your hard drive, you must transfer the four locating pins (removed with a T6 screwdriver) from the old hard drive to the new one.
What you need
-
-
Remove the following 10 screws securing the lower case to the MacBook Pro 13" Unibody:
-
Seven 3 mm Phillips screws.
-
Three 13.5 mm Phillips screws.
-
-
-
Slightly lift the lower case and push it toward the rear of the computer to free the mounting tabs.
-
-
-
Use the flat end of a spudger to lift the battery connector up out of its socket on the logic board.
-
-
-
-
Remove two Phillips screws securing the hard drive bracket to the upper case.
-
-
-
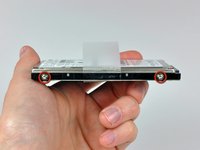
Remove the two T6 Torx screws from each side of the hard drive (four screws total).
-


To reassemble your device, follow these instructions in reverse order.
To reassemble your device, follow these instructions in reverse order.
Cancel: I did not complete this guide.
569 other people completed this guide.

16 Comments
I'd suggest using the free software "Super Duper" to clone the hard drive. It worked wonders for me and after the 2 hour clone, I was up and running in 5 minutes!
I wholeheartedly agree. Super Duper! made the task effortless.
The T6 torx screws on the side of the existing Hitachi drive fit my Crucial M500 240GB replacement perfectly. Be aware that they were originally installed into the HDD with blue Loctite, so it takes a bit of effort to break them loose.
Thanks ifixit for excellent guidance!
What do you do when your laptop doesn't read your new hard drive?
If your hard drive dosent connect. you might need to change your hard drive connect cable . The second option is that you need a strip to replace your hard drive with DVD rom.