Introduction
Use this guide to replace your iPod Touch's battery. Replacing the battery requires a soldering iron and knowledge of surface mount soldering.
Before you start, first back up your iPod by sync-ing it with iTunes. It may come back up in a state where it needs resetting and restoring.
What you need
-
-
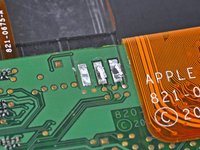
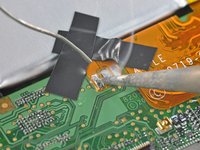
The picture at left (front panel already removed) shows the locations of the metal clips (shown in red) that snap on to the plastic frame. In the next few steps, try to pry the front panel up from the gaps between these clips.
-
-
-
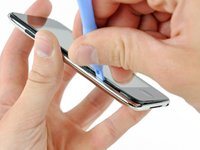
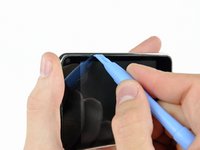
Insert a small iPod opening tool with the edge angled up toward the underside of the display between the white plastic backlight and the metal shield beneath it.
-
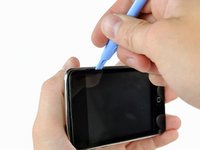
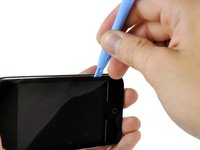
Pry up along the lower edge of the display enough to grab it with your fingers, being careful to not flex the screen.
-
-
-
-
Use the flat end of a spudger to pry the battery off the adhesive securing it to the metal display tray.
-
Remove the metal display tray and set it aside.
-
-
-
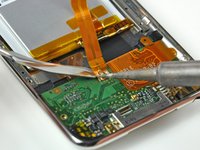
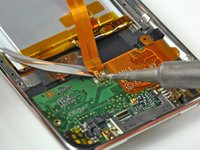
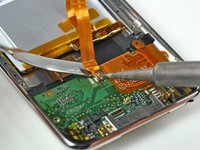
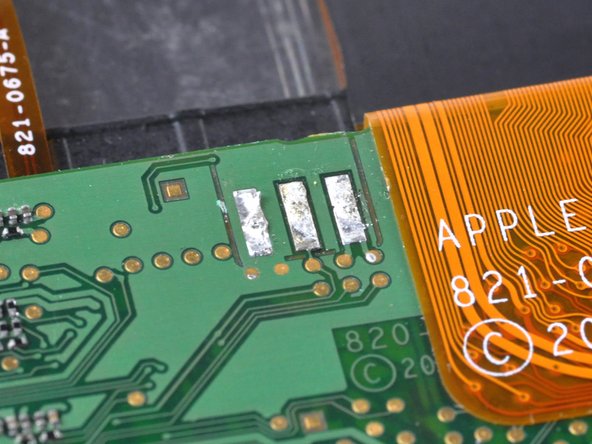
Start working from one side of the battery ribbon cable. In our case, we started on the left. Heat the leftmost solder pad while gently prying up from under the ribbon cable to free it from the board. Repeat this process for each of the two remaining pads, working either right to left or left to right.
-
-
-
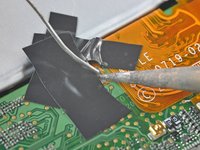
Place your battery in the rear panel, with the cable side down, and use two small strips of electrical tape to hold the cable against the solder pads.
-
Place a strip of tape over the end of the battery ribbon cable to both cover two of the solder pads and hold the contacts down against the logic board.
-
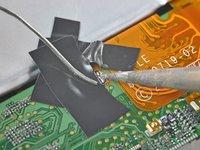
Heat the rightmost contact until the solder below melts and apply a small amount of solder to the contact, allowing it to flow through the two holes in the cable and down to the logic board.
-
As soon as the solder has flowed into the joint, remove both the solder and the iron.
-
-
-
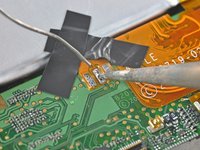
Remove the piece of tape covering the remaining two leads. If you are satisfied with the position of the cable relative to the pads on the board, proceed. If not, de-solder the first connection and try again.
-
Solder the two remaining pads to the logic board, being mindful of overheating the cable or board.
-


To reassemble your device, follow these instructions in reverse order. Don't forget to clean both the display and the inside of the screen before final reassembly. You can use spectacle cleaning spray and a lint-free cloth for this. Clean the screen horizontally and the display vertically, and have a test look. The direction will tell you where the smudges are.
To reassemble your device, follow these instructions in reverse order. Don't forget to clean both the display and the inside of the screen before final reassembly. You can use spectacle cleaning spray and a lint-free cloth for this. Clean the screen horizontally and the display vertically, and have a test look. The direction will tell you where the smudges are.
Cancel: I did not complete this guide.
103 other people completed this guide.

20 Comments
They can be found here in our store.
I've done the battery change and went through the whole process without too much hassle. Once it was done, I turned my iPod on and it worked. However, when I came to charge it, it just wouldn't work (the battery won't charge at all). So my iPod just depleted itself till the new battery went empty, and now it just won't boot anymore. I think I've done the job pretty well (or at least the iPod worked for a little while after the battery change) so I don't know what's the real reason for this not to work. Now my iPod is stuck on this screen http://km.support.apple.com/library/APPL.... Sucks to be me.
at least u didnt fix it, boot it so it worked, then assemble it and have it broken.
Appreciate it's probably way too late for yourself, but wanted to comment here in case anyone else is in this situation and stumbled across this thread.
Don't give up here if the battery won't charge, it may still be fixable! It was for me!
I Replaced the battery, everything appeared to work fine, so I reassembled only to find that the battery would not charge. The icon came up saying that it was charging, but slowly the charge ran out until I was stuck at that same screen.
Was about to sell it on for spares when I thought I'd have one last go... It turned out that the problem was not with the replacement battery itself, but the protection circuitry attached to the battery. I was able to remove the circuit (plus ribbon cable) from the original (dud) battery, and solder it onto the new one (as always being carful not to short it out in the process. Once reattached, it worked perectly!
Can only suspect it's an issue with the non-OEM circuit being faulty, or detected and blocked by apple somehow...