Introduction
In this guide, you will learn how to teardown and disassemble a ASUS Chromebook CR1 (CR1100). This guide requires minimal tools and is a medium difficult for tearing down the device due to the screw sizes used in the laptop and removal of parts.
NOTICE:
- Tearing down or disassembling your device may void your warranty. To check your device warranty, contact your manufacturer or visit their website
- This is a teardown guide for the full removal of components. This guide should not be used for repair and should be used as a reference for internal components
What you need
-
-
Make sure you have a clean desk space with plenty of room to separate components.
-
Ensure any devices or peripherals plugged into the laptop are removed and set aside.
-
Using the system dialog, power off the computer to prevent data loss.
-
-
-
Keep the device lid open at 180 degres, away from any magnets to prevent autostart.
-
Loosen the 11 screws in the backplate. Do not remove screws, they are attached to the backplate. Flip the device, keyboard up against you.
-
Using one or more plastic prytool(s), work your way around the keyboard assembly. Careful not to slide the tool across, to prevent cutting wires and plastic clips.
-
Once the keyboard is loose, lift up from the screen side.
-
Detach keyboard cable (wide) by lifting the black latch on the connector. Use fingernail or plastic prytool. Grab the cable with the blue plastic and pull it up and away from the connector.
-
Detach the touchpad cable (thin) by lifting the white latch on the opposite side from the cable. Then grab the cable by the blue plastic and pull away from the connector.
-
Remove keyboard.
-
-
-
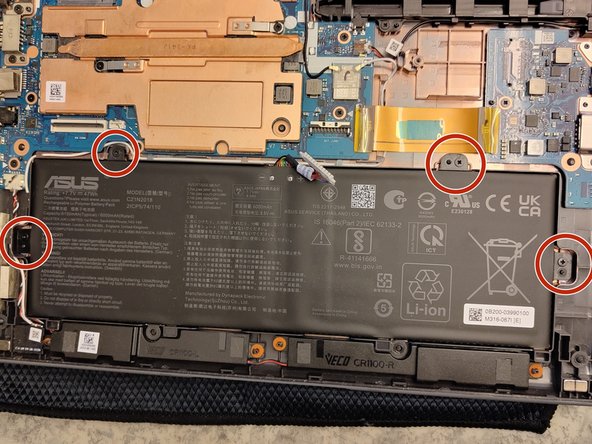
Move the metal bracket on the battery connector away from the white plastic that is the battery cable contact.
-
Lift the white plastic contact away from the battery connector.
-
Remove 4 screws.
-
Remove battery by sliding it up and away from the bottom. (4 plastic pins keep it from falling out)
-
-
-
-
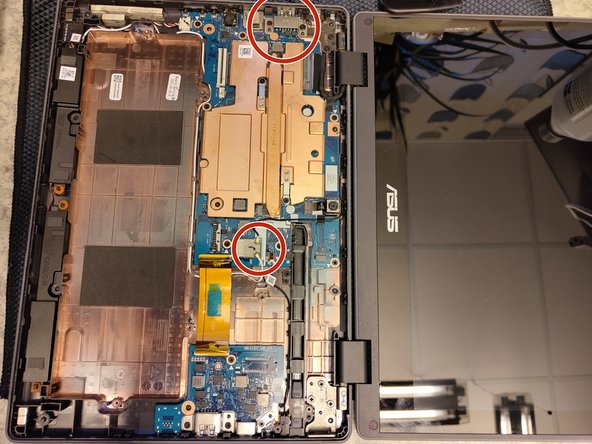
Remove two screws holding down a USB-A cover. The lower one in the picture is a M2.0 and the upper is a M2.5. Then remove the metal cover.
-
Remove display ribbon cable. There is a latch under the plastic film.
-
The black antenna connector (white is removed in the next step) has a hard plastic cover, lift it slowly from the network-chip cover to not delaminate the metal cover from the chip. Follow the cables through the guided fits.
-
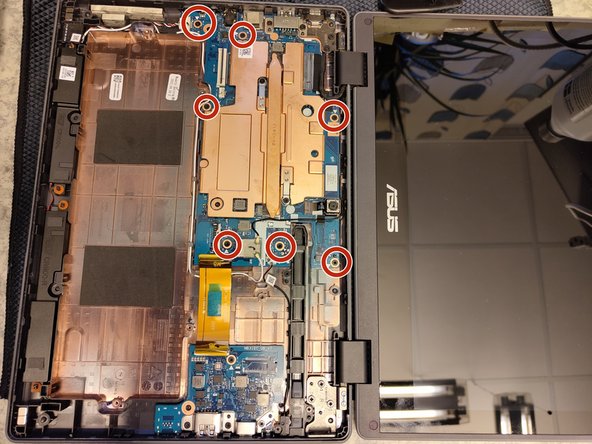
Remove the remaining 5 screws (2 on the left side and 3 on the right) holding down the screen assembly to the backplate and motherboard assembly. Marked with debossed triangels in the metal.
-
-
-
Identify and detach all cables. Be observant of the type of connector and cable. Make sure to release latches and only pull on the plastic part of the cable. Some cables require lifting a protective film to access it.
-
The wide Motherboard/IO-cable is especially hard to to lift. Have patience to not rip the cable. Leave the protective film on the connector.
-
The white antenna connector (black was removed in previous step) has a hard plastic cover, lift it slowly from the network-chip cover to not delaminate the metal cover from the chip. Follow the cables through the guided fits.
-
The camera connector has the latch on the opposite side of the cable.
-
Display cable should have been removed in the previous step.
-
Last two cables are the speaker cable at the top and pencil power cable. Pull on the white hard plastic part of the cable.
-
Remove the 7 screws marked with a white triangle next to them.
-
Remove the motherboard.
-
-
-
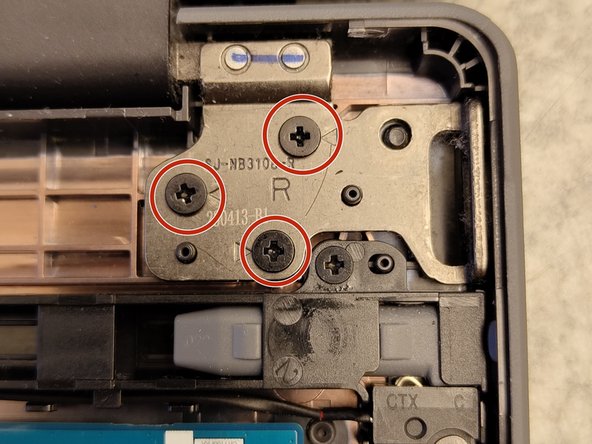
Remove 3 screws holding down the metal bracket.
-
Metal bracket may be glued down to the board, leave it.
-
Remove one remaning screw holding down the board.
-
All screws are M2.0
-
-
-
Lift the speakers from far right to left. Pull under the orange rubber ring.
-
The white cable end at the WiFi Aux antenna "black box". That is glued to the case. But can be pryed off.
-


One Comment
Wow smart Guy God Bless you Brother. Keep going and Doing like that. Buddy ok you are awesome. Try to fixed next Time The One Plus 11. And 12. Ok.