
Acer Chromebook 13 CB5-311-T7NN Battery Replacement
Introduction
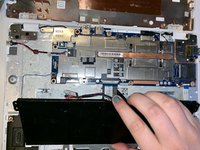
Go to step 1To avoid electric discharge and possible damage to internal components, the battery should be disconnected from the motherboard as a prerequisite to replacing other parts. You will not need to remove or replace any other parts of the device in order to do so. For this guide, you will need an anti-static mat to avoid electrostatic discharge, a Phillips #0 screwdriver head, a spudger (either plastic or metal) and tweezers to handle small parts. The process is relatively simple and should only take about 10 minutes.
What you need
Fix Kit
This kit contains all the parts and tools needed to complete this guide.

Parts

Tools


Show more…
-
-
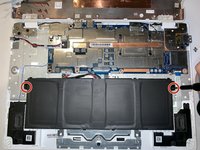
Flip the computer over and use a Phillips #0 screwdriver head to remove the 13 2.5 mm bottom cover screws.
-


To reassemble your device, follow these instructions in reverse order.
To reassemble your device, follow these instructions in reverse order.
Cancel: I did not complete this guide.
2 other people completed this guide.
Team

University of Michigan, Team S1-G1, Li Winter 2019 Member of University of Michigan, Team S1-G1, Li Winter 2019
UMIC-LI-W19S1G1
4 Members
1 Guide authored