Alienware 17 R4 Hard Disk Drive (HDD) Replacement

Alienware 17 R4 Hard Disk Drive (HDD) Replacement

Hector Mendez III

Hector Mendez III and 5 other contributors

Last updated on November 15, 2022

15 minutes
Moderate

Introduction

Go to step 1

This guide will show you how to replace the hard disk drive (HDD) for your Alienware 17 R4.

What you need

  1. Alienware 17 R4 Hard Disk Drive (HDD) Replacement, Base Cover: step 1, image 1 of 1
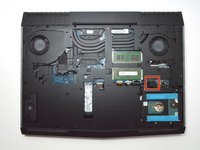
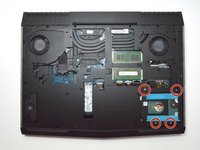
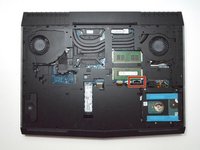
    • Use a PH1 screwdriver bit to remove the six M2.5x13 screws (2.4 mm) on the back of the laptop.

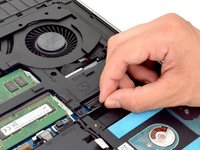
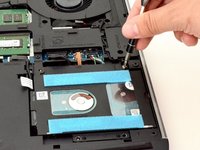
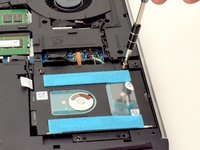
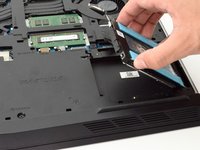
    • Use a PH1 screwdriver bit to loosen the one M2x3 screw (1.9 mm).

    • The M2x3 screw (1.9 mm) does not come out completely.

  2. Alienware 17 R4 Hard Disk Drive (HDD) Replacement: step 2, image 1 of 2 Alienware 17 R4 Hard Disk Drive (HDD) Replacement: step 2, image 2 of 2
    • Pull the base cover up to remove it.

    • If you are having trouble, insert a plastic opening tool into the divots along the laptop's edges to loosen.

    • Removing the cover may require some force.

  3. Alienware 17 R4 Hard Disk Drive (HDD) Replacement, Hard Disk Drive (HDD): step 3, image 1 of 3 Alienware 17 R4 Hard Disk Drive (HDD) Replacement, Hard Disk Drive (HDD): step 3, image 2 of 3 Alienware 17 R4 Hard Disk Drive (HDD) Replacement, Hard Disk Drive (HDD): step 3, image 3 of 3
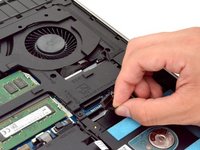
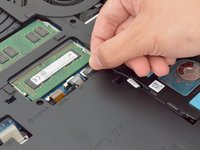
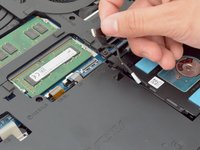
    • Disconnect the battery connector cable, located on the right side of the laptop, above the hard disk drive.

    • Once you have removed the cable, wait 5-10 minutes to allow the laptop to power down.

    • Failure to remove the battery connector cable properly may damage other parts of the laptop.

  4. Alienware 17 R4 Hard Disk Drive (HDD) Replacement: step 4, image 1 of 3 Alienware 17 R4 Hard Disk Drive (HDD) Replacement: step 4, image 2 of 3 Alienware 17 R4 Hard Disk Drive (HDD) Replacement: step 4, image 3 of 3
    • Use a PH1 screwdriver bit to remove the four M2.5x5 screws (2.4 mm) on the hard disk drive.

  5. Alienware 17 R4 Hard Disk Drive (HDD) Replacement: step 5, image 1 of 3 Alienware 17 R4 Hard Disk Drive (HDD) Replacement: step 5, image 2 of 3 Alienware 17 R4 Hard Disk Drive (HDD) Replacement: step 5, image 3 of 3
    • Gently lift the HDD cable to disconnect it from the laptop.

  6. Alienware 17 R4 Hard Disk Drive (HDD) Replacement: step 6, image 1 of 2 Alienware 17 R4 Hard Disk Drive (HDD) Replacement: step 6, image 2 of 2
    • Pull the hard drive up to remove.

Conclusion

To reassemble your device, follow these instructions in reverse order.

2 other people completed this guide.

Hector Mendez III

Member since: 09/11/17

1,340 Reputation

8 Guides authored

Team

0 Comments

Add Comment

View Statistics:

Past 24 Hours: 2

Past 7 Days: 9

Past 30 Days: 50

All Time: 6,711