Introduction
This repair guide is for the back cover of your Asus Chromebook C523N. This repair or removal may be necessary for access to the hardware of the laptop, the battery, or to replace a damaged back cover. You might find yourself needing to repair inner parts of the computer or replace a cracked, scratched, or ill-fitting back cover.
This guide does not require any advanced knowledge or skills for computer repair. To complete this guide you will need to use a screwdriver, iFixit tools, and Spudger.
Prior to starting ensure the computer is unplugged from its charger and you have an understanding of the tools being used.
What you need
-
-
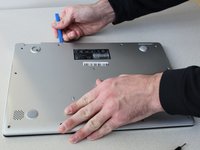
Remove the four 0.5mm JIS #00 screws from the bottom edge of the Chromebook and one in the center.
-
Remove the six 1.7mm JIS #00 screws from the sides and top edge of the Chromebook.
-
-


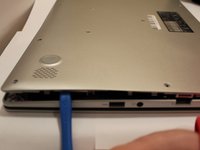
To reassemble your device, follow these instructions in reverse order.
To reassemble your device, follow these instructions in reverse order.
Cancel: I did not complete this guide.
3 other people completed this guide.
Team

Grand Valley State University, Team S4-G2, DeVasto Fall 2019 Member of Grand Valley State University, Team S4-G2, DeVasto Fall 2019
GVSU-DEVASTO-F19S4G2
4 Members
6 Guides authored