What you need
-
Tool used on this step:Tweezers$4.99
-
First remove the Rubber inside the screwable mount area. This can easily be done with a small screw driver tip or Tweezers. From here you can remove the 3 screws using a #1 Phillips head.
-
-
-
The 4 exterior buttons can be removed with any force such as fingers or any form of pliers. I used my fingers to remove and pull the buttons from their button placement. You will notice there is a lot of give from the mesh and the body.
I’m having trouble removing the volume and mute buttons from the front, much more so than the gain and sound pattern knobs. Is this just me or are all yetis like that?
-
-
-
-
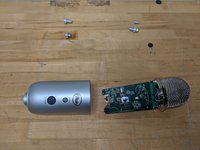
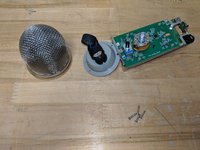
On this step, you can easily and carefully pull the entire mic mechanism from the protective housing. On the bottom you will see where the Audio port and USB port are if you need to replace them.
-
-
-
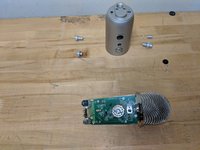
If you look toward the mesh and the circuits you will see that it is held by 4x #0 Phillips screws. Carefully remove these and the entire cap will come from the board. There are 3 sets of wires, 1 per condenser. You will notice that they are pointed sideways, making this microphone a side condenser, not a face-pointed one.
-
-
-
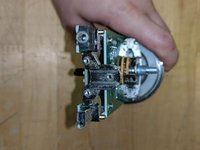
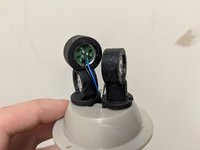
As seen in the picture, this Microphone cap comes with a internal foam guard to protect the three internal mic condensers. These point outward to the side of the mic making this mic more useful from the side and not pointed at the users itself.
You referred to those components as “mic receivers” and “speakers” which is a little confusing since they are neither receivers or speakers. Those are condenser microphones. Thanks.
I made some edits. Hopefully they were meaningful changes to reflect what you said.
The mics don't really point "outward". The mics are not very directional but mostly cardioid to omni-directional. So this is an X-Y configuration (two mics on top of another at 90 degrees angle) that provides the best stereo image or mono if the signals are mixed. So both "front" mics are used for "Stereo" image. All 3 cells are used for "omni" (all signal mixed), Both mics are used for "cardioid" imaging (in mono) with some rejection, maybe, from the back mic. The front mics are also used, in mono, with the back mic, all 3 mixed to offer the "front-back" sound image. The user's best placement is definitely in front of the Yeti for "stereo", "cardioid" and "front-back" imaging. For "omni", it doesn't matter.
-
-
-
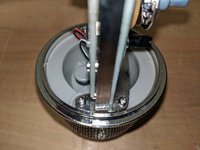
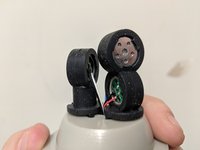
If you need to disconnect the microphone cap from the board, pay close attention to the connections.
-
There are 3 condenser, therefore 3 pairs of wires connect to the board, each with their own wire color (black & white, black & red and black & blue)
-


To reassemble your device, follow these instructions in reverse order.
To reassemble your device, follow these instructions in reverse order.
Cancel: I did not complete this guide.
31 other people completed this guide.
29 Comments
And what if i want to do the opposite?
For example, you removed the down part of the yeti, I wanna remove just the top. How can I do that?
You have to remove the bottom to unscrew the top from the inside.
this is a bit of a long shot. but any idea on a replacement part# / source for the 3.5mm barrel jack on one of these?
Try searching on e.g. ebay for “3 pin pcb mount female 3.5mm jack”
The plug is a standard part, so it should be readily available. I replaced my plug with a scavanged part that I happened to have on hand!
Anton -
@ Joe
Sorry I don’t.
Can the internal foam guard be taken out of the microphone mesh, so that they both can be washed, cleaned, and dried separately?
This would be great for those who want to buy a used Blue Yeti microphone.
Lenneurt -
This article answers part of my question:
Lenneurt -
I wouldn’t worry to much about taking the foam out. You will more than likely need to just wash it by running soapy water through it or dumping it into a soap bath and then I would use a fan to dry it.
Lucet. . 28 minutes ago (edited). . I found a video that shows that removing the internal foam from the microphone grill/mesh is possible
Lenneurt -
I have a blue yeti with distorted audio from the mic. Any idea which component may have failed? I'm guessing there's an encoder or amplifier IC on the board which would be a good guess but not too sure on these things
Yeah my Blue just blew I think. The recordings are chopped in half (one of mics is clean). The other sounds clipped/distorted/robotic/digital. So the audio curve is lopsided: the lower half looks correct, the upper half is flattened and nearly dead.
My screwhole on the bottom of the yeti seems too small for the standard screw that comes with the blue radius iii shock mount. I can only tighten the screw 1 turn before it stopes, but there’s still about 6 threads of space… I think I either stripped or compressed the thread tracks because I was an idiot and tried screwing in the wrong screw…
Please help, any ideas to troubleshoot much appreciated
I would suggest taking it apart and try putting the screw into the receiving hole while unbuilt to see if the screw still fits properly with no obstructions. It could be just slightly off when you put it back together causing friction.
Anyone else find their Yeti foam inside the mesh to smell terribly chemical and/or moldy?
I bought mine new years ago and it still has this smell. I spray alcohol and vinegar and the smell comes back
in minutes. I’m thinking it’s just the toxic foam they used on the models ten years ago at least.
Thanks for your help disassembling the mike.
I have a blue yeti with a broken mute button. Looks like a part that can be replaced without soldering if I can find a replacement part, or that there might be something off the shelf that might work. A cylindrical push button with light. Any ideas how to find a replacement part?
I called the company to see if I can purchase the part.
The Microphone repair shops won’t work on anything in that price range.
Blue said they will neither repair the device or sell the part. Shame on them.
Best regards
Do you know the dimensions of the three screws on bottom (length and thread?). I realize one is stripped and two are missing. I emailed Blue and they said they wouldn’t disclose that information. Thanks!
The buttons on there were really tight, had to use pliers to do the job. Completely ruined the buttons, does anyone happen to know places where you could find the replacement buttons on these mics?
EBay has a few spare knobs and buttons, Etsy also has some 3D printed replacements. Hope this helps
Kippler -
Any idea where to get replacement PCB?
Are you using a standard mini USB port for replacement? I also have a friend that has an damaged mini USB port that needs replacement.
I'll be danged if I can get the buttons and knobs off. Kind of afraid to use vise grips or channel lock pliers. My fingers can't get enough grip on them, and they're "ON THERE." Hmmm...................
Got an iffy phone out volume pot, was going to get in there and squirt the sucker.
Do you know the measurements of the screws? I was looking to take mine apart to resolder the connections and realized I am missing them. Maybe that’s why my audio crackles.
Ryan Fujimoto - Reply
On black model there is a sticker to remove and 2 of the screws are hidden beneath.
Branden Rush - Reply