Canon PowerShot ELPH 300HS LCD Screen Replacement

Canon PowerShot ELPH 300HS LCD Screen Replacement

Kathryn Van Susante

Kathryn Van Susante and 6 other contributors

Last updated on February 26, 2025

15 - 20 minutes
Moderate
Action Shots
Needs Better Images
Student In Progress

Introduction

Go to step 1

This will show you how to replace the LCD screen on the back of your camera.

What you need

Parts

Tools

  • Spudger
    Spudger

Show more…

iFixit earns commission when you buy through these links.
    • Before you begin taking apart your device, the first, and MOST IMPORTANT STEPS are to:

    • Turn off your camera.

    • Remove the battery to prevent risk of shock.

  1. Canon PowerShot ELPH 300HS LCD Screen Replacement, Remove the Battery: step 2, image 1 of 2 Canon PowerShot ELPH 300HS LCD Screen Replacement, Remove the Battery: step 2, image 2 of 2
    • Turn off your camera by pressing the power button, located on the top-center of the device.

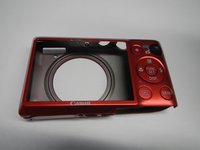
    • Locate the battery door on the bottom right area of the camera case.

    • Place your finger firmly on the black rubber pad on the battery door and slide the door to the right to open it.

    • Locate the orange battery release button beneath the battery door.

    • Slide the battery release button downward to release the battery.

  2. Canon PowerShot ELPH 300HS LCD Screen Replacement, Left Side Screws: step 3, image 1 of 1
    • Be careful when removing screws, as they are stripped easily.

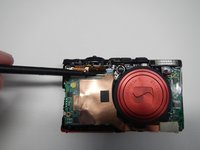
    • Remove the two screws located on the left side of the camera case, using the Phillips screwdriver #00 (2.0 mm).

  3. Canon PowerShot ELPH 300HS LCD Screen Replacement, Bottom Screws: step 4, image 1 of 1
    • Remove the two screws on the bottom of the camera located near the battery door (Phillips #00 screwdriver) (4.0 mm).

  4. Canon PowerShot ELPH 300HS LCD Screen Replacement, Right Side Screws: step 5, image 1 of 1
    • Remove the screw located on the lower right side of the camera case (Phillips #00 screwdriver) (4.0 mm).

    • Remove the HDMI A/V out port cover located on the upper right side of the camera.

    • Remove the screw located just beneath the port cover removed in step 2. (Phillips #00 screwdriver) (2.0 mm).

  5. Canon PowerShot ELPH 300HS LCD Screen Replacement: step 6, image 1 of 1
    • Remove the back portion of the camera case to reveal the screw located on the top of the case.

    • Remove the screw from the top of camera case, located next to the shutter button (Phillips #00 screwdriver) (1.5 mm).

  6. Canon PowerShot ELPH 300HS LCD Screen Replacement, Remove the Case from the Camera: step 7, image 1 of 3 Canon PowerShot ELPH 300HS LCD Screen Replacement, Remove the Case from the Camera: step 7, image 2 of 3 Canon PowerShot ELPH 300HS LCD Screen Replacement, Remove the Case from the Camera: step 7, image 3 of 3
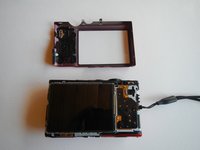
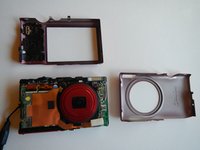
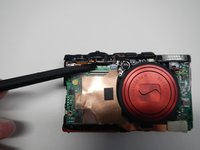
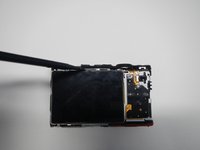
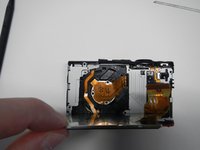
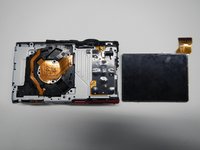
    • Carefully pry the case apart at the seem, using your fingers.

    • Be careful not to over bend the small metal projections located along the seams. These aid in holding the case together.

    • Be careful not to allow dust or other particles to settle inside of the camera while the case is detached. This can cause functional issues in the future.

  7. Canon PowerShot ELPH 300HS LCD Screen Replacement, LCD Screen: step 8, image 1 of 2 Canon PowerShot ELPH 300HS LCD Screen Replacement, LCD Screen: step 8, image 2 of 2
    • Disconnect the copper ribbon next to the blue port on the motherboard

    • To remove ribbon cable, gently lift the black tab with a flat head screwdriver. Lift from the top of the camera towards the bottom. This releases the cable. Be gentle, as the cables are fragile.

  8. Canon PowerShot ELPH 300HS LCD Screen Replacement: step 10, image 1 of 3 Canon PowerShot ELPH 300HS LCD Screen Replacement: step 10, image 2 of 3 Canon PowerShot ELPH 300HS LCD Screen Replacement: step 10, image 3 of 3
    • Remove the L shaped bracket around the top and right side of the LCD screen

  9. Canon PowerShot ELPH 300HS LCD Screen Replacement: step 11, image 1 of 3 Canon PowerShot ELPH 300HS LCD Screen Replacement: step 11, image 2 of 3 Canon PowerShot ELPH 300HS LCD Screen Replacement: step 11, image 3 of 3
    • Insert the flat side of the spudger tool carefully on the top of the LCD screen and lift the screen free

Conclusion

To reassemble your device, follow these instructions in reverse order.

Kathryn Van Susante

Member since: 02/26/14

697 Reputation

5 Guides authored

Team

0 Comments

Add Comment

View Statistics:

Past 24 Hours: 0

Past 7 Days: 0

Past 30 Days: 16

All Time: 4,950