Dell Inspiron 15 5584 Bottom Cover Replacement

Dell Inspiron 15 5584 Bottom Cover Replacement

Sam Vorn

Sam Vorn and 2 other contributors

Last updated on May 9, 2022

3 - 5 minutes
Easy

Introduction

Go to step 1

Use this guide to assist in removing the bottom cover on your Dell Inspiron 15 5584 laptop.

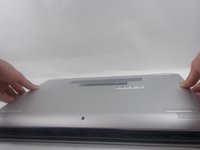
The bottom cover serves as a guard to protect the sensitive hardware components within the machine and acts as a surface to place the laptop as well. All hardware issues within the Dell Inspiron 15 5584 require you to remove the bottom cover to resolve them.

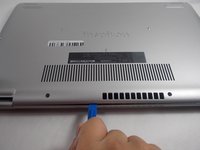
Before using this guide, make sure to review the troubleshooting page and confirm what issue you are having with your device. Keeping the bottom cover off for too long may result in components becoming damaged. Furthermore, when removing the bottom cover, clicking and snapping sounds are normal; however, the bottom cover is made of hard plastic that can easily snap.

What you need

Tools

  1. Dell Inspiron 15 5584 Bottom Cover Replacement, Bottom Cover: step 1, image 1 of 1
    • Make sure to turn off and unplug your laptop before starting.

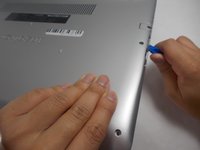
    • Turn over the laptop so that the bottom is facing upwards, and the Inspiron logo is upside-down.

  2. Dell Inspiron 15 5584 Bottom Cover Replacement: step 2, image 1 of 3 Dell Inspiron 15 5584 Bottom Cover Replacement: step 2, image 2 of 3 Dell Inspiron 15 5584 Bottom Cover Replacement: step 2, image 3 of 3
    • Remove the seven 7 mm screws from the bottom using a Phillips #0 screwdriver.

    • Loosen the two captive back corner screws using a Phillips #0 screwdriver.

    • The two corner screws are not removable. A clicking sounds indicates that the screw is fully loosened.

  3. Dell Inspiron 15 5584 Bottom Cover Replacement: step 3, image 1 of 2 Dell Inspiron 15 5584 Bottom Cover Replacement: step 3, image 2 of 2
    • Slide an iFixit opening tool underneath the right side USB port and the keyboard.

    • Gently trace the iFixit opening tool along the entire outer rim of the laptop, carefully applying an upwards pressure.

    • Be careful not to force open the plate or push too much off without loosening the other sides. This can cause the bottom cover to crack.

  4. Dell Inspiron 15 5584 Bottom Cover Replacement: step 4, image 1 of 2 Dell Inspiron 15 5584 Bottom Cover Replacement: step 4, image 2 of 2
    • Gently pry off the bottom cover from the laptop.

    • Use the iFixit opening tool to loosen any spots you may have missed from Step 3.

Conclusion

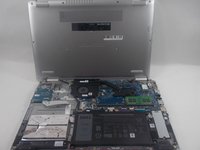
To reassemble your device, follow these instructions in reverse order.

Sam Vorn

Member since: 03/29/22

977 Reputation

9 Guides authored

Team

0 Comments

Add Comment

View Statistics:

Past 24 Hours: 1

Past 7 Days: 3

Past 30 Days: 5

All Time: 447