Dell Latitude E7440 RAM Replacement

Dell Latitude E7440 RAM Replacement

Akash Kedia

Akash Kedia and one other contributor

Last updated on March 6, 2019

5 minutes
Easy

Introduction

Go to step 1

You may have noticed your computer slowing down when using several programs. This is likely a result of insufficient RAM. Fortunately, Dell made RAM replacement straightforward, allowing you to easily upgrade your RAM capacity.

What you need

Tools

  1. Dell Latitude E7440 RAM Replacement, Prepare the laptop: step 1, image 1 of 1
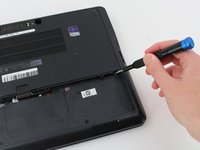
    • Power off your laptop before starting.

    • Flip the device over so that the vents on the bottom are facing away from you.

  2. Dell Latitude E7440 RAM Replacement, Release the battery: step 2, image 1 of 3 Dell Latitude E7440 RAM Replacement, Release the battery: step 2, image 2 of 3 Dell Latitude E7440 RAM Replacement, Release the battery: step 2, image 3 of 3
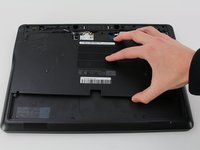
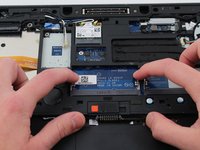
    • Place your finger on the latch located in the center of the laptop.

    • Slide the latch to the right, applying enough force to reveal a red indicator.

    • You will hear a soft click when the latch has been disengaged.

  3. Dell Latitude E7440 RAM Replacement, Remove the battery: step 3, image 1 of 1
    • Lift the battery by the top, away from the laptop body.

  4. Dell Latitude E7440 RAM Replacement, RAM: step 4, image 1 of 2 Dell Latitude E7440 RAM Replacement, RAM: step 4, image 2 of 2
    • Remove two M2 x 3mm Phillips #0 screws from the base cover.

  5. Dell Latitude E7440 RAM Replacement: step 5, image 1 of 2 Dell Latitude E7440 RAM Replacement: step 5, image 2 of 2
    • Slide the base cover down slightly and remove it.

  6. Dell Latitude E7440 RAM Replacement: step 6, image 1 of 3 Dell Latitude E7440 RAM Replacement: step 6, image 2 of 3 Dell Latitude E7440 RAM Replacement: step 6, image 3 of 3
    • For each RAM module, pull apart both the clips and remove the memory.

    • iFixit’s device came without RAM installed. Your device will have a module between each set of clips.

Conclusion

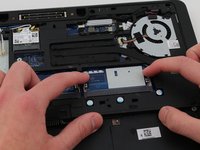
To reassemble your device, follow these instructions in reverse order.

6 other people completed this guide.

Akash Kedia

Member since: 01/24/19

1,445 Reputation

5 Guides authored

Team

Cal Poly, Team S2-G5, White Winter 2019 Member of Cal Poly, Team S2-G5, White Winter 2019

CPSU-WHITE-W19S2G5

4 Members

5 Guides authored

0 Comments

Add Comment

View Statistics:

Past 24 Hours: 3

Past 7 Days: 30

Past 30 Days: 56

All Time: 2,890