Dell XPS 13 9365 2-in-1 Touchpad Replacement

Dell XPS 13 9365 2-in-1 Touchpad Replacement

Melissa Schlein

Melissa Schlein and one other contributor

Last updated on May 12, 2022

7 - 10 minutes
Moderate
Community-Contributed Guide

Introduction

Go to step 1

Use this guide to remove or replace the touchpad on your Dell XPS 13 9365 2-in-1 laptop. This is a simple and quick guide, but take care in handling the fragile touchpad cable when you disconnect it.

What you need

Tools

  1. Dell XPS 13 9365 2-in-1 Touchpad Replacement, Battery: step 1, image 1 of 1
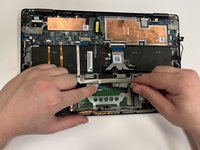
    • Use a Torx T4 screwdriver to remove the eight screws (M2x3) that secure the base cover to the palm-rest assembly.

  2. Dell XPS 13 9365 2-in-1 Touchpad Replacement: step 2, image 1 of 1
    • Use your fingertips to lift the system badge open and reveal the single case screw.

    • Use a Phillips #000 screwdriver to remove the screw (M1.6x4) that secures the base cover to the palm-rest assembly.

  3. Dell XPS 13 9365 2-in-1 Touchpad Replacement: step 3, image 1 of 1
    • Starting from the front corner of the computer, pry up the base cover using a spudger and lift the base cover off the palm-rest assembly.

  4. Dell XPS 13 9365 2-in-1 Touchpad Replacement: step 4, image 1 of 1
    • Disconnect the battery cable from the system board.

  5. Dell XPS 13 9365 2-in-1 Touchpad Replacement: step 5, image 1 of 1
    • Use a Phillips #000 screwdriver to remove the two screws (M1.6x4) that secure the battery to the palm-rest assembly.

  6. Dell XPS 13 9365 2-in-1 Touchpad Replacement: step 6, image 1 of 1
    • Use a Phillips #000 screwdriver to remove the six screws (M2x3) that secure the battery to the palm-rest assembly.

  7. Dell XPS 13 9365 2-in-1 Touchpad Replacement: step 7, image 1 of 1
    • Lift the battery off the palm-rest assembly.

  8. Dell XPS 13 9365 2-in-1 Touchpad Replacement, Touchpad: step 8, image 1 of 3 Dell XPS 13 9365 2-in-1 Touchpad Replacement, Touchpad: step 8, image 2 of 3 Dell XPS 13 9365 2-in-1 Touchpad Replacement, Touchpad: step 8, image 3 of 3
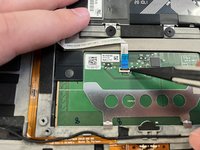
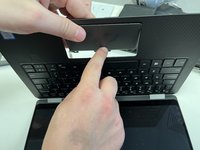
    • Open the ZIF latch on the touch pad connector.

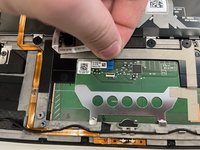
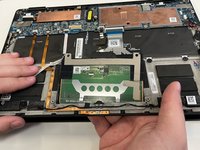
    • Disconnect and remove the ribbon cable from the touch pad. The ZIF connector latch lifts up to allow its release.

  9. Dell XPS 13 9365 2-in-1 Touchpad Replacement: step 9, image 1 of 1
    • Use a Phillips #000 screwdriver to remove the two screws (M2x2) that secure the touch pad to the palm-rest assembly.

  10. Dell XPS 13 9365 2-in-1 Touchpad Replacement: step 10, image 1 of 2 Dell XPS 13 9365 2-in-1 Touchpad Replacement: step 10, image 2 of 2
    • Lift the touch pad from the inner edge and remove it from the palm-rest assembly.

Conclusion

To reassemble your device, follow these instructions in reverse order.

0 Guide Comments

Add Comment

View Statistics:

Past 24 Hours: 0

Past 7 Days: 2

Past 30 Days: 17

All Time: 828