Dell XPS 15 9575 Battery Replacement

Dell XPS 15 9575 Battery Replacement

Andre Williams

Andre Williams and 7 other contributors

Last updated on June 21, 2024

20 minutes
Moderate

Introduction

Go to step 1

This guide shows the process of how to replace the battery in your Dell XPS 15 9575. Batteries are consumable components, that will lose their effectiveness over time. If your battery has a significant amount of charge cycles and is losing its ability to hold a charge for a reasonable amount of time, replacing the battery may give your device a new life. Check out our Troubleshooting Page for more information on issues you may be experiencing with your device.

Be sure to dispose of a battery properly, and if it appears to be swollen, exercise cation removing and handling it.

What you need

Fix Kit

This kit contains all the parts and tools needed to complete this guide.

Parts

Tools

Show more…

  1. Dell XPS 15 9575 Battery Replacement, Bottom Cover: step 1, image 1 of 3 Dell XPS 15 9575 Battery Replacement, Bottom Cover: step 1, image 2 of 3 Dell XPS 15 9575 Battery Replacement, Bottom Cover: step 1, image 3 of 3
    • For your safety, please make sure the device is powered off and the A/C adapter is unplugged.

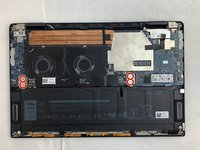
    • Use your T5 Torx driver to remove all eight 3.2 mm screws holding down the back panel.

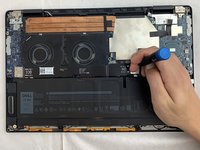
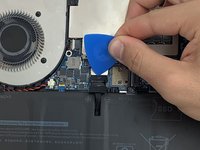
    • Wedge an opening pick between the back cover and the base of the board, then slightly lift the tool to pop the clips on the back cover off.

  2. Dell XPS 15 9575 Battery Replacement: step 2, image 1 of 1
    • Make sure all screws are removed before you lift the panel to prevent any damage from occurring.

    • Remove the bottom cover from the device when all sides are free.

  3. Dell XPS 15 9575 Battery Replacement, Interconnect Cable: step 3, image 1 of 2 Dell XPS 15 9575 Battery Replacement, Interconnect Cable: step 3, image 2 of 2
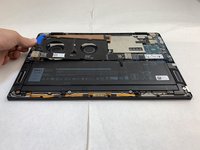
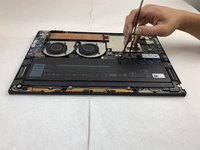
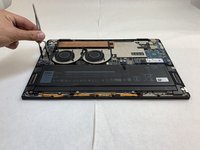
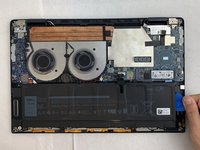
    • Use the Phillips #0 screwdriver to remove all four silver 3.2 mm screws fastening the interconnect cable.

  4. Dell XPS 15 9575 Battery Replacement: step 4, image 1 of 2 Dell XPS 15 9575 Battery Replacement: step 4, image 2 of 2
    • Carefully wedge the plastic opening pick between the fan and the interconnect cable.

    • If this position does not release the interconnect cable, slide the opening pick along the edge until it is completely free.

    • Remove the interconnect cable.

  5. Dell XPS 15 9575 Battery Replacement: step 5, image 1 of 2 Dell XPS 15 9575 Battery Replacement: step 5, image 2 of 2
    • Use the nylon tweezers to remove the interconnect pins from each of the circuit boards.

  6. Dell XPS 15 9575 Battery Replacement, Battery: step 6, image 1 of 2 Dell XPS 15 9575 Battery Replacement, Battery: step 6, image 2 of 2
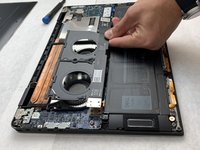
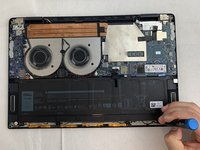
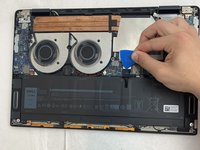
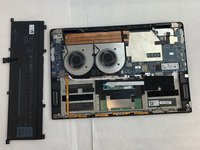
    • Use the Phillips #0 screwdriver to remove all eight 6.4 mm screws from the battery.

  7. Dell XPS 15 9575 Battery Replacement: step 7, image 1 of 2 Dell XPS 15 9575 Battery Replacement: step 7, image 2 of 2
    • Use a plastic opening pick to pry the black battery cable away from its silver adapter.

    • Hold the pick at 35 degrees from the computer and push towards the battery to remove the cable from its socket.

    • Do not push straight into the battery cable as this could damage the adapter.

    • When you disconnect connectors like these, be careful not to dislodge the small surface-mounted components surrounding the socket.

  8. Dell XPS 15 9575 Battery Replacement: step 8, image 1 of 2 Dell XPS 15 9575 Battery Replacement: step 8, image 2 of 2
    • Use a plastic opening pick to separate the battery from the device.

    • Lift the battery straight up and remove it when it is completely separated.

Conclusion

To reassemble your device, follow these instructions in reverse order.

Take your e-waste to an R2 or e-Stewards certified recycler.

Repair didn’t go as planned? Try some basic troubleshooting, or ask our Answers community for help.

10 other people completed this guide.

3 Comments

Completed and I still have a working laptop, Many thanks for the guide.

See inline comments above for issues I faced as it took me 40 minutes to complete - but I was being very careful.

Mr Mac - Reply

I replaced my battery issue free except for when I screw in the bottom plate my trackpad looses its ability to "click". It only comes back when I completely loosen/ remove the bottom plate... Please advise. Thanks!

Matthew Ormiston - Reply

I have the exact same issue as Matthew Ormiston, the new Battery seems to be just a bit bigger.

Simon Feldhaus - Reply

Add Comment

View Statistics:

Past 24 Hours: 4

Past 7 Days: 21

Past 30 Days: 83

All Time: 13,846