
Dell XPS 15 9575 Heat Sink Replacement
Introduction
Go to step 1This guide will show you how to remove the heat sink in a Dell XPS 15 9575 laptop.
The heat sink works in tandem with the fan to cool the laptop and offset the heat produced by the central processing unit. The heat sink sits directly over the CPU, and funnels heat to the fan unit where it can be dispersed. Since the heat sink is bonded to the CPU with thermal paste to ensure good thermal transfer, you will need to reapply the thermal paste during reinstallation. Be sure to clean both the heat sink and CPU with isopropyl alcohol and follow our How to Reapply Thermal Paste guide for best practice on reapplication.
Since the heatsink is a static rather than dynamic component, its failure most likely involves aging or faulty thermal paste. If the fans of the device still function properly, excessive heat may not be obvious, so instead look to the heatsink when the processing of the computer seems to have issues. If your computer experiences regular freezing, trouble handling intensive tasks, or crashing after substantial use, replacing the thermal paste of the heatsink may help. The heatsink should only be replaced completely if there is obvious physical damage, but you should check out the Dell XPS 15 9575 Troubleshooting page for more details.
What you need


-
-
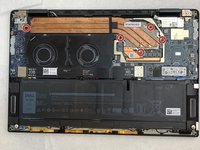
Use your T5 Torx driver to remove all eight 3.2 mm screws holding down the back panel.
-
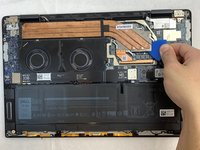
Wedge an opening pick between the back cover and the base of the board, then slightly lift the tool to pop the clips on the back cover off.
-
-
-
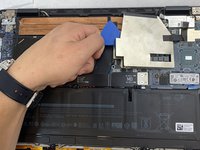
Wedge the plastic opening pick in between the aluminum cover and the motherboard.
-
Gently pull up popping off the cover and revealing the rest of the heat sink.
-


To reassemble your device, follow these instructions in reverse order.
To reassemble your device, follow these instructions in reverse order.
Team

Embry-Riddle Aeronautical University, Team S1-G1, Watkins Fall 2019 Member of Embry-Riddle Aeronautical University, Team S1-G1, Watkins Fall 2019
ERAU-WATKINS-F19S1G1
4 Members
16 Guides authored