Dynex DX-WBRDVD1 Cleaning The Optical Lens

Dynex DX-WBRDVD1 Cleaning The Optical Lens

Caleigh Firth

Caleigh Firth and 4 other contributors

Last updated on March 7, 2024

15 minutes
Moderate

Introduction

Go to step 1

Cleaning your optical drive is standard maintenance especially if your movies wont play. Here is how you get to it and clean it properly.

What you need

Tools

  1. Dynex DX-WBRDVD1 Cleaning The Optical Lens, Top Cover: step 1, image 1 of 2 Dynex DX-WBRDVD1 Cleaning The Optical Lens, Top Cover: step 1, image 2 of 2
    • Remove the four 5mm Phillips #1 screws that connect the black outer shell to the silver back of the device.

  2. Dynex DX-WBRDVD1 Cleaning The Optical Lens: step 2, image 1 of 1
    • Remove the two 5mm screws on the left and right side panels.

    • There is one screw on each side that secures the cover to the body of the device.

  3. Dynex DX-WBRDVD1 Cleaning The Optical Lens: step 3, image 1 of 1
    • Lift the black cover to a 45 degree angle from the rear of the device and pull the cover away entirely.

    • Check that the power cord is not preventing the device from opening or closing.

  4. Dynex DX-WBRDVD1 Cleaning The Optical Lens, Dynex DX-WBRDVD1 Cleaning The Optical Lens: step 4, image 1 of 2 Dynex DX-WBRDVD1 Cleaning The Optical Lens, Dynex DX-WBRDVD1 Cleaning The Optical Lens: step 4, image 2 of 2
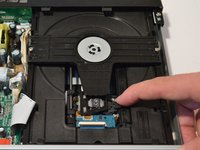
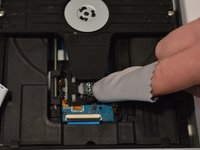
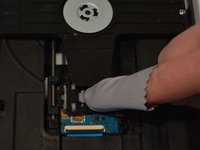
    • To access the optical lens, pull back the optical drive as shown in the pictures located on the two metal rails.

  5. Dynex DX-WBRDVD1 Cleaning The Optical Lens: step 5, image 1 of 2 Dynex DX-WBRDVD1 Cleaning The Optical Lens: step 5, image 2 of 2
    Tool used on this step:
    Microfiber Cleaning Cloths
    $3.99
Conclusion

To reassemble your device, follow these instructions in reverse order.

3 other people completed this guide.

0 Comments

Add Comment

View Statistics:

Past 24 Hours: 0

Past 7 Days: 4

Past 30 Days: 10

All Time: 648