Satin Stitch a Tear in Your Shirt

Satin Stitch a Tear in Your Shirt

Brittany McCrigler

Brittany McCrigler and 6 other contributors

Last updated on March 6, 2025

10 - 15 minutes
Easy
Featured Guide
Patagonia

Introduction

Go to step 1

This guide will walk you through the steps necessary to repair a rip or tear in your Patagonia shirt using a satin stitch—a tightly-spaced stitch that’s very wide. This guide should be used for rips and tears that aren’t on a seam. If you have a tear in the seam, see the Repairing a Torn Seam guide. This satin-stitching guide should only be used on holes that are narrow enough not to require additional fabric to patch. New to sewing? Check out our sewing glossary.

For replacement parts or further assistance, contact Patagonia Customer Service.

What you need

iFixit earns commission when you buy through these links.
  1. Satin Stitch a Tear in Your Shirt, Satin Stitch a Tear in Your Shirt: step 1, image 1 of 1
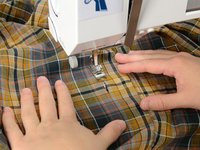
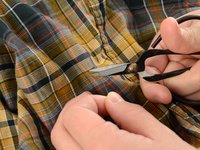
    • Examine the tear and the surrounding fabric.

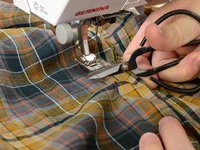
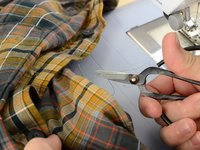
    • Clip any loose threads to keep them from getting caught in the new stitching.

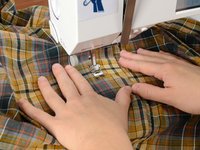
    • Select a coordinating color of thread and thread the sewing machine.

  2. Satin Stitch a Tear in Your Shirt: step 2, image 1 of 1
    • Adjust the sewing machine to a stitch-width of two or three.

    • Stitch-width controls the sideways distance of the stitch, so if you feel you need a little more width, three is acceptable.

    • Every sewing machine is different, so refer to your sewing machine manual to find the stitch width adjustment on your machine.

    • Be sure your sewing machine is fitted with a wide-mouthed pressor foot, as opposed to one with a small round hole. When the sewing machine does a satin stitch, it will bump into the the pressor foot and break if there is not a wide enough opening.

  3. Satin Stitch a Tear in Your Shirt: step 3, image 1 of 1
    • Set the sewing machine stitch length down to just above zero.

    • Stitch length controls how far forward the sewing machine advances with each stitch. Satin stitches should be very tight, which is why we want this number very close to zero.

    • Every sewing machine is different, so refer to your sewing machine manual to find the stitch length adjustment on your machine.

  4. Satin Stitch a Tear in Your Shirt: step 4, image 1 of 2 Satin Stitch a Tear in Your Shirt: step 4, image 2 of 2
    • If the fabric you’re repairing is gauzy or thin, you can add a small scrap of interfacing or scrap fabric on the backside of your rip or tear. Most of the time this isn’t necessary.

    • Align the fabric in the sewing machine about half an inch before the rip or tear.

    • Lower the pressor foot and begin sewing, guiding the machine over the tear.

  5. Satin Stitch a Tear in Your Shirt: step 5, image 1 of 2 Satin Stitch a Tear in Your Shirt: step 5, image 2 of 2
    • Sew about half an inch past the end of the slit.

    • Lift the presser foot and clip the threads to free the garment.

  6. Satin Stitch a Tear in Your Shirt: step 6, image 1 of 2 Satin Stitch a Tear in Your Shirt: step 6, image 2 of 2
    • Trim any extra threads.

    • Admire your handiwork.

Finish Line

10 other people completed this guide.

Brittany McCrigler

Member since: 03/05/12

89,739 Reputation

142 Guides authored

Team

iFixit Member of iFixit

Staff

118 Members

19,418 Guides authored

3 Comments

Pretty useful !

Vincent Monteil - Reply

it repaired hannedil

Shafikahmed - Reply

Now we can save a beloved, very old Patagonia shirt

Josiah M. Daniel III - Reply

Add Comment

View Statistics:

Past 24 Hours: 14

Past 7 Days: 120

Past 30 Days: 467

All Time: 78,488