Introduction
In this guide we will be showing you how to replace the camera lens in your GoPro Hero4 Silver. The lens focuses the light before it reaches the camera sensor. Before you begin make sure the battery is removed from the device and that you have the necessary tools to preform this repair.
What you need
-
-
Start by removing the silver plastic face from the camera using a plastic opening tool. Insert the plastic opening tool into the middle of each edge and lift up the tabs that keep the camera face on.
-
The seven plastic tab locations are marked in red.
-
-
-
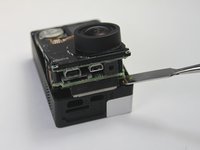
Remove the three 8 mm Phillips #000 screws on each corner of the camera.
-
Remove the single 4 mm Phillips #000 screw on the bottom left corner of the camera.
-
-
-
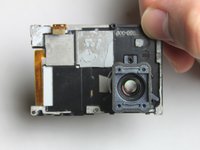
To remove the motherboard assembly from the camera casing, use the plastic opening tool on the lens side of the camera to pry the motherboard assembly out of the camera housing.
-
To avoid breaking the plastic on the lens side of the camera (see photo), pry along the edges near the corners.
-
-
-
-
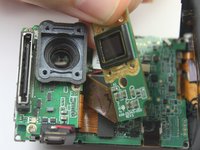
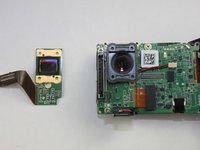
To remove the sensor assembly, simply peel off the lens towards the attached ribbon cable.
-
The sensor has ribbon cables running to the motherboard via a black rectangular connector.
-
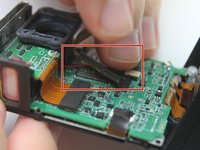
To remove the sensor, use the spudger to pry up each side, Then, lift the connector straight up from its socket.
-
With the old camera sensor assembly removed, you can now replace it with a new sensor.
-
-
-
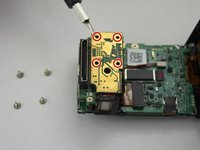
Remove the three 8 mm Phillips #000 screws securing the Hero port to the motherboard.
-
-
Tool used on this step:Tweezers$4.99
-
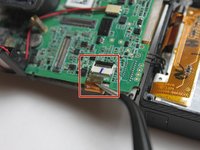
Use a pair of tweezers to disconnect the ribbon cable from the ZIF connector by flipping up the black retaining flap. You should then be able to pull the cable free.
-
Once the ribbon cable is disconnected, you can remove the black plastic bracket which holds the camera lens.
-


To reassemble your device, follow these instructions in reverse order.
Cancel: I did not complete this guide.
20 other people completed this guide.
Team

USF Tampa, Team 2-1, Blackwell Fall 2015 Member of USF Tampa, Team 2-1, Blackwell Fall 2015
USFT-BLACKWELL-F15S2G1
4 Members
20 Guides authored
7 Guide Comments
the 3 copper wires on the far right side came out and now my gopro doesnt work at all.
Mine too, these instructions leave out several crucial steps for making the repair. Step number 7 is not feasible and step number 9 is totally lacking in detail (it doesn't mention the removal of a crucial screw, and doesn't instruct you on how to ACTUALLY make the step). Garbage.... I'm not sure if my camera will ever work again
My 3 ribbon cables popped out too. I can't fathom how I could ever plug them back in.
By the way, they are also un-plugged on the tutorial photos.
I'm almost sure that this hardware went straight to the garbage can afterwards.
This is a great video tutorial for Hero4 lens R/R - very detailed.
ok, so i strongly suggest some edits.
First step 5 through 8 don’t need to be done. Step 4 should include removing the 5th screw in the main circuit board, and then on to step 9. Step 9 should also describe the black release lever to unlock the ribbon cable. then the whole front assembly with the lens will come out.
as for the three ribbon cables attached to the back case (for power and the buttons) if they do come out, while the black panel is detached, you need to pull the tape off, lift the three locking levers and very carefully reseat the ribbon cables, reapply the tape and continue with the reassembly