HP Envy 4-1030us Battery Replacement

HP Envy 4-1030us Battery Replacement

Christopher Luna

Christopher Luna and 2 other contributors

Last updated on January 4, 2018

10 minutes
Moderate

Introduction

Go to step 1

This replacement guide will show in-depth step by step tasks to easily remove and replace the battery from the HP Envy 4-1030us. This guide is used in case of a faulty battery, or something caused it to break.

When working with electronic components, we recommend wearing an electrostatic wristband, it is possible for the static electricity present on you to discharge onto one of the components, wearing one of these wristbands and clipping it to a piece of metal will prevent this from happening.

What you need

Tools

  1. HP Envy 4-1030us Battery Replacement, Bottom Cover: step 1, image 1 of 2 HP Envy 4-1030us Battery Replacement, Bottom Cover: step 1, image 2 of 2
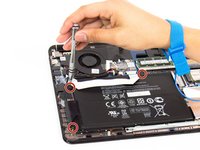
    • Using the Philips #0 screwdriver, remove the 12 7.5mm screws from the bottom cover.

  2. HP Envy 4-1030us Battery Replacement: step 2, image 1 of 2 HP Envy 4-1030us Battery Replacement: step 2, image 2 of 2
    • Using the plastic opening tool, carefully work the tool between the bottom cover and bottom chassis to loosen the connection.

    • Lift the bottom cover off of the system.

  3. HP Envy 4-1030us Battery Replacement, Battery: step 3, image 1 of 2 HP Envy 4-1030us Battery Replacement, Battery: step 3, image 2 of 2
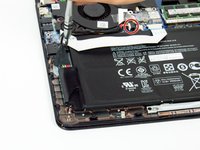
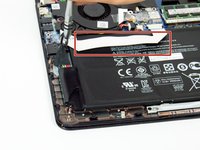
    • Disconnect the battery cable from the motherboard. This will be found above the battery and below the CPU fan.

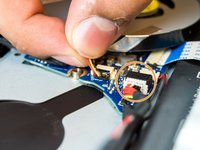
    • To take the cable out, carefully grab the head of the cable and slowly pull it outwards.

  4. HP Envy 4-1030us Battery Replacement: step 4, image 1 of 2 HP Envy 4-1030us Battery Replacement: step 4, image 2 of 2
    • Use the Philips #0 screwdriver to remove the three 4.2mm screws that are securing the battery to the board.

  5. HP Envy 4-1030us Battery Replacement: step 5, image 1 of 2 HP Envy 4-1030us Battery Replacement: step 5, image 2 of 2
    • Then slowly remove the battery from the right side of the battery and then raise it up.

    • Make sure to move the USB Audio board cable away from the battery incase it gets caught.

Conclusion

To reassemble your device, follow these instructions in reverse order.

2 other people completed this guide.

Christopher Luna

Member since: 10/08/17

700 Reputation

6 Guides authored

Team

USF Tampa, Team S1-G1, Thompson Fall 2017 Member of USF Tampa, Team S1-G1, Thompson Fall 2017

USFT-THOMPSON-F17S1G1

4 Members

6 Guides authored

0 Comments

Add Comment

View Statistics:

Past 24 Hours: 0

Past 7 Days: 2

Past 30 Days: 10

All Time: 999