
HP Pavilion 17 TS RAM Replacement
Introduction
Go to step 1RAM, or Random Access Memory, is what a computer loads its programs into. When you run a program, it pulls it off the hard drive and puts it into RAM. You are using RAM as you are reading this! This guide will show you how to replace it.
What you need


-
-
Press and hold the release switch, and then slide the battery out. Insert the new battery into the slot and you're done!
-
-
-
In the battery compartment, find the phillips screw that is holding the rear panel onto the computer. Unscrew it.
-
With the battery compartment closest to you, push the panel away from you. Once it slides back until it stops, gently lift it and put it to the side.
-
Please note that this particular screw does not completely come out, it stays with the rear panel and that is ok.
-
-
Tool used on this step:Tweezers$4.99
-
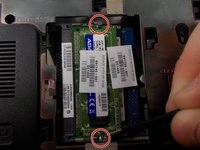
On each side of each RAM card, there will be a thin strip of metal that is holding the chip down. Using tweezers or another thin tool, gently push these pins apart.
-
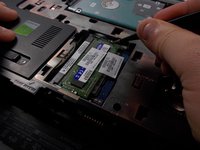
The first RAM card should pop up on its own. Gently remove this card, and look for the two strips of metal holding the bottom card down.
-
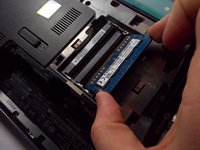
Push the pins apart just like for card one. Just like the first card, this one will pop up and you can remove it.
-


Team

UMass Dartmouth, Team 1-6, Miles Spring 2016 Member of UMass Dartmouth, Team 1-6, Miles Spring 2016
UMASSD-MILES-S16S1G6
3 Members
9 Guides authored