HP dv5-1125nr Keyboard Replacement

HP dv5-1125nr Keyboard Replacement

Nick Loey

Nick Loey and 5 other contributors

Last updated on March 7, 2024

20 minutes - 1 hour
Moderate

Introduction

Go to step 1

The dv5-1125nr keyboard is a single piece of plastic and is easy to replace when removed. New keyboards can be bought from HP or online. Unfortunately, it is one of the more difficult pieces to remove.

What you need

Tools

Show more…

  1. HP dv5-1125nr Keyboard Replacement, Battery: step 1, image 1 of 1
    • Ensure your computer is shut down. Removing the battery while the laptop is still on may corrupt your files. Remove any power adapters and cords connected to the laptop body.

    • Slide the switch to the left until the release clicks.

  2. HP dv5-1125nr Keyboard Replacement: step 2, image 1 of 1
    • Remove the battery.

    • The release switch may need to be held down while removing the battery.

  3. HP dv5-1125nr Keyboard Replacement, Hard Drive: step 3, image 1 of 2 HP dv5-1125nr Keyboard Replacement, Hard Drive: step 3, image 2 of 2
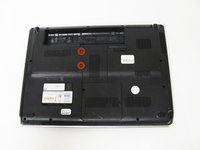
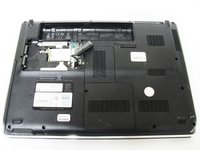
    • Remove the two 5mm Phillips screws on the hard drive cover using a Phillips #00 screwdriver.

  4. HP dv5-1125nr Keyboard Replacement: step 4, image 1 of 1
    • Remove the plastic hard drive cover.

  5. HP dv5-1125nr Keyboard Replacement: step 5, image 1 of 2 HP dv5-1125nr Keyboard Replacement: step 5, image 2 of 2
    • Pull up on the two plastic flaps on the hard drive enclosure to remove it.

  6. HP dv5-1125nr Keyboard Replacement: step 6, image 1 of 2 HP dv5-1125nr Keyboard Replacement: step 6, image 2 of 2
    • Gently lift the ribbon cable away from the hard drive enclosure to free the drive.

  7. HP dv5-1125nr Keyboard Replacement: step 7, image 1 of 2 HP dv5-1125nr Keyboard Replacement: step 7, image 2 of 2
    • Locate four 2mm Phillips screws on the side of the enclosure and remove them using a Phillips #00 screwdriver.

    • Slide the hard drive out of the enclosure to complete the removal process.

  8. HP dv5-1125nr Keyboard Replacement, RAM: step 8, image 1 of 1
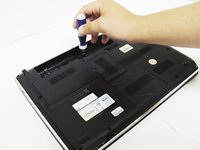
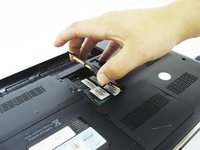
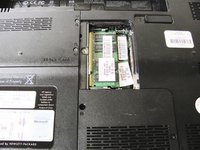
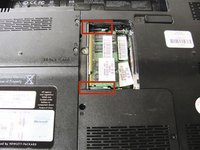
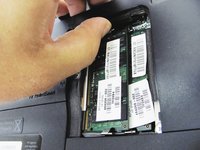
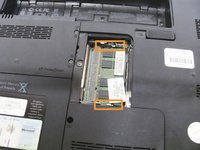
    • Remove the one 4mm Phillips screw from the RAM cover using a Phillips #00 screwdriver.

  9. HP dv5-1125nr Keyboard Replacement: step 9, image 1 of 2 HP dv5-1125nr Keyboard Replacement: step 9, image 2 of 2
    • Remove the RAM cover to reveal the module's underneath.

  10. HP dv5-1125nr Keyboard Replacement: step 10, image 1 of 3 HP dv5-1125nr Keyboard Replacement: step 10, image 2 of 3 HP dv5-1125nr Keyboard Replacement: step 10, image 3 of 3
    • Make sure to ground yourself before touching the RAM modules; they are very sensitive to static electricity.

    • Push the two metal tabs on the side of the RAM module outwards, towards the battery and CMOS compartments (up and down).

    • Once the module is released, gently pull the module upwards.

    • Repeat for the RAM module underneath the first one.

  11. HP dv5-1125nr Keyboard Replacement, Keyboard: step 11, image 1 of 1
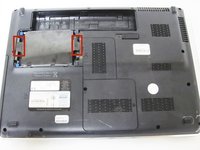
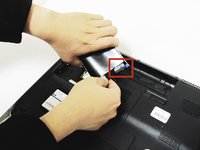
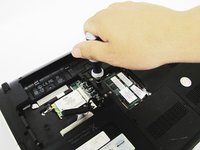
    • Begin by unscrewing the three 3mm Phillips head screws inside the battery bay with the Phillips #00 screwdriver.

  12. HP dv5-1125nr Keyboard Replacement: step 12, image 1 of 1
    • Remove the five remaining 2mm screws using a Phillips #00 screwdriver.

  13. HP dv5-1125nr Keyboard Replacement: step 13, image 1 of 1
    • Unscrew the 4mm Phillips screw inside the hard drive bay.

    • Make sure to keep track of which screw goes where. The sizes are different for each set of screws!

  14. HP dv5-1125nr Keyboard Replacement: step 14, image 1 of 2 HP dv5-1125nr Keyboard Replacement: step 14, image 2 of 2
    • Locate the hole in between the hard drive and RAM compartments.

    • The hole is marked by a small keyboard symbol in the plastic (see the second picture).

    • Unscrew the 4mm Phillips head screw from this hole.

  15. HP dv5-1125nr Keyboard Replacement: step 15, image 1 of 2 HP dv5-1125nr Keyboard Replacement: step 15, image 2 of 2
    • Flip the laptop, and use the plastic opening tool on the side seam to remove the top cover.

    • You may need to use the opening tool on both sides of the cover.

    • Be careful not to break the ribbon cables under the cover.

  16. HP dv5-1125nr Keyboard Replacement: step 16, image 1 of 1
    Tool used on this step:
    Flathead 3/32" or 2.5 mm Screwdriver
    $5.49
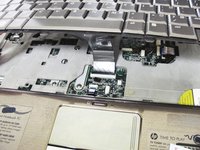
    • Use a 2.5mm flathead screwdriver to remove the four 3mm screws on top of the keyboard.

  17. HP dv5-1125nr Keyboard Replacement: step 17, image 1 of 1
    • Dislodge the keyboard to access the underside.

    • Do not fully remove the keyboard. It is still attached by a ribbon cable, and forceful removal could break this necessary connection.

  18. HP dv5-1125nr Keyboard Replacement: step 18, image 1 of 2 HP dv5-1125nr Keyboard Replacement: step 18, image 2 of 2
    • Locate the ribbon cable connection between the keyboard and motherboard.

    • Pull upwards on the small black bar to release the ribbon cable and remove it.

    • Do not yank on the ribbon or try to pull it out. This may break the cable or motherboard.

  19. HP dv5-1125nr Keyboard Replacement: step 19, image 1 of 1
    • The keyboard is now ready for replacement.

Conclusion

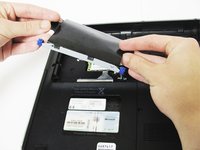
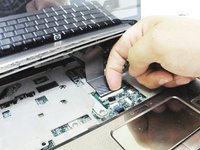
To reassemble your device, follow these instructions in reverse order. When reinserting the ribbon cable, it should click into place.

2 other people completed this guide.

Nick Loey

Member since: 04/01/14

1,715 Reputation

8 Guides authored

Team

Cal Poly, Team 9-15, Regan Spring 2014 Member of Cal Poly, Team 9-15, Regan Spring 2014

CPSU-REGAN-S14S9G15

4 Members

10 Guides authored

0 Comments

Add Comment

View Statistics:

Past 24 Hours: 0

Past 7 Days: 9

Past 30 Days: 27

All Time: 2,462