
Honda EU2200IT A2 Carburetor Replacement

What you need

  1. Honda EU2200IT A2 Carburetor Replacement, Honda EU2200IT A2 Safety Precautions: step 1, image 1 of 1
    • Before you begin, make sure the generator is switched off and the generator is cool to the touch.

  2. Honda EU2200IT A2 Carburetor Replacement, Disconnect the spark plug: step 2, image 1 of 2 Honda EU2200IT A2 Carburetor Replacement, Disconnect the spark plug: step 2, image 2 of 2
    • Lift and remove the spark plug cover.

  3. Honda EU2200IT A2 Carburetor Replacement: step 3, image 1 of 2 Honda EU2200IT A2 Carburetor Replacement: step 3, image 2 of 2
    • Grab the plastic housing at the end of the spark plug wire.

    • Pull firmly to disconnect the wire from the spark plug.

  4. Honda EU2200IT A2 Carburetor Replacement, Remove the maintenance cover: step 4, image 1 of 1
    • Use a Phillips #2 screwdriver to loosen the screw holding the maintenance cover in place.

  5. Honda EU2200IT A2 Carburetor Replacement: step 5, image 1 of 3 Honda EU2200IT A2 Carburetor Replacement: step 5, image 2 of 3 Honda EU2200IT A2 Carburetor Replacement: step 5, image 3 of 3
    • Swing the top of the maintenance cover out.

    • Remove the maintenance cover.

  6. Honda EU2200IT A2 Carburetor Replacement, Drain the carburetor fuel bowl: step 6, image 1 of 1
    • Place a container below the drain tube to catch the excess fuel.

  7. Honda EU2200IT A2 Carburetor Replacement: step 7, image 1 of 2 Honda EU2200IT A2 Carburetor Replacement: step 7, image 2 of 2
    • The carburetor drain screw is located at the bottom of the carburetor.

    • Use a flathead screwdriver to loosen the fuel drain screw until fuel begins to drain out of the carburetor.

    • Once you drain the fuel bowl, re-tighten the fuel drain screw.

  8. Honda EU2200IT A2 Carburetor Replacement, Remove the air filters: step 8, image 1 of 1
    • Remove the Phillips screw securing the filter cover.

    • During reassembly, be sure to tighten the screw to at least 1.7 ft-lb to prevent it from loosening during operation.

  9. Honda EU2200IT A2 Carburetor Replacement: step 9, image 1 of 2 Honda EU2200IT A2 Carburetor Replacement: step 9, image 2 of 2
    • Remove the filter cover.

  10. Honda EU2200IT A2 Carburetor Replacement: step 10, image 1 of 2 Honda EU2200IT A2 Carburetor Replacement: step 10, image 2 of 2
    • Remove the air filters from the filter box.

    • To clean the filters:

    • Clean the filters in warm soapy water.

    • Allow the filters to dry thoroughly.

    • Dip the filters in clean engine oil, and squeeze out any excess oil.

  11. Honda EU2200IT A2 Carburetor Replacement, Remove the air cleaner housing: step 11, image 1 of 3 Honda EU2200IT A2 Carburetor Replacement, Remove the air cleaner housing: step 11, image 2 of 3 Honda EU2200IT A2 Carburetor Replacement, Remove the air cleaner housing: step 11, image 3 of 3
    • Use a flathead screwdriver to loosen the breather tube from the air cleaner housing.

    • Disconnect the breather tube from the air cleaner housing.

  12. Honda EU2200IT A2 Carburetor Replacement: step 12, image 1 of 1
    • Remove the following fasteners securing the housing:

    • Two 8 mm nuts

    • During reassembly, tighten these to 3.6 ft-lb.

    • One 8 mm bolt

  13. Honda EU2200IT A2 Carburetor Replacement: step 13, image 1 of 2 Honda EU2200IT A2 Carburetor Replacement: step 13, image 2 of 2
    • Remove the air cleaner housing.

  14. Honda EU2200IT A2 Carburetor Replacement: step 14, image 1 of 1
    • During reassembly, replace the air intake gasket if it shows signs of wear.

  15. Honda EU2200IT A2 Carburetor Replacement, Remove the carburetor: step 15, image 1 of 2 Honda EU2200IT A2 Carburetor Replacement, Remove the carburetor: step 15, image 2 of 2
    • Fuel may leak out when you disconnect this hose. Be ready to catch any spillage.

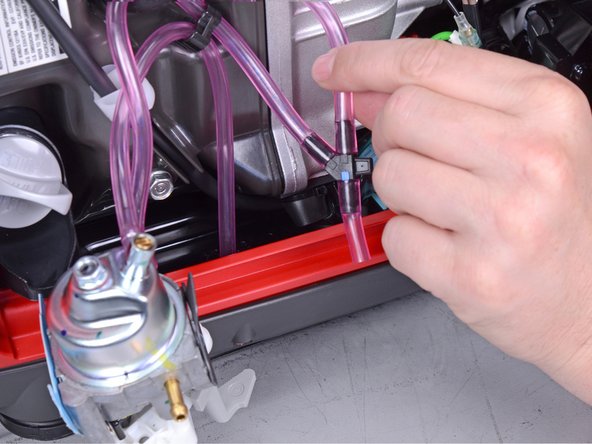
    • Use a pair of pliers to squeeze and slide the spring clip off the carburetor fuel intake.

  16. Honda EU2200IT A2 Carburetor Replacement: step 16, image 1 of 3 Honda EU2200IT A2 Carburetor Replacement: step 16, image 2 of 3 Honda EU2200IT A2 Carburetor Replacement: step 16, image 3 of 3
    • Pry and disconnect the fuel hose from the carburetor intake.

  17. Honda EU2200IT A2 Carburetor Replacement: step 17, image 1 of 3 Honda EU2200IT A2 Carburetor Replacement: step 17, image 2 of 3 Honda EU2200IT A2 Carburetor Replacement: step 17, image 3 of 3
    • Residual fuel may leak out of the carburetor. Be ready to contain any spillage.

    • Slide the carburetor off its two bolt rails.

  18. Honda EU2200IT A2 Carburetor Replacement: step 18, image 1 of 1
    • During reassembly, use this photo as a reference for how to route the tubing.

  19. Honda EU2200IT A2 Carburetor Replacement: step 19, image 1 of 3 Honda EU2200IT A2 Carburetor Replacement: step 19, image 2 of 3 Honda EU2200IT A2 Carburetor Replacement: step 19, image 3 of 3
    • The throttle control cover is held in place with three clips.

    • Unclip and remove the throttle control cover.

  20. Honda EU2200IT A2 Carburetor Replacement: step 20, image 1 of 3 Honda EU2200IT A2 Carburetor Replacement: step 20, image 2 of 3 Honda EU2200IT A2 Carburetor Replacement: step 20, image 3 of 3
    • Disconnect the throttle control cable from the carburetor.

    • During reassembly, use the third image as a reference for how to route the control cable.

  21. Honda EU2200IT A2 Carburetor Replacement: step 21, image 1 of 3 Honda EU2200IT A2 Carburetor Replacement: step 21, image 2 of 3 Honda EU2200IT A2 Carburetor Replacement: step 21, image 3 of 3
    • Slide the air vent tube out of the tube clip on the side of the carburetor.

    • Remove the tube clip from the side of the carburetor and transfer it to your replacement part.

  22. Honda EU2200IT A2 Carburetor Replacement: step 22, image 1 of 3 Honda EU2200IT A2 Carburetor Replacement: step 22, image 2 of 3 Honda EU2200IT A2 Carburetor Replacement: step 22, image 3 of 3
    • Pull the air vent tube and drain tube out of the port holes on the bottom of the cover.

  23. Honda EU2200IT A2 Carburetor Replacement: step 23, image 1 of 2 Honda EU2200IT A2 Carburetor Replacement: step 23, image 2 of 2
    • Remove the tube clip bridging the vent tubes.

    • Transfer the tube clip to your replacement carburetor.

  24. Honda EU2200IT A2 Carburetor Replacement: step 24, image 1 of 2 Honda EU2200IT A2 Carburetor Replacement: step 24, image 2 of 2
    • Remove the carburetor along with any attached tubing.

    • Compare your replacement part with the original, and transfer over any missing components.

  25. Honda EU2200IT A2 Carburetor Replacement: step 25, image 1 of 1
    • Replace the carburetor seal if it shows signs of wear.

Conclusion

To reassemble your device, follow these instructions in reverse order.

2 other people completed this guide.

Arthur Shi

Member since: 01/03/18

258,916 Reputation

531 Guides authored

Team

iFixit Member of iFixit

Staff

140 Members

18,077 Guides authored

0 Comments

Add Comment

View Statistics:

Past 24 Hours: 3

Past 7 Days: 15

Past 30 Days: 93

All Time: 2,345