
How to Unclog an Epson ET-2760 Printhead

Introduction
Go to step 1If your Epson ET-2760 printer is not printing complete lines and is having trouble printing a full color image, use this procedure to manually unclog the printhead.
The printhead supplies and transfers the ink onto the paper into the correct form for whatever is being printed, so before beginning, perform a head cleaning or a power cleaning to make sure that the issue must be dealt with manually. From here, the guide can be started following the steps below.
All of the following steps are easy to perform and require no prior skills. However, there is a chance that ink could get on one’s hands and clothes, so don't wear your favorite shirt!
What you need
Tools


Show more…
-
-
Begin a print of any kind, or a nozzle check.
-
Once the print has begun, pull the power cable out mid-print.
-
-
-
Open the printer, then pull out the half-printed paper through the slot.
-
Place a thick paper towel or rag under the printhead.
Place a thick paper towel or rag under the printhead?
Assuming the printhead is now freely moveable at this point, DO we first push it to the rightmost docking position THEN place a paper towel? or to the leftmost position as picture indicates?
Place a thick paper towel or rag under the printhead?
Assuming the printhead is now freely moveable at this point, DO we first push it to the rightmost docking position THEN place a paper towel? or to the leftmost position as picture indicates?
If you pulled the power cord mid-print, the printhead should move fairly freely. DO NOT FORCE IT.
Place a paper towel under the printhead and slide one edge of the paper towel to an outer edge of the printhead. As you progress through this, you will want to move the printhead to a cleaner part of the paper towel.
Porqué se introduce un papel y se desconecta a mitad de la impresión y luego se casa completo?
-
-
-
Remove the single screw with a Phillips #0 screwdriver.
-
Unclip the two white plastic clips.
-
Lift the top cover off of the printhead.
You also have to unclip that long clear plastic peace of the side. Note were it will need to be reclipped in. It will hang there to the left while you work.
-
-
-
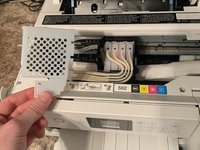
Unclip the four ink cartridges from the printhead by pulling the small tabs on top of the cartridges.
-
-
-
Fill a syringe with printhead cleaning solution and place the syringe tip over the holes left by the cartridges.
-
-
-
Begin to flush the manufacturer's recommended amount of solution through each hole onto the paper towel.
Pull the cleaning solution into the syringe thru the tube. Place other end of the tube securely over the print head.
The recommended kit doesn't come with a tube. What size tube is needed?
Check Amazon for proper epson kit, many come with tubes and adapters for all printers
-
-
-
Remove the paper towel from under the printhead.
-
-
-
Reattach each ink cartridge into their original positions.
-
Reattach the two printhead cover clips back onto the printhead.
-
Screw the single screw back into place with a Phillips #0 screwdriver.
Reclipping everything is the hardest part. Be super careful reattaching screw. The holding is fragile.
-
-
-
Perform an automatic cleaning to ensure that any ink residue is removed.
The cleaning solution linked by this article, the seller specifically says "Sorry, this printhead solution cannot be used for Epson ecotank." July 14, 2022.
Thank you for your time and efforts
Le he dado 3 head cleaning y la misma cantidad de nozzle check y no ha imprimido nada, segui cada paso según la explicación, es que tengo que esperar algún tiempo luego de la limpieza de los cabezales con el Printhead cleaning kit?
How would I clean my rollers or can they be replaced they're leaving Pizza wheel marks I've tried cleaning them
What to do if the print is still clogged? Can it be replaced?
Merci beaucoup, c'est parfait !!!
-


Enjoy your clean printhead!
Enjoy your clean printhead!
Cancel: I did not complete this guide.
16 other people completed this guide.

Team

University of Memphis, Team 51-2, Willis Spring 2022 Member of University of Memphis, Team 51-2, Willis Spring 2022
UM-WILLIS-S22S51G2
1 Member
6 Guides authored
30 Comments
Simple but to the point tutorial that detailed every step including the tools and supplies needed. Photos helped tremendously too. Thank you.
Where do I find out the "manufacturer's recommended amount of solution" per flush?
Usually it's 5ml
I sent a colored page to the printer, it gave me all shades of blue, no yellow, black or magenta. A nozzle check, and print head cleaning gave me black & yellow, 5 days later I have black, yellow & magenta. No blue. IF I get power back tomorrow I’ll be manually cleaning the print head.
Lynn -
Same problem with no Yellow or Blue; cleaning did no help. POWER CLEANING once did the trick.. Thank you for the instructions especially the pictures. Printer was just out of warranty (one year warranty) and only a little over 500 printed sheets when it suddenly failed. Must remember to run a full color print at least once a week ro keep from drying out the heads as I was doing mostly B&W. Ken
No yellow or blue, I’ve flushed the print heads twice. Any suggestions appreciated
I did this and then printed out the test sheet a couple times..... Then my printer completely shut down and now won't come back online..... Tried a new power cord.... Nothing. Help!
I did the same thing, did yours ever turn back on?
Great pictures and general description. I did add some notes to make it easier for future users. I did flush my magenta twice, as that was the clogged color. After back together, I did a pin head test, followed by a pin head clean, then another test and it looks great!
The guide is great but it seems likely that the author hasn't actually identified a problem with the yellow.
Looking at the pictures it seems there's very little ink in the ink buffer (the white block that replace the cartridges and feed the printhead). Each of those needs to be at least half full with ink otherwise the printhead is likely to be receiving air instead of ink and producing results that look like a clog when the reality is that the buffers aren't primed properly with enough ink to delivery it.
For reference look at the picture in Step 4 and note the difference in buffer ink levels between the black and the yellow. The black is about right, the yellow is almost empty.
Hope that helps for some of you who are reporting that you aren't getting ink through.
How do you resolve the problem of not enough ink in the ink buffer? Does that mean there's some kind of clog in the line?
Hola mi impresora epson ET-2760 no veía el color magenta y la lleve a un técnico que me le diera mantenimiento, ese problema era el único. A las 3 horas me llamó el técnico y me dijo que la impresora no enciende. Yo le afirmé obviamente que mi equipo lo único que tenia era lo antes dicho y el me afirma que eso es normal, que en el solo le dio mantenimiento y que seguro que el cabezal tiene problemas, pero que el sabe lo que es, que cuando él cambie en la placa lo que se dañó , " si el problema es el cabezal, se vuelve a apagar". Pero cuando lo cambio resulta que ahora enciende perfectamente, pero no le llega corriente al cabezal. Por favor necesito ayuda , que hago ,pues no pienso permitir que me devuelva mi equipo si arreglarlo , pues ese es el sustento de mis hijas y yo le entregué mi impresora con solo el detalle de el magenta. Gracias espero me puedan ayudar .
I did every thing but the blue still clogged
What is print head cleaning solution?
It's a nice printer but they still have a way to go. I would have never bought this printer if I knew it would do this.
Excellent guide, saved my printer. Can't thank enough.
I did that. After i did the power clean. I waited 19 hours and i now have an error code of 31006 and cant get past that screen.
I can't get the cleaning solution to go thru the black on the head.
my printer prints on reguler paper but acts like its printing on primium glossy paper but nothing showing. Iwas only printing black and white. I have gone through the head cleaning process a couple of times but notworking. dsidebot@yahoo.com
I would add that after completing steps 1-8 above, the first thing you must immediately do is a power cleaning, in order to fill up the ink head with ink. If you try to print as soon as you finish step 8, you will get blank pages or pages with only 1 color ink printing. So do the power clean at step 9 and then run an nozzle check. If the nozzle check is not perfect, you can try a head cleaning and rerun the nozzle check. If still not perfect, you will need to wait 12 hours and run a second power clean, as I had to do. Once I did that, the printing was perfect.
Thank you!!! I was trying to figure out what to do after. :)
G M -
Need to find something that will fit over the nozzles I used a syringe but all it did was blow out the other side of the nozzle top nothing comes out under the printer head
bonjour pareil plus de couleurs du tout malgré verfi de bus et nettoyage que faut réamorcer au final ?
Is there no way to center the print head without unplugging it?
Richolduncle - Reply