Introduction
Use this guide to replace a worn out battery in your Huawei P20 Pro.
Opening the Huawei P20 Pro will damage the waterproof sealing on the device. If you do not replace the adhesive seals, your phone will function normally, but will lose its water-protection.
Before disassembling your phone, discharge the battery below 25%. If your battery is swollen, do not heat your phone. Swollen batteries can be very dangerous, so wear eye protection and exercise due caution, or take it to a professional if you're not sure how to proceed.
You’ll need replacement adhesive to reattach components when reassembling the device.
What you need
-
-
Switch off your phone.
-
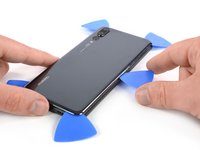
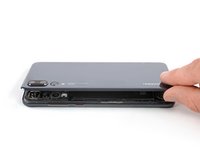
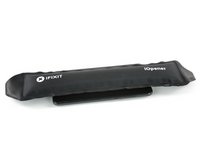
Use an iOpener to loosen the adhesive beneath the rear glass. Apply the iOpener for at least two minutes. You might want to repeat this step several times during the back cover removal.
-
-
-
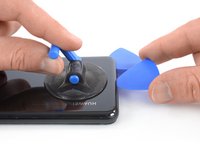
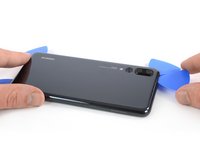
Press a suction cup onto the rear glass close to the bottom edge of the phone.
-
Lift the bottom edge with the suction cup, opening a slight gap between the rear glass and the frame.
-
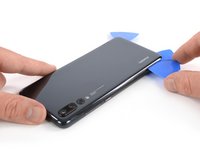
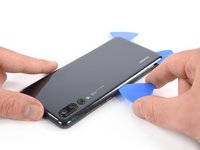
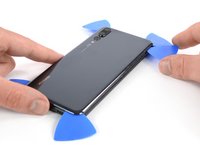
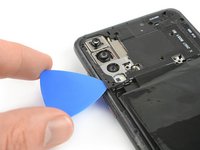
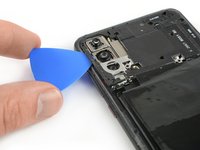
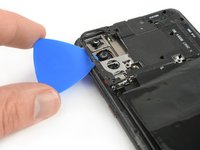
Insert an opening pick in the gap and slide it to the bottom right corner. Leave it there to prevent the adhesive from resealing.
if the back cover is not broken, i’d suggest NOT to use an opening pick as if the phone was not heated enough, you may crack the glass on the edges. better use the iPlastix, it is thinner and less stressful for the glass.
I have to agree that is is much easier to start opening from the side. Do read the rest of the guide though, to make sure you won’t hit something when opening it from the side.
-
-
-
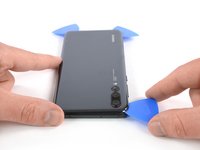
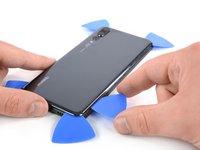
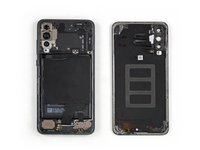
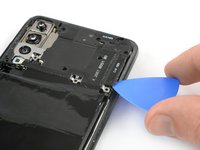
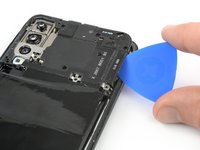
Remove the rear glass.
Das mit den Klebstreifen funktioniert nicht. Ich habe die Tube E6000 in die Dichtungen eingeklebt und so das Smartphone wieder zusammengesetzt.
-
-
-
-
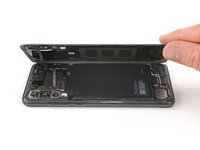
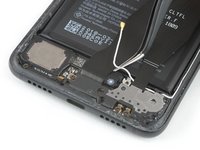
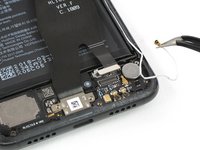
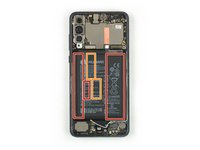
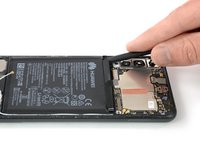
Remove the motherboard cover.
Porque cuando desconectas el nfc no vuelve a funcionar?
a teraz to zopakuj po vychodňarsky
-
-
-
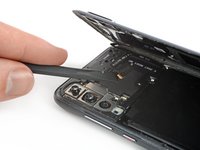
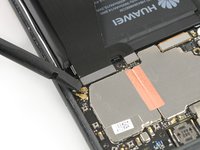
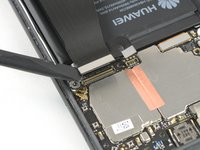
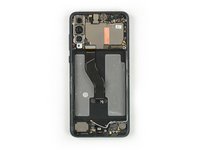
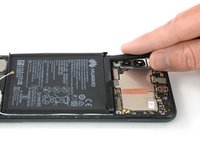
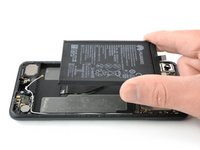
Use the flat end of a spudger to pry up and disconnect the battery flex cable.
Das Flachbandkabel kann einen Zentimeter zu lange sein. Ich musste ihn 2 mal falten, um beim Einbau die Steckerbuchse wieder zu treffen.
-
-
-
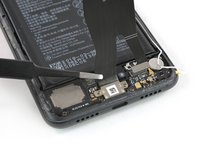
Remove the five Phillips #00 screws (3.4 mm length).
-
-
-
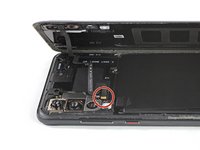
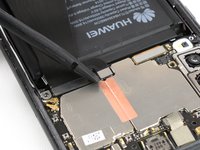
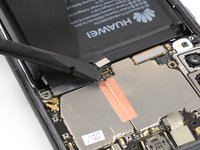
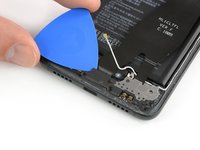
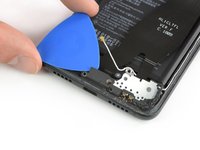
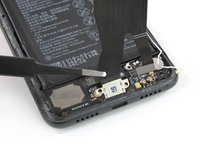
Use an iOpener to loosen the adhesive beneath the battery. Apply the iOpener on the display for at least two minutes.
-
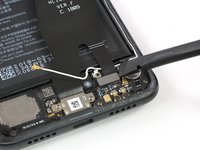
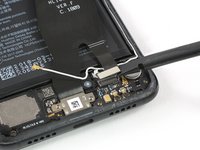
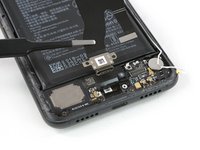
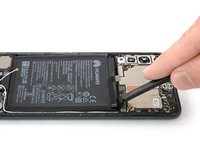
In the following step, only apply the spudger in the areas marked in red, which is where the battery adhesive is located.
-
Avoid the orange area where the display flex cable is running.
-
-
-
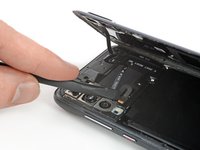
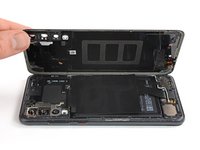
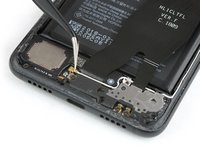
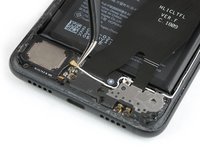
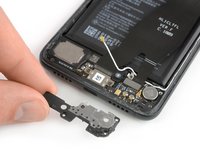
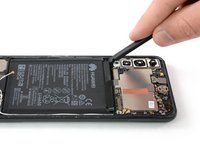
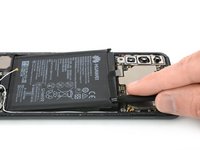
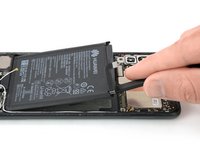
Remove the battery.
Bonjour, le "ôter la batterie " m'a fait rigoler, trois fois chauffer le Iopener pour ramollir la colle et malgré tout, la batterie était tellement bien accrochée qu'elle est maintenant déformé, plier et même percée donc bonne à jeter, j'avais pas prévu de la remplacer mais j'y suis contraint 😑
Merci encore pour ce tutoriel génial 👍
-


To reassemble your device, follow these instructions in reverse order.
If possible, turn on your phone and test your repair before installing new adhesive and resealing the phone.
For optimal performance, calibrate your newly installed battery: Charge it to 100%, and keep charging it for at least two more hours. Then, use it until it shuts off due to low battery. Finally, charge it uninterrupted to 100%
Take your e-waste to an R2 or e-Stewards certified recycler.
Repair didn’t go as planned? Check out our Answers community for troubleshooting help.
Cancel: I did not complete this guide.
64 other people completed this guide.


23 Comments
Hi Ale,
when replacing the battery you won’t lose any data as long as you don’t damage any relevant components for data saving.
Dato che purtroppo non parlo italiano, ho creato questa risposta con l'aiuto di un traduttore. — Quando si sostituisce la batteria non si perderanno dati finché non si danneggiano componenti rilevanti per il salvataggio dei dati.
I just watched 2 YouTube guides on doing this and one used an adhesive ring strip while the other used glue from a bottle. Is one solution any more solid than the other?
Also, I don’t have an iOpener so would either isopropyl alcohol or a hair dryer be a good alternative for softening the back cover/battery adhesive?
Finally, I’ve seen and heard people using all sorts of things to pry out phone batteries ~ plastic pry sticks, metal pry tools, and even flat-edge screwdrivers. Which tool(s) are the safest and/or most effective?
Hi TinkerJosh, isopropyl alcohol (>97%) is a valid option for softening adhesive. A hairdryer will also achieve a good result for heating the adhesive. I would advise against using metal tools (such as metal spudgers or flat screwdrivers). To pry out the battery you are better off with opening picks and a plastic card. Either way, try not to puncture or deform the battery to avoid damaging it. Successful repairing
You can actually replace the battery just fine stopping at Step 14. You dont need to take the bottom interconnect baord out at all. Just hold the interconnect ribbon up out of the way, and pry the battery out (carefully) as you would any other phone. The new one can then be refitted following the same method. I would also argue that this task doesnt deserve its “Moderate” dificulty rating… Its the abck cover and 9 screws. That’s all.
Yes, stopping at step 14 worked for me too. It was easy to remove the battery with the interconnect ribbon held out of the way. Total time was one hour using an iOpener kit. The whole process was a lot simpler than I had expected.
Steve -
Hi.
I had my battery changed due to bloating and everything works except I get no service unless the power cable is plugged in.
Any ideas where they should be looking as it’s had No Fault Found from two labs now?
Cheers
Can someone help me out here, so I have a Huawei mate P20 Pro, and my current battery keeps losing charge and seems to be faulty. I had ordered a battery to replace the faulty one. I swapped out the battery, however, for some reason when I switch on the device it shows the Huawei logo and then switches off. It's so odd I even bought another battery and it does the same thing. But when I put back the original battery that came with the device, the device boots up normally. I feel as though I need to format my device or something, can anyone advise ?
Hi Minhaz,
sadly I do not have the perfect solution for you but here is some information from the Huawei service I found which might help you:
1. Use a USB cable to connect your phone to a charger or computer. Press and hold the Volume up and Power buttons for at least 30 seconds to enter eRecovery mode. Connect to an available Wi-Fi network and follow the onscreen instructions to restore your phone.
2. If a USB cable is not available, press and hold the Volume up and Power buttons for at least 30 seconds to enter Recovery mode, and then restore your phone to factory settings.
3. Connect your phone to a computer using a USB cable, then press and hold the Volume down and Power buttons for at least 30 seconds to enter Fastboot mode. Then, install HiSuite on your computer, then use HiSuite to restore your phone.
Please take note that your personal data may be erased during the process. Exercise caution when doing so and back up your important data first if your phone can be powered on.
I just replaced my battery following these instructions. The only problem I found was the top right side screw was covered by thick rubber (adhesive?) and I had to cut it away with a scalpel to get at the screw underneath. Other than that, it was pretty simple to follow. I used a hot air gun to soften the battery adhesive and it came off easily enough. For some reason the fingerprint scanner isn't recognised anymore. Although that may be a software issue as lots of people are complaining about this happening after software updates.
Thank you, this guida was great and I fully managed to change my battery. I would only suggest to use a lot of patience, the hardest part was actually to take off the battery due to all the glue. Good Luck to everyone else who will try this!
Any video hot to change whole body?
Eine sehr gute Anleitung. Allerdings kann man auf Schritt 16-18 verzichten; habe ich bis dato nie gemacht. Man muss nur darauf achten, das man die Folienkabel nicht scharf knickt beim zur Seite halten, wenn man den Akku aushebelt
Die Reparaturanleitung ist ausgezeichnet! Lediglich das Flachbandkabel in Schritt 14 kann beim neuen Akku etwas zu lange sein und muss daher vorsichtig gefaltet werden.
Es empfiehlt sich, eine Klebertube zu kaufen, um das Smartphone wieder abzudichten.
Welche Dichtmasse oder Klebeband hast du verwendet?
Dapper -
many thanks for the guide, but
the steps 15-18 and 20-21 are not necessary !!
Ich hatte keinen iOpener. Daher hab ich das P20 Pro für ein paar Minuten auf eine Wärmflasche gelegt. Die Klebeschicht konnte relativ schnell gelöst werden.
David T. - Reply
Bonjour à toute l'équipe, déjà un grand merci pour votre travail, j'adore vraiment l'état d'esprit.
J'en suis à l'étape 1 et comme ma vitre arrière est cassé, la ventouse n'adhère pas.
Donc plan B, comme suggéré malheureusement ma cyanolite ne semble pas adhérer sur le verre, j'essaie avec une bonne colle à chaussure car Trés solide et je laisse sécher la nuit en légère pression, j'espère avoir un minimum de prise afin de glisser les médiators mais le verre est bien brisé et j'ai un peu peur que ça parte en morceaux, croisons les doigts 🤞
Je vous dirais pour la suite 😉
Salut à l'équipe, vous faites un travail formidable, merci beaucoup
cyp cabs - Reply
@cypcabs avec grand plaisir ! Bravo pour l'ingéniosité en tout cas ! J'espère que vous avez pu ouvrir votre Huawei avec succès entretemps.
Claire Miesch -