
Infant Optics DXR-8 Monitor Screen Replacement

What you need

  1. Infant Optics DXR-8 Monitor Screen Replacement, Internal Monitor Components: step 1, image 1 of 3 Infant Optics DXR-8 Monitor Screen Replacement, Internal Monitor Components: step 1, image 2 of 3 Infant Optics DXR-8 Monitor Screen Replacement, Internal Monitor Components: step 1, image 3 of 3
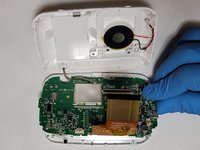
    • Using the plastic opening tool, remove screen protector from front of monitor.

  2. Infant Optics DXR-8 Monitor Screen Replacement: step 2, image 1 of 3 Infant Optics DXR-8 Monitor Screen Replacement: step 2, image 2 of 3 Infant Optics DXR-8 Monitor Screen Replacement: step 2, image 3 of 3
    • Remove the six 4mm screws using a Phillips #00 screwdriver.

    • Remove the screen, exposing the circuit board.

    • Turn device over to expose rear circuit board.

  3. Infant Optics DXR-8 Monitor Screen Replacement: step 3, image 1 of 3 Infant Optics DXR-8 Monitor Screen Replacement: step 3, image 2 of 3 Infant Optics DXR-8 Monitor Screen Replacement: step 3, image 3 of 3
    • Disconnect speaker from monitor for ease of access by unplugging wire.

  4. Infant Optics DXR-8 Monitor Screen Replacement, Monitor Screen: step 4, image 1 of 3 Infant Optics DXR-8 Monitor Screen Replacement, Monitor Screen: step 4, image 2 of 3 Infant Optics DXR-8 Monitor Screen Replacement, Monitor Screen: step 4, image 3 of 3
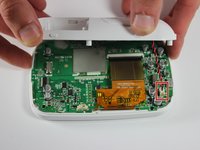
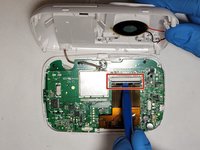
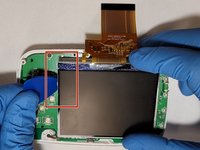
    • Using a plastic opening tool, disconnect the ribbon cable connector.

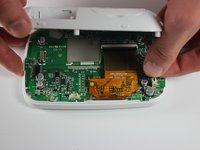
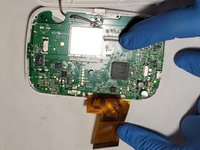
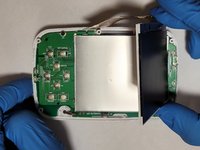
    • Gently separate the ribbon cable from the motherboard.

  5. Infant Optics DXR-8 Monitor Screen Replacement: step 5, image 1 of 2 Infant Optics DXR-8 Monitor Screen Replacement: step 5, image 2 of 2
    • Using a Phillips #000 screwdriver, remove the four 4mm screws around the edge of the motherboard.

    • Flip the motherboard away from the front case to reveal the screen on the other side.

  6. Infant Optics DXR-8 Monitor Screen Replacement: step 6, image 1 of 1
    • Using a plastic opening tool, carefully pry the top retaining frame off of the screen. Start in one corner and work around the bottom of the frame.

  7. Infant Optics DXR-8 Monitor Screen Replacement: step 7, image 1 of 3 Infant Optics DXR-8 Monitor Screen Replacement: step 7, image 2 of 3 Infant Optics DXR-8 Monitor Screen Replacement: step 7, image 3 of 3
    • Using a plastic opening pick, carefully pry a corner of the screen away from the motherboard.

    • Lift the screen off of the motherboard.

Conclusion

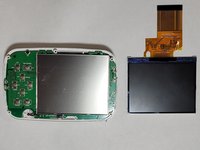
To reassemble your device, follow these instructions in reverse order.

2 other people completed this guide.

5 Guide Comments

Hey Daniel!

Thanks for sharing ??

Where did you get the replacement part?

Ro Brandi - Reply

On Amazon is the quickest option.

Hilitand LQ035NC111 LCD Display, 3.5inch TFT RGB LCD Display Module 320 x 240 Display Panel LQ035NC111 54pin LCD

Stebe -

Just completed the screen change, it works great! Thanks so much for this step by step guide.

The screen I ordered came with the metal brackets. Since the base was glued to the motherboard, it took a few extra steps of de-casing the one I got and re-casing onto the board. But worked fine.

I ordered: https://www.amazon.com/dp/B07NYN5PK2?psc...

James Quinlan - Reply

Does this improve the brightness of the screen or is it essentially an OEM replacement? I have found the monitor to be basically unusable in daylight conditions (like every midday nap) so I’m hoping to add some anti glare and boost the screen brightness/contrast.

Thanks for the information!

Owen - Reply

Excellent guide! Followed the step by step here and it went super smooth, new screen installed with no issues whatsoever!!

Thanks Daniel for putting it up and other authors for tweaking!

I hadn’t seen this website yet, but I’m glad I found it now!! This is awesome!!

Alan Bueno - Reply

Add Comment

View Statistics:

Past 24 Hours: 3

Past 7 Days: 25

Past 30 Days: 89

All Time: 5,903