
Karcher Pressure Washers 15209900 2018 Opening Procedure

Prerequisite Only
This guide is only intended to be used as a prerequisite for other guides. It's incomplete by itself.

What you need

  1. Karcher Pressure Washers 15209900 2018 Opening Procedure, Safety precautions: step 1, image 1 of 3 Karcher Pressure Washers 15209900 2018 Opening Procedure, Safety precautions: step 1, image 2 of 3 Karcher Pressure Washers 15209900 2018 Opening Procedure, Safety precautions: step 1, image 3 of 3
    • Before you begin, make sure to power off and unplug the device from the outlet.

    • Unscrew the output hose from the pressure washer.

  2. Karcher Pressure Washers 15209900 2018 Opening Procedure, Remove the rubber strap: step 2, image 1 of 3 Karcher Pressure Washers 15209900 2018 Opening Procedure, Remove the rubber strap: step 2, image 2 of 3 Karcher Pressure Washers 15209900 2018 Opening Procedure, Remove the rubber strap: step 2, image 3 of 3
    • Unlatch and remove the yellow rubber strap.

  3. Karcher Pressure Washers 15209900 2018 Opening Procedure, Unscrew the hand grip: step 3, image 1 of 1
    • Use a T20 driver to remove the two 55mm-long screws securing the hand grip.

  4. Karcher Pressure Washers 15209900 2018 Opening Procedure, Remove the hand grip: step 4, image 1 of 2 Karcher Pressure Washers 15209900 2018 Opening Procedure, Remove the hand grip: step 4, image 2 of 2
    • Remove the hand grip from the extension bars.

  5. Karcher Pressure Washers 15209900 2018 Opening Procedure, Unscrew the top panels: step 5, image 1 of 2 Karcher Pressure Washers 15209900 2018 Opening Procedure, Unscrew the top panels: step 5, image 2 of 2
    • Use a T15 driver to remove the six screws securing the top black plastic panels on either side of the device.

  6. Karcher Pressure Washers 15209900 2018 Opening Procedure, Remove the top panels: step 6, image 1 of 3 Karcher Pressure Washers 15209900 2018 Opening Procedure, Remove the top panels: step 6, image 2 of 3 Karcher Pressure Washers 15209900 2018 Opening Procedure, Remove the top panels: step 6, image 3 of 3
    • Remove the two plastic panels.

  7. Karcher Pressure Washers 15209900 2018 Opening Procedure, Unscrew the plastic feet: step 7, image 1 of 2 Karcher Pressure Washers 15209900 2018 Opening Procedure, Unscrew the plastic feet: step 7, image 2 of 2
    • Remove the two T15 screws securing the plastic feet—one screw on either side.

  8. Karcher Pressure Washers 15209900 2018 Opening Procedure, Remove the plastic feet: step 8, image 1 of 3 Karcher Pressure Washers 15209900 2018 Opening Procedure, Remove the plastic feet: step 8, image 2 of 3 Karcher Pressure Washers 15209900 2018 Opening Procedure, Remove the plastic feet: step 8, image 3 of 3
    • Unclip and remove the plastic feet.

  9. Karcher Pressure Washers 15209900 2018 Opening Procedure, Unscrew the housing: step 9, image 1 of 2 Karcher Pressure Washers 15209900 2018 Opening Procedure, Unscrew the housing: step 9, image 2 of 2
    • Use a T15 driver to remove the ten screws securing the housing halves together.

    • Remove the T15 screw underneath the wheel axle.

  10. Karcher Pressure Washers 15209900 2018 Opening Procedure, Remove the housing: step 10, image 1 of 2 Karcher Pressure Washers 15209900 2018 Opening Procedure, Remove the housing: step 10, image 2 of 2
    • Set the device on its side.

    • Lift the housing half away from the body.

    • If the housing half does not separate, check to make sure you removed all the body screws.

    • Remove the housing.

    • Screws may get stuck inside the plastic housing. Be careful not to lose any screws.

  11. Karcher Pressure Washers 15209900 2018 Opening Procedure, Release the cord strain relief: step 11, image 1 of 2 Karcher Pressure Washers 15209900 2018 Opening Procedure, Release the cord strain relief: step 11, image 2 of 2
    • Slide the power cord strain relief out its notch on the plastic housing.

  12. Karcher Pressure Washers 15209900 2018 Opening Procedure, Remove the motor: step 12, image 1 of 2 Karcher Pressure Washers 15209900 2018 Opening Procedure, Remove the motor: step 12, image 2 of 2
    • Lift the motor assembly out of the plastic housing and set it aside.

  13. Karcher Pressure Washers 15209900 2018 Opening Procedure, Reassembly tip: step 13, image 1 of 3 Karcher Pressure Washers 15209900 2018 Opening Procedure, Reassembly tip: step 13, image 2 of 3 Karcher Pressure Washers 15209900 2018 Opening Procedure, Reassembly tip: step 13, image 3 of 3
    • Reassembly tip: Use these images to help reassemble the housing back around the motor.

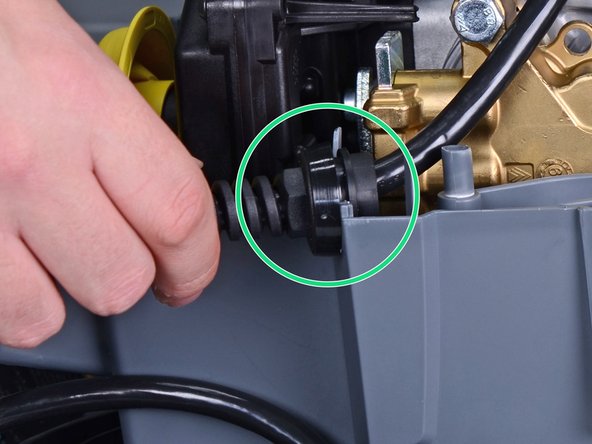
    • Make sure that all five bushings are in place.

    • In order for the housing to fit properly, the bushings must fit in their respective mounts.

    • Make sure that the yellow tube is properly notched onto the housing.

    • Make sure that the power cord strain relief sits correctly in the housing notch.

Conclusion

To reassemble your device, follow these instructions in reverse order.

Arthur Shi

Member since: 01/03/18

281,659 Reputation

584 Guides authored

Team

iFixit Member of iFixit

Staff

118 Members

19,410 Guides authored

0 Comments

Add Comment

View Statistics:

Past 24 Hours: 0

Past 7 Days: 0

Past 30 Days: 0

All Time: 20