Introduction
This guide will show you how to replace the display of a Kobo Aura HD e-reader.
What you need
-
-
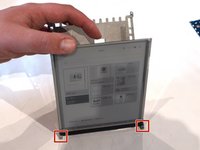
Starting at the bottom right corner, use a plastic spudger to separate the front bezel from the case.
-
Work along the bottom, then up the side, slowly going all the way around the device.
-
-
-
Using a Phillips #000 screwdriver, remove the 4 screws at the corners of the display.
-
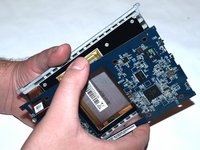
Remove the display and motherboard assembly from the back plate.
-
-
-
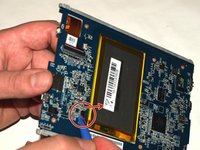
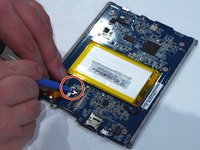
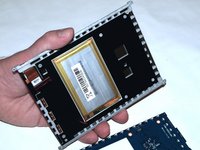
Pry the battery connector up, away from (i.e. perpendicular to) the board to disconnect it.
-
-
-
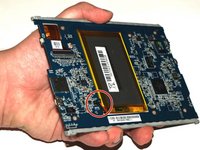
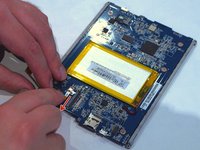
Gently open the Zero Insertion Force (ZIF) connector holding in the display cable.
-
You may find it easier to pry it open with your spudger.
-
Once the connector is open, gently pull the cable to the left to slide it out.
-
-
-
-
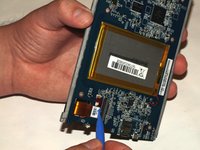
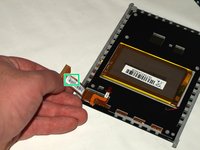
Gently open the second, smaller Zero Insertion Force connector by prying up the brown pressure-clip from the bottom.
-
Slide the cable down to disconnect it.
-
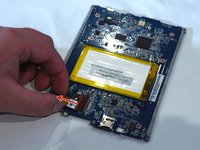
On the back of the display cable, you will find the full model number of your display, which you should use when searching for a replacement to ensure you get the correct part.
-
-
-
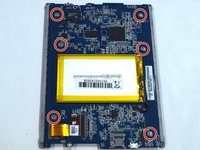
Using a Phillips #000 screwdriver, remove the 6 screws holding the display to the motherboard.
-
Separate the board from the display assembly.
-
-
-
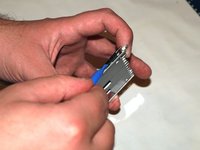
The glass backing of the display is secured to the metal frame with adhesive strips. Slowly and gently pry the two apart.
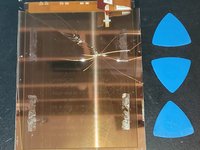
Use a hair dryer to heat the metal frame. Pry the screen from the frame by pushing two plastic cards between the longside of screen and frame. Repeat this on the other longside.
Even with heating, assume the glass will break into the TINIEST shards. It is super thin, super brittle, and the adhesive is super sticky. After heating I tried to insert one card along the screen and it still broke before I tried prying.
Wear safety glasses, work on a hard (not padded) worktop, clear everything in a 2 foot radius, wipe up tiny glass shards (assume they’re 50% further than you think), and wash your hands and face immediately after! (can you tell I’ve had a glass splinter before?)
The same adhesive, in step 1, pulled the frame screws out of the case. This stuff, at least on my Aura HD, is no joke!
Hi crew, same comment as Cliff above: extremely small micro-shards. What ended up working for me was:
– NOT using a heat gun or hair drier. It somehow softens the adhesive, but not enough to make a difference, and the metal plate is then too hot to handle.
– Instead, first removing the screen’s plastic casing that will stay in one piece however hard you bend it, and then using a razor-fine scraper tool (e.g. a window scraper) to unstick the screen glass itself + the adhesive.
– I used regular cleaning latex gloves to avoid micro shards in my fingers (not the first time though… they hurt…)
Have fun!!
The iFixit opening picks helped me a lot there - the old screen was intact (except of that break which caused its replacement :)
Hi, i just found a little trick that makes this much easier. First, pry with something between the metal and the glass. Then, pour IPA in between. The adhesive breaks down and then you just go little by little. The glass never broke for me.
What is IPA ?
-
-
-
Fit the screen into the notches at the base of the frame to ensure it is correctly aligned.
-
Feed the display and power cables through the cutouts in the frame.
Be sure that the frame is flat before adhering to the display. I noticed that on my frame, one of the corner ‘ears’ was bent back away from the display slightly, probably from the necessary prying to separate the old display. This situation could prevent a compact layering of the display/IR bezel/outer bezel and may produce a bit of a gap under the outer bezel. It’s really easy to check this by placing the frame on a flat surface and confirming that all 4 corner ears are sitting on the same plane. It’s difficult to bend back once the display is adhered to the frame, so do it first.
Don’t forget to remove a protective film from the new screen :)
-
-
-
Carefully align the screen with the frame and press it in to place.
-
Apply gentle, even pressure for 5-10 minutes to adhere the screen in place.
Do not neglect this step. If the screen isn’t securely attached to the frame, it will affix to the front bezel instead, making disassembly much more difficult in the future.
-
-
-
Perform the above steps in reverse to reassemble the device
-
Once you have reconnected the display and power cables, and screwed the motherboard back in place, you can turn the device on to confirm the display is connected properly and working.
After plugging in the device, make sure it shows the battery charging indicator. If it doesn’t, you’ve not connected the battery cable correctly.
Buenas tardes, he conseguido llegar hasta el final, pero no me responde al tacto, aún poniendo la junta frontal como dice , he reiniciado y tampoco, alguna idea?
There are actually 2 parts layered on top (or in front) of the display: a 3-dimensional plastic part that is essential for the proper operation of the IR touch, and a mostly 2-dimensional outer (or front) bezel. Some forums call the IR part an ‘IR guide’, as it helps to direct the IR beams in order for the touch to work. The IR guide has very small pins in each corner that index with holes in the motherboard. These indexing pins must be engaged for the touch to work. In order to prevent misalignment of the pins, I separated the IR guide from the outer bezel. This allowed me to first align and adhere the IR guide to the front of the display in a similar manner to the instructions above for adhering the display to the frame. I was careful not to break the pins during alignment. With the IR guide adhered to the display/frame/motherboard assembly, I then screwed this entire assembly into the back case. After testing that the device responded to touch, I then adhered the outer bezel.
Merci pour le tuto !
Je confirme qu'il faut enlever le scotch orange sur les diodes IR de l’écran pour que le tactile fonctionne.
Leider ist mein Display nach dem Einbau und ersten Versuch sehr unscharf. Darüber hinaus funktioniert die Ein/Aus Taste nur bei Stromanschluss und das Display ist gar nicht Berührungsempfindlich.
Hab beim Einbau alles exakt nach Vorgabe gemacht. Gibt es ggf Anschlüsse welche nicht richtig sitzen könnten?
-


To reassemble your device, follow these instructions in reverse order.
To reassemble your device, follow these instructions in reverse order.
Cancel: I did not complete this guide.
42 other people completed this guide.

58 Comments
Hi,
Many thanks for your tutorial.
One quick question, where did you buy the replacement screen?
Many thanks in advance for your help.
Kind regards
Hello, King Koton,
I already had another broken Kobo, so I could reuse the screen. I don’t think you can buy original parts, so maybe you will have to get a broken Kobo at an auction.
Good luck, John
Hi King Koton, I brought a brand new screen on AliExpress, look for ED0680G1 (the Kobo Aura HD uses the exact same screen as the Kobo Aura H2O).
Marc -
Hello John, Ur information did helped me for 100%. We reinstalled a screen to based on ur guide. But i have a question. After reinstalling the front bezel the touch screen is responding reliable. sometimes he doesnt turn a page or somtimes turn more then one page etc. I usend also there the existing adhesive. Can that be a the reason of less responding quality. I hope u have an advice. Kind regards, Jan de Jong
Sorry Jan, I don’t know either. Maybe someone else can give advice. Good luck. (This guide was written by Spencer Harding, I only added one comment), John
Hey, I followed your guide, but unfortunately it seems that I have a problem. I did as you instructed but the touch does not respond, at all, even after reinstalling the front bezel. I honestly don’t know about the adhesive, is that the problem? The adhesive on the front bezel has definitely worn off. What do I do? Please help me.
Regards, Uzayer Masud
Sorry Uzayer Masud, I don’t have a solution for your problem. At my Kobo the adhesive still existed, so maybe you are right and the missing tape is part of the problem. Maybe you can use some other adhesive e.g. like for photos. Best wishes for success, John
Hi, I also followed this guide and unfortunately the touch is not working. Did you find a solution? Or is my kobo just wasted?
I believe the touch functionality relies on infrared technology, but I don’t know how this applies to the kobo and how to fix it. What kind of tape do you have to use? The supplier of the screen told me a plastic cover should be used. But I have never found a plastic cover on the screen anyway.
Your help will be highly appreciated. Kind regards, Ruben
Hi, meanwhile I managed to get my kobo working! These were my actions : I removed all adhesive tape around the screen, motherboard and backplate. While assembling I made sure the IR sensors on the back of the motherboard were aligned and no obstacles (tape!) were blocking the sensors. I cleaned the front bezel thouroughly (dust, etc.) on the inside.
Now the touch is working!
Kind regards, Ruben
Success! I replaced the screen on a Aura HD (ED0680G1 worked ).
the IR sensors worked after i put back the front bezel (two part).
i also removed the 4Go SD card, and replaced it with a 128 GB Samsung micro SDXC bought on Gearbest on sale.
i followed this: https://www.mobileread.com/forums/showth...
it started right away, the card is recognised. Perhaps i will have problem if i try to put more than 32go of books, didn’t try it yet..
Thanks!
This worked for me! Thanks for sharing!
Hi, thank you for your instructions. I tried to open my kobo aura HD and got till step 1 photo 2. it seems that the bezel is held to the back cover by something. Is it glue or tape and how did you manage to work around it?
Thanks for sharing,
Pepijn
Hi, yes there is an adhesive, you can use expired credit card to disassemble it like in this video
hlam -
Thank you for sharing, it worked fine for me, your guide is perfect. I bought my screen from AliExpress: look for ED0680G1. I paid 33,72€ and after 7 days it arrived in a good health in the Netherlands.
please can you do tutorial about changing micro usb port of kobo aura one i couldn’t find any tuto on net .
Yes, just made the same for a h2o
Thanks a lot. I easily replaced the broken display with your instructions! :)
Just as you said! It really helps confidence having a good guide like this, when working with such delicate parts. Thank you.
My new screen (from an eBay store in China) seems salvaged and while it’s glossy unlike the original, I swear the contrast is far better too, despite the same part number. I’m optimistic this repair will hold up.
Many thanks for this great tutorial again ! I bought a screen on aliexpress and salvaged my Kobo and saved money and waste !
I would rate it as quite difficult, rather than moderate, though. The screen is indeed very fragile, it is impossible not to break it when removing the old one. Beware of fingers cuts ! But all good in the end..
Hi I’ve bought this andd changed succesfully on a Kobo AURA HD using the tutorial. Thnks Ifixit
Great tutorial, I bought the screen on aliexpress and following the steps on the tutorial, i could manage to change the screen without any problem, just one tip in case the touch screen is not working, check if the small connector of the screen is properly adjusted on the motherboard connector, is a small piece and must be properly adjusted in order to IR work properly.
hi, where can i find the IR sensors?
I tried to replaced the screen, cleaned, checked the connector, but touch is still not working.
can someone help me?
m.baroni -
Hello John Maier! Many thanks for this wonderful guide, but I have a big doubt: I tried to find this screen on AliExpress (ED0680G1 - the Kobo Aura HD) but there’s this information included:
Original ED068TG1 ED068OG1 (LF) e-ink LCD Screen for KOBO Aura HD or Kobo H2O ebook Reader Display, Don't include TOUCH module
but what does it mean? should I buy this one or another one to repair my Kobo Aura Edition2?
thanks a lot
Cristina
Hello,
I bought a replacement screen, but I broke the metal frame while removing the former screen.
I tried to reassemble the whole thing without the metal frame, the touching functions seems to not work anymore. Is the metal frame mandatory for these functions ? Thank you.
Thanks. Our Kobo Aura H2O works again thanks to this instruction.
One tip, upon reassembly. Make sure the flat cables from the screen are guided properly through the hole in the frame. If you forget you have to pry the new screen halfway lose, again.
Hello
what is the reference of a screen for a Kobo Aura H20. The original part number (the broken one) is ED068TH1.
Is ED068OG1 a possible replacement part ?
Thank you
Michel -
ED068TH1 is the reference of a screen for a Kobo Aura H20 edition 2 (or Onyx BOOX Cleopatra 3) with 3 connectors
ED068OG1 is for edition 1 (only 2 connectors)
va Vroum -
Hi John thanks for tutorial. I broke my lcd(Kobo Aura H2O edition 1) I tried to find the exact screen but I couldn’t. Can you help me to find it? It is ed068OG1 and behid the cable it is writen “2.04”, another cable is writen “j4h”. thank you
Hi, this instruction was written by Spencer Harding. Sorry I can’t help you because all I could do is use the same search machine as you. Maybe you can find an answer in the comments given before.
Jens
Hi
I did as the guide instruction. All well not problem but the touch screen doesn’t work. Used the ED0680G1 from AliExpress , checked 2 or 3 times the connector no result. Pity all seem work but the touch isn’t felt at all.
Any advice?
Claudio Bernardele Italy
Hi Guys
all good after the bezel installation. Thank you
There is not IR sensor. The ED0680G1was the correct cod for my Aura HD.
Claudio Bernardele Italy
normaly ED0680G1 is for Kobo Aura H2O edition 1, it’s a E-ink Pearl HD 1080 x 1440
for Kobo Aura HD it’s a ED068TG1 (E-ink Carta 1080 x 1440)
but it’s seem to be the same connector
va Vroum -
Where can I buy a replacement screen for Aura H2O Edition2 ?
I’m looking for this too . but it seem to be difficult to find it
perhaps here : https://www.beck-elektronik.de/produkte/...
but i dont speak german for asking them
va Vroum -
ED068TH1 is the reference of a screen for a Kobo Aura H20 edition 2
va Vroum -
Hello John,
thank you for the tutorial : I managed to replace the screen of my kobo, but it’s all zoomed and off-centered now, so I can’t use my kobo anymore (although the touch responds) . Do you have any idea what could have gone wrong ?
thanks in advance
blandine
Diese Anleitung kann man auch wunderbar für den Austausch des Displays beim Kobo Glo verwenden. Beim Glo fängt man mit dem hinteren Cover an, da er keine abnehmbare Frontblende hat. Es gibt innen ein paar Schrauben mehr, aber das erschließt sich beim Umbau. Ich habe das ziemlich problemlos hinbekommen und bin völlig unerfahren. Ein neues Display bekommt man bei AliExpress (New original E-Ink ED060XG1(LF)T1-00 ED060XG1T1-768*1024 HD XGA Pearl Screen for Kobo Glo)für ca. 25 Euro incl. Versand, Lieferzeit war ca. 2 Wochen statt der angegebenen 4 Wochen.
Somit herzlichen Dank für all diese hilfreichen Informationen!
bonjour,
Ma carte sd interne est hs et je n’ai pas de sauvegarde. ou puis je en acheter une sd micro avec le systeme exploitation “kobo Glo hd”
Tu peut chercher pour “bricked kobo glo mobilread”. Ma c’est en anglais.
You can search for “bricked kobo glo mobilread”. There you will find all you need.
Merci beaucoup pour vos explications. Ma fille est ravie
Merci beaucoup, grâce à votre tutoriel, j’ai redonné vie à ma kobo aura h2o
Thank you for this great tutorial.
Alas, the problem was not my battery but a burned voltage regulator. I would like to replace it but cannot identify t he the part.
It has printed “UY5GA” on it and the PCB silkscreen mentions U3. It is a Kobo Auro H2O reader (N250) from 2016.
I also have a thread running here: https://forum.allaboutcircuits.com/threa...
Can anyone help me to the schematics or tell me maker/specification of the SOT23 part?
Thank you so much and keep up the good work.
Mercie bien,
David
Hi Spencer, Thank you for that great tutorial.
I used it to repair my Kobo Glo HD, (yes, not an Aura, but exact same pattern except only 4 screws are holding the mother board) and it’s working perfectly well now.
Thanks so much, I would have been so upset to trash it to the bin when a 40€ purchase could save it.
Hello, so I ripped off the whole battery connector, as in the connector and the part attached to the motherboard. I need a new one of that part attached to the motherboard as it’s broken. Any help? I should have looked closer at the photos as I assumed the whole piece was coming off :(
For anybody having problems with touch after reassembly, please see my comment in Step 10 above. Also, when vendors mention “does not include TOUCH module”, I believe that they are referring to the IR guide, so you’ll need to reuse your original IR guide. I am by no means an expert so my terminology may be incorrect, but I believe that the gist of what I’m describing is correct and may help somebody.
This guide follows the same steps I took. My Kobo now has a working touch screen. But has developed an new issue. It no longer works on battery power. While the kobo is powered through the USB port, the kobo recognizes the battery is at 100% capacity. I put a volt meter on the battery and confirmed it read 3.7 volts. If I unplug the battery then the icon for the battery disappears when turned on again under USB power. I believe this tells me the problem is not the battery or the battery connection. I tried reinserting the ribbon cables a few times but I just can’t seem to solve this issue. I should also indicate that the kobo looses functionality immediately upon unplugging from the USB power source. Does anyone have some guidance?
Found the solution. The connection of the battery was not strong enough. You really have to jam it in hard until you hear an audible click. It was confusing how it registered the battery but the battery wasn’t powering the device.
Mike -
Un immense MERCI!!! J’ai pu sauver ma liseuse et en profiter encore longtemps j’espère.
C’était même assez facile. Bravo pour le tuto.
Bonjour,
Qu'avez-vous utilisé comme joint pour recoller le cadre a l’écran?
Cordialement
Alexandre
Hi John,
Do you know the kind of seal we need to use to put the cover around the screen back?
Thank you
Sorry Alex,
i don't know it. Anyhow I don't have this ebook no more.
Regards, John
Hi,
Many thanks for your tutorial. It was very helpful, every step is very detailed.
Many thanks in advance.
Regards.
Goed te volgen gids, m'n kobo doet het weer als geen ander! Let vooral goed op dat je het juiste scherm koopt voor jou KOBO op aliexpress, dat was eigenlijk nog het spannendst.
Daarnaast heb terwijl ik op het nieuwe scherm wachtte de oude onderdelen netjes stofvrij/stofdicht verpakt, zodat de tape nog bruikbaar zou blijven. Dit is goed gelukt en hoefde geen nieuwe tape te halen. Wellicht een goede tip voor iemand anders...
There is some light adhesive attaching the bezel to the screen. Will take some pressure to get it off.
Michael Newton - Reply
When I did this, the front bezel stayed attached to the screen/motherboard, and it pulled the screws out of the rear casing. The screws don’t seem stripped, but time will tell.
Cliff - Reply
On the KOBO GLOW (very similar to KOBO AURA) : be careful at step 1 not to torn down the ON/OFF micro switch soldered on the mother board. On my model it was not sealed correctly, it opened when I removed the motherboard. I had to put back in place the lever and the spring.
frde - Reply