Introduction
Although these lights have a three-year guarantee, it's cheaper to fix them yourself than to pay the postage to send the lights back. I bought T1 3/4 (5 mm) LEDs from Digikey, looking for anything in the 800 mcd or up range in the proper colors. I ended up buying:
404-1096-ND (red)
404-1097-ND (orange)
C503B-BCS-CV0Z0461-ND (blue)
C503B-GCN-CY0C0791-ND (green)
404-1092-ND (yellow)
The LEDS are wired in series in groups- three groups to a strand. If one LED in the group has failed, none in that group will light. The trick is to find out which one (or ones) is bad.
Its easiest if you have one working strand or part of a strand. If so, remove one LED from the good strand, and use that socket to test each LED, one at a time, from the bad strand. If the LED doesn't work in the good strand, replace the LED according to the directions that follow. There may be more than one bad one, so after replacing,if the bad strand still doesn't light up, go on to the next LED.
If you don't have a good strand to test with, and don't have another way to test the LEDs, then remove each LED, one at a time from the bad strand, and check the leads to make sure they're not broken. If broken, replace, if not, put the LED back and go on to the next one.
What you need
-
-
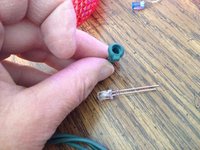
'Getting the faceted "bulb "off. The colored lamp covers snap out- some are pretty stiff but they do come out. They don't unscrew.
-
-
-
-
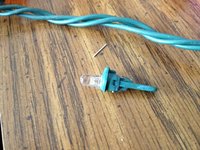
Remove the bad LED from the plug so you can re-use the plug. Notice the new LED has one leg longer than the other.
-
The long lead goes into the side of the plug with the key as shown in the picture.
-
The bulb of the LED may not seat perfectly but who cares, it will be under the plastic faceted bulb cover.
-
Bend the leads up and cut.
-
Try bulb in your "good" strand if you have one. If it works, put it into your bad strand and see if that has fixed the problem. If not, you know the LED is good now, so go on to the next one.
-


To reassemble your device, follow these instructions in reverse order.
To reassemble your device, follow these instructions in reverse order.
Cancel: I did not complete this guide.
9 other people completed this guide.
13 Comments
Hi! Can you tell me the difference between the two types of light bases you show above? The situation I have is I bought a set of the clear LEDs figuring we could get replacements since my husband prefers the colored ones. But, once we started pulling them apart, we found the different sized bases and the only replacement ones I could find had the short stubby base. Are they interchangeable if we pull the bulb out of the base? Do you have any suggestions for us? Thanks for any help!
The reason for the two different size sockets is that if you look at your strand, every so many lights three wire come into the socket instead of two. I think (and this is only a hypothesis) than the shorter sockets are to allow room for the connection of the third wire. Why they didn't just use short sockets for everything I don't know. But it seems likely to me that the short one would work everywhere. I have not tried it.
Thanks so much for posting this guide! My outdoor light strings are far from waterproof and I live in a rainy climate (yes, even in December), so my original LEDs corroded badly and the strings stopped working.
I ordered a whack of replacement LEDs using the reference numbers you provided. Replacement was simple. The results were spectacular -- better than I had dared hope. For $10 and a few minutes work, I kept $200 worth of strings from getting tossed. Thanks a bunch!