
LG Intuition Plastic Motherboard Shield Replacement

What you need

  1. LG Intuition Plastic Motherboard Shield Replacement, Battery: step 1, image 1 of 1
    • Turn the device so the two bottom screws are shown.

  2. LG Intuition Plastic Motherboard Shield Replacement: step 2, image 1 of 1
    • Remove the two 7mm screws holding the back panel of the phone using the P5 bit and magnetic driver.

  3. LG Intuition Plastic Motherboard Shield Replacement: step 3, image 1 of 1
    • Carefully use the plastic opening tool to pry the back panel of the phone from the front screen. This will expose the battery and other parts.

  4. LG Intuition Plastic Motherboard Shield Replacement: step 4, image 1 of 1
    • Use the Phillips #0 screwdriver to remove the 5mm screw holding the metal bracket that protects the battery's ribbon cable.

  5. LG Intuition Plastic Motherboard Shield Replacement: step 5, image 1 of 1
    • Carefully use the plastic opening tool to pry the ribbon cable connecting the battery to the motherboard of the phone.

  6. LG Intuition Plastic Motherboard Shield Replacement: step 6, image 1 of 2 LG Intuition Plastic Motherboard Shield Replacement: step 6, image 2 of 2
    • Gently raise the battery from its compartment.

  7. LG Intuition Plastic Motherboard Shield Replacement, Plastic Motherboard Shield: step 7, image 1 of 1
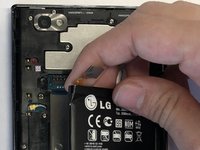
    • Remove the thirteen 5mm screws holding the plastic shield covering the motherboard using the Phillips #00 screwdriver.

  8. LG Intuition Plastic Motherboard Shield Replacement: step 8, image 1 of 1
    • Carefully use the plastic opening tool to pry the plastic shield from the motherboard. This will expose the motherboard and ribbon cables for each component.

Conclusion

To reassemble your device, follow these instructions in reverse order.

Thomas Morrissey

Member since: 10/25/18

616 Reputation

6 Guides authored

Team

0 Comments

Add Comment

View Statistics:

Past 24 Hours: 0

Past 7 Days: 0

Past 30 Days: 0

All Time: 159