
Lenovo Ideapad 320-17IKB RAM Replacement
Introduction
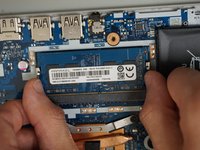
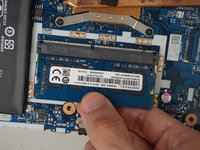
Go to step 1This guide will show you how to replace the RAM in a Lenovo IdeaPad 320-17IKB. The RAM is what allows the computer to load applications, browse on the internet, play video games, and perform other daily functions. Replace the RAM when either the computers performance is running slower opening programs, the applications start crashing, or your laptop is running low on memory because of the applications in use.
Before you begin this repair, turn off your laptop and unplug it from the charger.


To reassemble your device, follow these instructions in reverse order. Take your e-waste to an R2 or e-Stewards certified recycler.
To reassemble your device, follow these instructions in reverse order. Take your e-waste to an R2 or e-Stewards certified recycler.
Cancel: I did not complete this guide.
One other person completed this guide.
Team

University of North Texas, Team 1-3, Coppersmith Spring 2024 Member of University of North Texas, Team 1-3, Coppersmith Spring 2024
UNT-COPPERSMITH-S24S1G3
4 Members
4 Guides authored