Lenovo ThinkPad X1 Carbon (2nd Gen) Fan Replacement

Lenovo ThinkPad X1 Carbon (2nd Gen) Fan Replacement

Vanessa Garcia Sanchez

Vanessa Garcia Sanchez and 2 other contributors

Last updated on June 10, 2020

5 - 10 minutes
Easy

Introduction

Go to step 1

If your Lenovo ThinkPad X1 Carbon (2nd Gen) randomly shuts off after getting hot, use this guide to replace the fan.

The fan cools down the computer and prevents the computer from overheating.

Before using this guide, check to make sure that nothing is covering the fan. The blocked fan may be the reason the computer is overheating. Also, use a dust removal spray to carefully clean out the vent. The cause of overheating may be the dust blocking the computer’s air flow. Cleaning the vent can prevent the need of replacing the fan.

Before you begin, make sure your computer is off.

What you need

Tools

Show more…

  1. Lenovo ThinkPad X1 Carbon (2nd Gen) Fan Replacement, Back Cover: step 1, image 1 of 1
    • Using a Phillips #0 screwdriver, remove the seven 7mm screws holding the back cover onto your computer.

  2. Lenovo ThinkPad X1 Carbon (2nd Gen) Fan Replacement: step 2, image 1 of 2 Lenovo ThinkPad X1 Carbon (2nd Gen) Fan Replacement: step 2, image 2 of 2
    • Use a plastic opening tool or your fingers to pry off the cover.

  3. Lenovo ThinkPad X1 Carbon (2nd Gen) Fan Replacement, Battery: step 3, image 1 of 2 Lenovo ThinkPad X1 Carbon (2nd Gen) Fan Replacement, Battery: step 3, image 2 of 2
    • Using your fingers, disconnect the battery from the motherboard.

  4. Lenovo ThinkPad X1 Carbon (2nd Gen) Fan Replacement: step 4, image 1 of 1
    • Using a Phillips #0 screwdriver, unscrew the five 4.3mm screws attaching the battery to the computer.

  5. Lenovo ThinkPad X1 Carbon (2nd Gen) Fan Replacement: step 5, image 1 of 1
    • Remove the battery by pulling it directly towards you.

  6. Lenovo ThinkPad X1 Carbon (2nd Gen) Fan Replacement, Fan: step 6, image 1 of 1
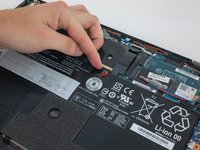
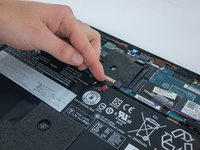
    • Use a Phillips #1 screwdriver to undo the four 5 mm screws attached to the heat sink.

  7. Lenovo ThinkPad X1 Carbon (2nd Gen) Fan Replacement: step 7, image 1 of 1
    • Undo the black clasp that holds the ribbon cable, attached to the fan, in place and disconnect the ribbon cable.

  8. Lenovo ThinkPad X1 Carbon (2nd Gen) Fan Replacement: step 8, image 1 of 1
    • Remove the fan by lifting it directly up.

Conclusion

To reassemble your device, follow these instructions in reverse order.

2 other people completed this guide.

Vanessa Garcia Sanchez

Member since: 01/23/20

127 Reputation

1 Guide authored

Team

Cal Poly, Team S18-G4, White Winter 2020 Member of Cal Poly, Team S18-G4, White Winter 2020

CPSU-WHITE-W20S18G4

4 Members

9 Guides authored

0 Comments

Add Comment

View Statistics:

Past 24 Hours: 2

Past 7 Days: 18

Past 30 Days: 29

All Time: 1,285