
Logic Board Removal

Prerequisite Only
This guide is only intended to be used as a prerequisite for other guides. It's incomplete by itself.

What you need

  1. Logic Board Removal, Prepare your Pixel for disassembly: step 1, image 1 of 3 Logic Board Removal, Prepare your Pixel for disassembly: step 1, image 2 of 3 Logic Board Removal, Prepare your Pixel for disassembly: step 1, image 3 of 3
    • Let your Pixel's battery drain below 25% before starting this repair. A charged lithium‑ion battery may catch fire if damaged.

    • Unplug all cables from your phone.

    • Completely power off your phone.

    • Press the power and volume up buttons at the same time to bring up the shutdown menu.

  2. Logic Board Removal, Remove the SIM card tray: step 2, image 1 of 3 Logic Board Removal, Remove the SIM card tray: step 2, image 2 of 3 Logic Board Removal, Remove the SIM card tray: step 2, image 3 of 3
    • Firmly press a SIM eject tool, bit, or straightened paper clip into the SIM card tray hole on the left edge of your phone until the tray ejects.

    • Remove the SIM card tray.

  3. Logic Board Removal, Adhesive information: step 3, image 1 of 3 Logic Board Removal, Adhesive information: step 3, image 2 of 3 Logic Board Removal, Adhesive information: step 3, image 3 of 3
    • The back cover is secured with adhesive around the perimeter and near the cameras. To avoid damaging your phone's internals, note the following:

    • Unless stated otherwise, don't insert your tool more than 3 mm (the width of your opening tool's flat section) around the edges.

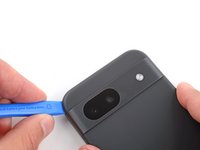
    • Don't insert your tool under the edges of the camera bump.

  4. Logic Board Removal, Insert an opening tool: step 4, image 1 of 3 Logic Board Removal, Insert an opening tool: step 4, image 2 of 3 Logic Board Removal, Insert an opening tool: step 4, image 3 of 3
    • Your opening tool has a flat end and a curved end. During the opening procedure, use the flat end and angle it so the tool's sharp edge points upward.

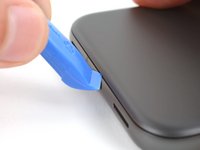
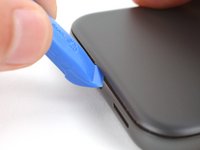
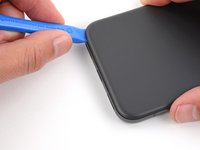
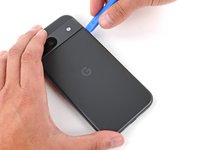
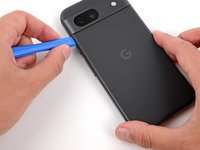
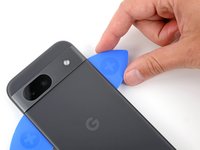
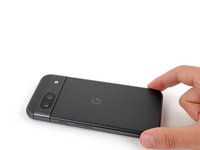
    • Insert the edge of an opening tool between the back cover and the frame, starting with a sharp corner of the tool to help separate the adhesive.

  5. Logic Board Removal, Separate the perimeter adhesive: step 5, image 1 of 3 Logic Board Removal, Separate the perimeter adhesive: step 5, image 2 of 3 Logic Board Removal, Separate the perimeter adhesive: step 5, image 3 of 3
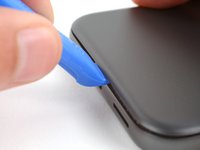
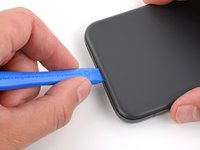
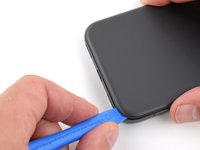
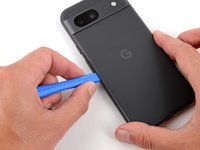
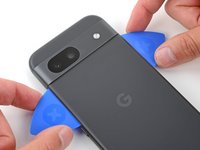
    • Slide your opening tool along the bottom edge to separate the adhesive securing the back cover.

  6. Logic Board Removal: step 6, image 1 of 3 Logic Board Removal: step 6, image 2 of 3 Logic Board Removal: step 6, image 3 of 3
    • Slide your opening tool around the bottom right corner and up the right edge, stopping at the bottom of the camera bump.

    • Remove your opening tool from under the back cover.

  7. Logic Board Removal: step 7, image 1 of 3 Logic Board Removal: step 7, image 2 of 3 Logic Board Removal: step 7, image 3 of 3
    • Insert your opening tool under the top right corner of the back cover, just above the camera bump.

    • Slide your opening tool along the top edge, stopping at the top left corner just above the camera bump.

    • Remove your opening tool from under the back cover.

  8. Logic Board Removal: step 8, image 1 of 3 Logic Board Removal: step 8, image 2 of 3 Logic Board Removal: step 8, image 3 of 3
    • Insert your opening tool under the left edge of the back cover, just below the camera bump.

    • Slide your opening tool down the left edge to separate the adhesive.

  9. Logic Board Removal, Separate the camera bump adhesive: step 9, image 1 of 3 Logic Board Removal, Separate the camera bump adhesive: step 9, image 2 of 3 Logic Board Removal, Separate the camera bump adhesive: step 9, image 3 of 3
    • A strip of adhesive above the camera bump secures the top edge of the back cover.

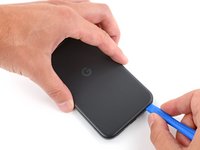
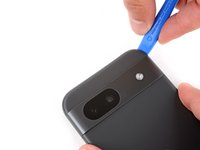
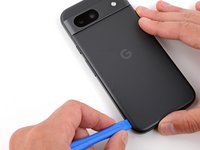
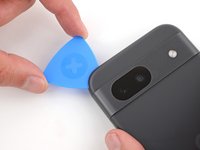
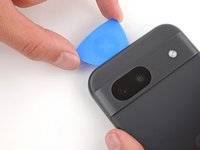
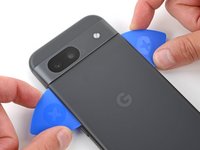
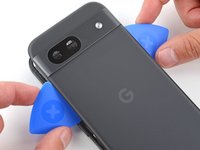
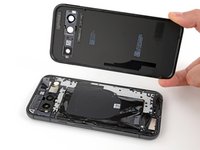
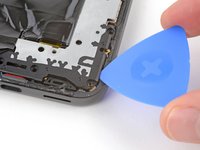
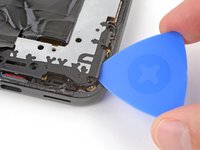
    • Insert an opening pick under the top left corner of the back cover until the tip is close to the top edge of the camera bump.

    • You can insert the opening pick more than 3 mm along the top edge.

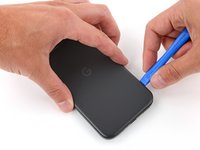
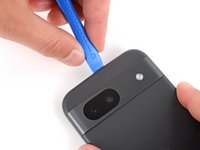
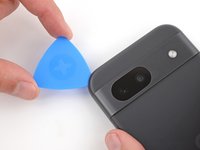
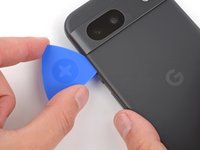
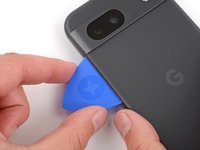
    • Slide the pick to the right, stopping when you reach the right edge of the cameras.

  10. Logic Board Removal: step 10, image 1 of 3 Logic Board Removal: step 10, image 2 of 3 Logic Board Removal: step 10, image 3 of 3
    • A final strip of adhesive below the camera bump secures the back cover.

    • Insert the flat edge of an opening pick under the back cover, just below the camera bump.

    • Insert a second opening pick in the same spot on the other side.

  11. Logic Board Removal: step 11, image 1 of 3 Logic Board Removal: step 11, image 2 of 3 Logic Board Removal: step 11, image 3 of 3
    • Pry up simultaneously with both picks and apply constant pressure to separate the final piece of adhesive securing the back cover.

    • Be careful not to bend the back cover. If the adhesive feels stubborn, rotate the cover side-to-side to further loosen the adhesive.

    • If the adhesive isn't separating, you can lightly heat the back cover just below the camera bump with a hair dryer or iOpener to soften the adhesive.

  12. Logic Board Removal, Remove the back cover: step 12, image 1 of 2 Logic Board Removal, Remove the back cover: step 12, image 2 of 2
    • Remove the back cover.

    • During reassembly:

    • Now is a good time to test your phone before sealing it up. Power it on and check that it works. Power it back down before you continue reassembly.

    • Follow this guide to apply new adhesive and install your back cover.

  13. Logic Board Removal, Separate the flash unit: step 13, image 1 of 2 Logic Board Removal, Separate the flash unit: step 13, image 2 of 2
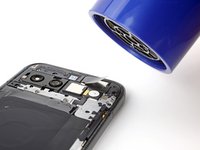
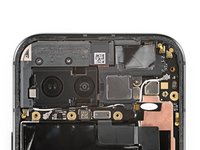
    • Use a hair dryer to heat the flash unit to soften the adhesive securing it to the logic board cover.

    • Alternatively, you can use an iOpener or heat gun to warm the flash.

    • Only heat the flash so it's warm to the touch. The battery and surrounding components are susceptible to heat damage.

  14. Logic Board Removal: step 14, image 1 of 3 Logic Board Removal: step 14, image 2 of 3 Logic Board Removal: step 14, image 3 of 3
    • Slide your pick under the top edge of the flash and lift to separate the adhesive securing it to the cover.

    • Be careful not to slip and tear the flash cable, as it's very fragile.

    • During reassembly, follow this guide to replace the flash adhesives.

  15. Logic Board Removal, Unclip the logic board cover: step 15, image 1 of 2 Logic Board Removal, Unclip the logic board cover: step 15, image 2 of 2
    Tool used on this step:
    FixMat
    $36.95
    Buy
    • Throughout this repair, keep track of each screw and make sure it goes back exactly where it came from.

    • While the Pixel 8a uses Torx Plus screws, standard Torx bits work. Make sure to apply constant, downward force to prevent stripping.

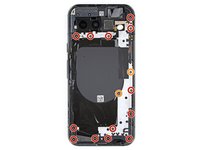
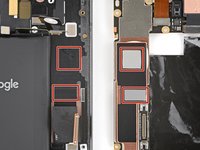
    • Use a Torx Plus 3IP screwdriver to remove the 15 screws securing the logic board cover:

    • Thirteen 4.3 mm‑long screws

    • Two 1.9 mm‑long screws

  16. Logic Board Removal: step 16, image 1 of 3 Logic Board Removal: step 16, image 2 of 3 Logic Board Removal: step 16, image 3 of 3
    • Be very careful not to damage the spring contacts around your phone's perimeter. Only insert your tool where instructed.

    • Insert an opening pick under the bottom right corner of the logic board cover and pry up to release the clip.

    • Insert the tip of a spudger under the notch near the top right corner of the logic board cover (just below the screw hole) and pry up to release the clip.

  17. Logic Board Removal: step 17, image 1 of 3 Logic Board Removal: step 17, image 2 of 3 Logic Board Removal: step 17, image 3 of 3
    • Slowly lift the top edge of the logic board cover and thread the flash unit through its cutout.

    • During reassembly, thread the flash through its cutout as you lower the logic board cover into place.

  18. Logic Board Removal, Remove the wireless charging assembly: step 18, image 1 of 2 Logic Board Removal, Remove the wireless charging assembly: step 18, image 2 of 2
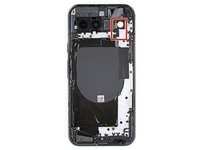
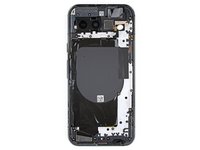
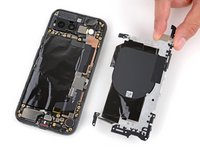
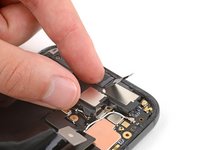
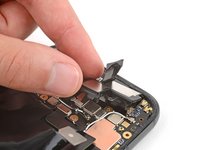
    • Remove the logic board cover (which has the wireless charging coil connected to it).

  19. Logic Board Removal, Disconnect the battery: step 19, image 1 of 3 Logic Board Removal, Disconnect the battery: step 19, image 2 of 3 Logic Board Removal, Disconnect the battery: step 19, image 3 of 3
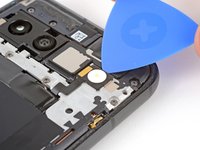
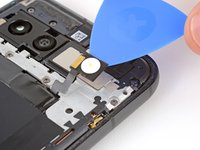
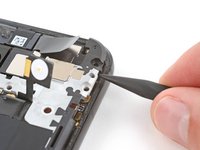
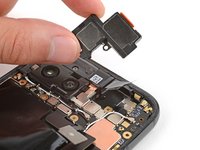
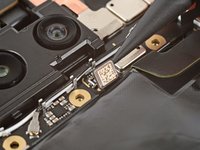
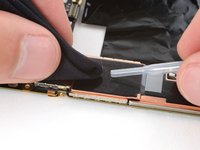
    • Use a pair of tweezers or your fingers to remove the metal cover on the right edge of your phone.

    • During reassembly, place the upper left corner of the cover under the hook on the logic board before laying it into place.

  20. Logic Board Removal: step 20, image 1 of 1
    • This guide was shot with the Verizon model (G8HHN) Google Pixel 8a, which has an extra cable and connector for the 5G mmWave antenna (just to the left of the battery connector). If you have the non-mmWave model, just skip any steps that mention the antenna cable.

  21. Logic Board Removal: step 21, image 1 of 3 Logic Board Removal: step 21, image 2 of 3 Logic Board Removal: step 21, image 3 of 3
    • To prevent damaging the surface mounted components around the battery and 5G mmWave connectors, only pry where instructed.

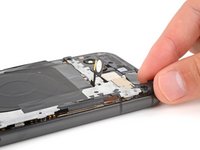
    • Insert the flat end of a spudger under the right edge of the battery press connector and pry straight up to disconnect it.

    • To reconnect a press connector, align it over the socket and gently press down on one side until it clicks into place, then press down on the other side. It might take a few tries to align the connector.

  22. Logic Board Removal, Disconnect the 5G mmWave antenna: step 22, image 1 of 2 Logic Board Removal, Disconnect the 5G mmWave antenna: step 22, image 2 of 2
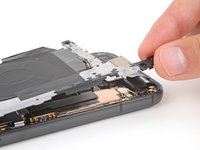
    • Insert the point of a spudger under the bottom edge of the 5G mmWave antenna press connector and pry straight up to disconnect it.

  23. Logic Board Removal, Remove the earpiece speaker: step 23, image 1 of 2 Logic Board Removal, Remove the earpiece speaker: step 23, image 2 of 2
    • Use a Torx Plus 3IP screwdriver to remove the 4.3 mm‑long screw securing the earpiece speaker to the frame.

  24. Logic Board Removal: step 24, image 1 of 3 Logic Board Removal: step 24, image 2 of 3 Logic Board Removal: step 24, image 3 of 3
    • Lift the bottom edge of the earpiece speaker and remove it.

    • When reinserting the speaker during reassembly, make sure the graphite film is out of the way. Then, insert the speaker at a downward angle and push it towards the front of the phone so the gasket goes into its cutout in the frame.

  25. Logic Board Removal, Remove the antenna housing: step 25, image 1 of 2 Logic Board Removal, Remove the antenna housing: step 25, image 2 of 2
    • Use a Torx Plus 3IP screwdriver to remove the two 4.3 mm‑long screws securing the antenna housing.

  26. Logic Board Removal: step 26, image 1 of 3 Logic Board Removal: step 26, image 2 of 3 Logic Board Removal: step 26, image 3 of 3
    • Insert an opening pick under the left edge of the antenna housing and pry up to release the clips securing the housing.

    • Repeat the process on the top edge to release the remaining clips.

    • During reassembly, press firmly around the perimeter of the housing to engage its clips.

  27. Logic Board Removal: step 27, image 1 of 3 Logic Board Removal: step 27, image 2 of 3 Logic Board Removal: step 27, image 3 of 3
    • Lift the antenna housing and remove it.

  28. Logic Board Removal, Disconnect the logic board: step 28, image 1 of 2 Logic Board Removal, Disconnect the logic board: step 28, image 2 of 2
    • Be careful not to touch the rear camera lenses during the next two steps.

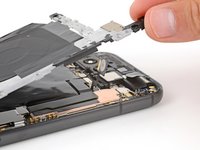
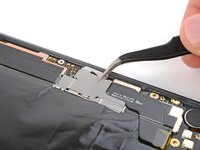
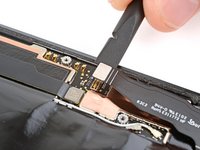
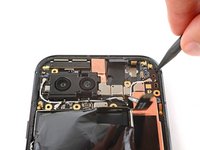
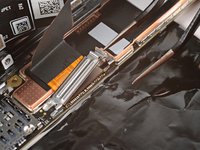
    • Use the point of a spudger or your fingernail to pry up and disconnect the press connector just above the battery.
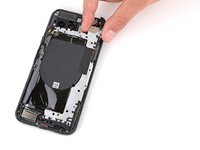
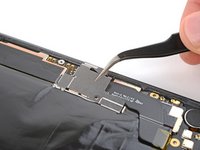
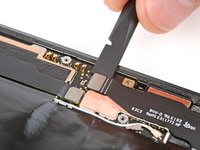
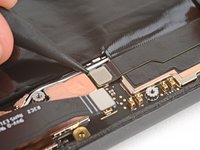
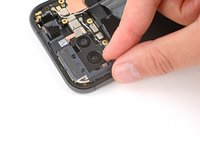
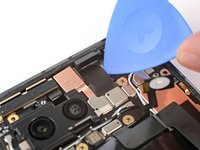
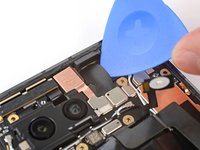
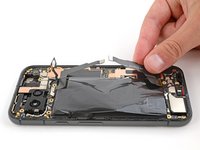
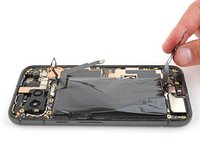
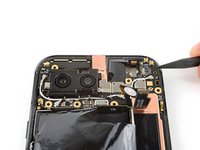
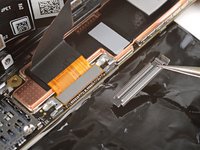
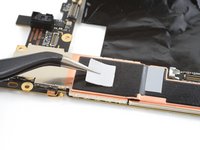
  29. Logic Board Removal: step 29, image 1 of 3 Logic Board Removal: step 29, image 2 of 3 Logic Board Removal: step 29, image 3 of 3
    • Slide the tip of your opening pick under the right edge of the front-facing camera cable and lift to detach it.

    • If the pick can't slide under the cable, lightly heat the cable with a hair dryer or heat gun to soften the adhesive underneath.

  30. Logic Board Removal: step 30, image 1 of 3 Logic Board Removal: step 30, image 2 of 3 Logic Board Removal: step 30, image 3 of 3
    • Move the battery and 5G mmWave cables out of the way of the battery.

  31. Logic Board Removal: step 31, image 1 of 3 Logic Board Removal: step 31, image 2 of 3 Logic Board Removal: step 31, image 3 of 3
  32. Logic Board Removal: step 32, image 1 of 3 Logic Board Removal: step 32, image 2 of 3 Logic Board Removal: step 32, image 3 of 3
    • The logic board is delicate. Be careful not to bend it as you free the lower edge from the frame.

    • Before trying to remove the board, make sure you removed the SIM tray.

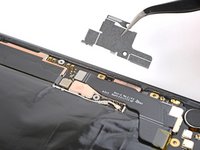
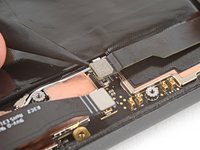
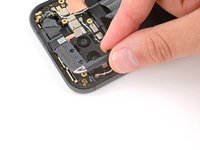
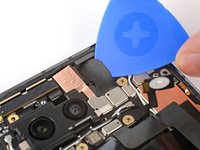
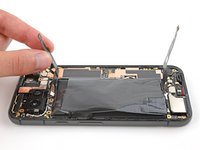
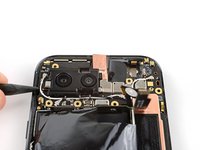
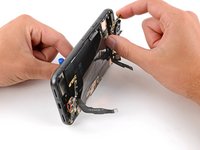
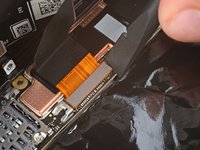
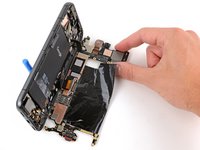
    • Lift the top edge of the logic board from the frame.

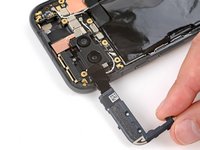
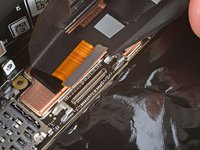
    • Pull the top edge of the logic board to the right of the frame so the cutouts of the board lift over the vibration motor and protrusions in the frame.

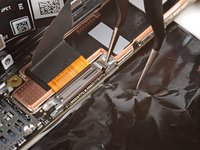
    • As you pull, guide the charging port out of its recess in the frame.

    • Don't fully remove the logic board yet, as it's still connected to the frame by the screen cable.

    • During reassembly, push the logic board toward the bottom of the frame and press the charging port down until the bottom edge sits flush with its protrusion in the frame.

    • Make sure the flash, front-facing camera, and press connector don't become trapped under the frame.

  33. Logic Board Removal, Prop up your phone: step 33, image 1 of 3 Logic Board Removal, Prop up your phone: step 33, image 2 of 3 Logic Board Removal, Prop up your phone: step 33, image 3 of 3
    • The logic board might fall out of place during this step. Hold it steady, but avoid gripping it by any of the camera lenses or connectors.

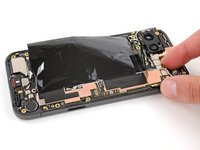
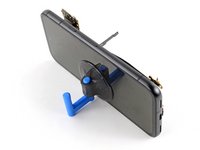
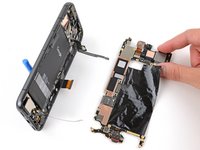
    • Apply a suction handle to the left side of the screen with the handle facing down.

    • Prop up the left side of your phone so it stands upright.

    • If you don't have a suction handle, prop up the phone against a sturdy object, such as a heavy box or thick book.

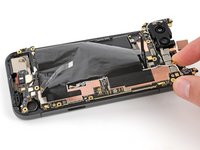
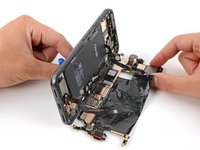
    • Tilt the logic board down and lay it flat, gently guiding the delicate graphite sheet around the cables.

    • Be careful not to touch the thermal pads on the underside of the logic board.

  34. Logic Board Removal: step 34, image 1 of 3 Logic Board Removal: step 34, image 2 of 3 Logic Board Removal: step 34, image 3 of 3
    • Be very careful not to puncture the battery during this step.

    • Hold one hand above the display bracket when prying it up, as the bracket can easily eject.

    • Use the tip of one arm of your angled tweezers to pry up the top edge of the display cable bracket from the center of the logic board.

    • Be very careful not to damage the board under the bracket's socket. Only insert your tweezers just enough to pry up the bracket.

    • Remove the bracket.

    • During reassembly, hook the bottom edge of the bracket into its slot on the logic board and press down firmly on the top to snap the bracket back into place.

    • If your display cable bracket is bent and doesn't fit, replace it with a new one.

  35. Logic Board Removal: step 35, image 1 of 2 Logic Board Removal: step 35, image 2 of 2
    • Insert the flat end of a spudger or a clean fingernail under the top edge of the display cable press connector and pry straight up to disconnect it.

    • The tension in this cable makes it tricky to reconnect. If necessary, hold the neck of the cable in place with tweezers and align it over the socket before pressing down to secure it.

  36. Logic Board Removal, Remove the logic board: step 36, image 1 of 2 Logic Board Removal, Remove the logic board: step 36, image 2 of 2
    • Remove the logic board from the frame.

  37. Logic Board Removal, Check the front sensor gasket: step 37, image 1 of 3 Logic Board Removal, Check the front sensor gasket: step 37, image 2 of 3 Logic Board Removal, Check the front sensor gasket: step 37, image 3 of 3
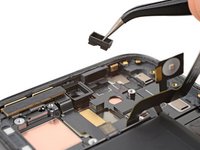
    • If the front sensor rubber gasket stayed on the frame or became misaligned, remove it and set it aside.

    • During reassembly, place the gasket over the front sensor on the logic board, with the smaller cutout toward the top.

    • Avoid touching the sensor with your fingers or tool.

  38. Logic Board Removal, Check the thermal pads: step 38, image 1 of 3 Logic Board Removal, Check the thermal pads: step 38, image 2 of 3 Logic Board Removal, Check the thermal pads: step 38, image 3 of 3
    • During reassembly:

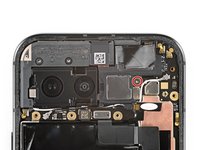
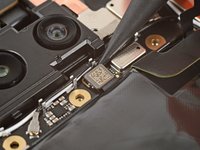
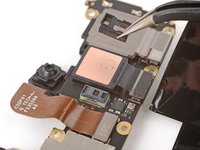
    • Check the condition of the thermal pads—they'll be on the bottom of the logic board or the corresponding spot on the right side of the frame.

    • If you're reusing your logic board and either of the thermal pads are damaged, remove the old pad, clean the surface with highly-concentrated isopropyl alcohol (over 90%), and apply a new pad.

    • If you have a new logic board and it doesn't come with thermal pads pre-installed, apply the new pads now.

Conclusion

To reassemble your device, follow these instructions in reverse order.

Spencer Day

Member since: 09/14/22

59,654 Reputation

430 Guides authored

Team

iFixit Member of iFixit

Staff

141 Members

17,895 Guides authored

0 Comments

Add Comment

View Statistics:

Past 24 Hours: 0

Past 7 Days: 0

Past 30 Days: 4

All Time: 34