
MacBook Air Models A1237 and A1304 Hard Drive Replacement

Introduction
Go to step 1Replacing your hard drive is easy! Also, you can upgrade to a higher capacity drive for more storage space.
What you need
Parts


Tools


Show more…
Video Overview
-
-
Remove ten Phillips screws securing the lower case to the MacBook Air:
-
Six 2.8 mm screws
-
Two 3.8 mm screws
-
Two 5.4 mm screws
-
-
-
Lift the battery out of the Air.
-
Charge it to 100%, and then keep charging it for at least 2 more hours. Then, unplug and use it normally to drain the battery. When you see the low battery warning, save your work, and keep your laptop on until it goes to sleep due to low battery. Wait at least 5 hours, then charge your laptop uninterrupted to 100%.
-
If you notice any unusual behavior or problems after installing your new battery, you may need to reset your MacBook's SMC.
-
-
-
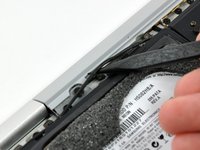
Disconnect the port hatch ribbon cable from the logic board by pulling it straight up by its black pull tab.
-
Pull the audio out ribbon cable off the adhesive securing it to the upper case.
-
Use a spudger to pry the audio out ribbon cable connector board off the hard drive bracket.
I skipped the step (6c) of prying the audio out ribbon cable connector board off the hard drive bracket (& disconnecting it), since it doesn't come off real easily, and I didn't want to damage it. It only requires a little more care when removing the HD from it's bracket if you skip step 6c.
-
-
-
Disconnect the audio out cable from its socket on the port hatch ribbon cable.
Agreed, I encountered no issues when I skipped this on a Rev.B model.
-
-
-
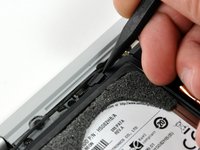
Use a spudger to pry the hard drive cable connector up off the logic board.
Reversing step 8 is where I ran into trouble. The replacement fan I had was slightly thicker than the original and caused the ZIF cable to work its way out of the tenuous connection it had to the SSD, resulting in a "?" missing boot drive error upon startup. Took me three tries to get it right! The difficulty is to get the drive connector to the logic board to reach and seat without pulling the other end out of the drive.
-
-
-
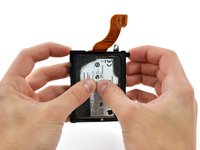
Remove the four Phillips screws securing the hard drive assembly to the upper case:
-
Two 4.7 mm screws.
-
Two 3.9 mm screws.
Longer screws on top.
Two 3.9 mm Phillips screws.
Two 4.7 mm Phillips screws.
There is a cable glued to the diskframe that must be loosened with a spudger before you can remove the frame.
-
-
-
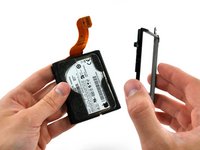
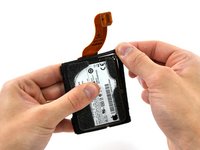
If you have the original MacBook Air (A1237), use a spudger or your thumbs to flip up the ribbon cable retaining flap TOWARD the cable (seen in picture 1).
-
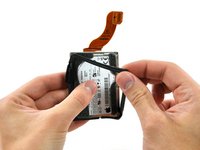
If you have the A1304 version of MacBook Air, use a spudger or your thumbs to flip up the ribbon cable retaining flap AWAY from the cable (seen in picture 2).
-
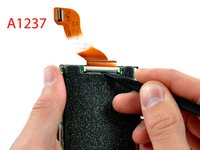
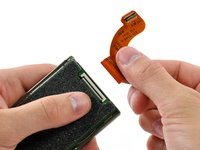
Pull the hard drive cable straight away from its socket.
The ribbon cable retaining flap is the black piece of plastic under the white piece of plastic.
Hello
I buy a 60GB m Nano ssd but whp can help me please :(
My Email; bmw357@hotmail.de
my macbook air hard driver was failed. now i need to buy the new one with model MCCOE64GEMPP-01A 1.8 INCH 3.3 V ATA7 UDMA66
could you send me with my email address anduamlakk@gmail.com
Hi, I've a A1304 hardware configuration (24-pin cable) and recently I've bought an SSD which uses an A1237 hard drive connector's (40-pin cable). If I buy this diferent cable can I use it without major problems?
Thanks
A1237(original and 2008) uses 40-pin ZIF cable, and internally E-IDE signal.
A1304(2009) uses 24-pin LIF cable, and internally S-ATA signal.
It’s not only different cable, but also different disk drive. If you bought one, you physically cannot uses on otherwise.
Sorry to resurrect ancient question, but this might be helpful if someone trying in the furute.
-


To reassemble your device, follow these instructions in reverse order.
To reassemble your device, follow these instructions in reverse order.
Cancel: I did not complete this guide.
188 other people completed this guide.

23 Comments
It is not necessary to remove the battery. The hard drive can easily be reached while the battery is in place, although you have a little bit more space if you do remove the battery.
It probably is a good idea to unplug the battery before replacing the hard drive, so you do not accidentally short-circuit anything.
My hard drive replacement (a Mach Xtreme Nano PATA ZIF 120GB SSD) actually went in the other way up from the stock Apple Drive. ie The ZIF connector is seen when put back together, rather than under the drive as is the case with the Apple Drive (as seen in Steps 10&11). This also meant the cable came up past the drive on the inside of the bracket then to the mother board. I had tried several times the same way as the Apple drive was, and the cable kept being pulled out of the ZIF connector when putting it back together. Luckily this did not damage my drive.
I cannot tell you how thankful I am for your comment. I bought exactly the same SSD and spent the better part of today trying to get the computer to see it in Disk Utility. I tried everything (at least I thought so!), tweaking the ZIF cable, resetting the rubber bumper, and so on. Must have done ten or more restarts to no avail. The only thing I didn't do was turn the drive upside down! Thank you so much!
SERIOUSLY. 2 hours trying to figure out WHY it wouldn't work, THANK YOU CHARLIE. YEARS LATER.
This guide was very helpful and accurate for our A1304 Air, I have commented/adjusted the guide to give some extra info which I felt was missing, useful for identifying the correct model/revision and related replacement part.
I fitted a RunCore 128GB SSD to our A1304 (Revision B) Air, it was easy enough and works exactly as we hoped! The A1304 (Revision B) model Air has a LIF connector. RunCore have different SSD products for the different Air revisions, it would be easy to order the wrong part, so be sure you you what modle/revision of Air you're working on!
Read the guide in full for, for all the details.
I think the hard drive connector cables for the A1237 & A1304 are different. I purchased a Samsung 120GB (HS12UHE/A) and the cable on my A1237 didn't fit.
I installed the new hard drive. Your instructions were very accurate. However, when I turn the machine on, I see a blinking folder image with a question mark in the middle. I am assuming since the hard drive is completely blank, there is no "boot" routine. However, since this is an Air, there is no internal disc drive so I don't know how to run the original install discs. Any thoughts?
There is a little restore USB that came with that MacBook Air that can be used to install the OS on the new hard drive.
Mike -
Hi
Did you have response to. Your question? I have same problem ?
Moh -
The foam looking parts on the HDD - what are they and where do I get them from ? Are they required or can the replacement drives go in without them? I have the rubber shock absorber and the casing but I don't have the felt or foam stick on parts. I hope someone knows what the !@#$ i'm talking about!
Great guide, but huge overkill!
As has been mentioned by others, I
1) removed the cover,
2) disconnected the battery (but left it in place)
3) unhooked the cable from the top edge of the hard disk bumper.
4) disconnected the wide 'port hatch' ribbon cable that sits on top of the drive, moving it back but not removing it completely.
5) disconnected the data cable for the hard disk where it plugs onto the logic board.
6) removed the screws holding the hard disk bumper in place
7) removed the hard disk.
Everything else is not needed, and you still have loads of room to work in. The more you touch in there, the easier it is to break something.
Thanks for the guide
Just in case anybody doing resurrection these old things.
As post upside mensioned, there are difference HDD thingy between Early 2008(A1237) and Late 2008 + Mid 2009(both A1304). 1st gen A1237 uses 40pin ZIF connector and internal PATA(=E-IDE) protocol. 2nd gen A1304 uses 24pin LIF connector and internal SATA protocol. They don't compatible each other both cable and disk.
If you want to replace 1g A1237 HDD, you can just buy 1.8" 40pin ZIF HDD and replace it. No problem.
But if you try to replace 2g A1304 HDD, There is no way to buy 24pin LIF connector used HDD or SSD (with proper price, at least). And that's because LIF24 is specific design for some Apple devices. But LIF24 internally uses standard SATA pins. So you can jump from the LIF24 cable's pin header. It provides 3.3v, GND, SATA data A+, A-, B-, B+. If you going to use mSATA SSD or 1.8" SATA SSD, it just uses 3.3v only so jump LIF24 to mSATA should works. By any chance it needs 5v, there's always 5v in USB.
I appreciate the effort you made to make the video but as a previous macBook Pro user and new to macBook Air scene, I have to ask doesnt the lit up apple logo on the outside mean you had the laptop on when you flipped it over and took it apart?
my macbook air hard driver was failed. now i need to buy the new one with model A1304. I prefer ssd
Could you send me with my email address gustavo.arce13@gmail.com
my macbook air hard driver was failed. now i need to buy the new one with model A1304. I prefer SSD
could you send me with my email address gustavo.arce13@gmail.com Thank you
Thank you so much, this worked perfectly for me. I needed to change the battery as well as the HDD anyway.
will this fit MacBook air A1237? https://www.memoryc.com/storage/solidsta...
Hi Guys, I hope you can help me with answer to my following questions:
I have an Issue witn my Macbook Air 2012. When I turn it on I do see a bliking question mark. For that I found out that I have to replace a Hard drive cable. Is that correct?
If yes could you please describe how to do that? And which cable “Serial Number” do I have to buy?
Many thanks to you in advance.
regards!
Mirak
Hi Sir
I need 1.8 Inch PATA ZIF SSD available sir
In umgekehrter Reihenfolge wieder zusammen bauen
? Und die neue Festplatte auch wieder mit der alten Austauschen?
😂😂😂
LOL
Where can I find a sdd for the A1304 in 2023?