Introduction
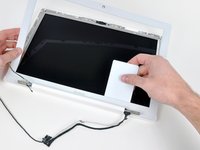
Save money by replacing just your MacBook Core Duo's LCD screen without the inverter, cables, or bezels.
What you need
Video Overview
-
-
Remove the three evenly-spaced Phillips screws from along the rear wall of the battery compartment.
While many guides here are good, this one is way more complex than needed. You can replace the inverter very easily by prising off the plastic bezel around the display, removing the three screws from the hinge cover, then prising off the hinge cover to expose the inverter. That is all that is needed.
Reference: "prising off the plastic bezel around the display, removing the three screws from the hinge cover, then prising off the hinge cover to expose the inverter. That is all that is needed."
Unfortunately putting it back an shred the cables to the airport card..
-
-
-
Lift up on L-shaped memory cover, slide it to the right, and lift it out of the computer.
Hey iFixit, I was wondering would a Mac fail to boot if this cover wasn't on?
-
-
-
Remove the following 3 screws:
-
One 11 mm Phillips #00 in the middle of the case.
-
Two 14.5 mm Phillips #00.
-
-
-
Remove the following 3 screws from the rear wall of the battery compartment:
-
Two 3 mm Phillips #00. (A1181 has three 3 mm screws and one 4 mm.)
-
One 4 mm Phillips #00 on the right side.
When putting the laptop back together, consider doing Step 5 before Step 6. The lower case will then line up on its own.
Otherwise, even pushing on the lower case, these screws are %#$#@$ for putting back in place.
When I reinstalled, I put the screws in the upper holes, which are for the battery cover. If you don't want to back track, be sure to use the lower screw holes at this step.
on my version the longer screw was in the middle
On my version the 3 mm screw (smaller of the three screws) was in the middle, which differs from the image.
i use iPhone screw driver
Comment enlever une vis en croix qui s est cassée ? Merci de m aider c est la première entourée en rouge a cette étape, je ne sais pas comment faire pour l avoir
Voici notre tutoriel pour enlever une vis cassée : https://fr.ifixit.com/Tutoriel/Comment+e...
-
-
-
Remove the four 3 mm indicated Phillips #00 screws from the front wall of the battery compartment. When working from the left, remove the 2nd, 4th, 7th and 9th screw.
Count carefully here. If you don't remove the right ones, you won't be able to separate the keyboard assembly later.
The srews are 3.3 mm
I have a screw that I think is stripped, any ideas on how to get it out?
-
-
-
Remove the following 4 screws from the back of the computer:
-
Two 7 mm shouldered Phillips on the far sides.
-
Two 10.5 mm Phillips toward the center.
-
-
-
Remove the two 5.2 mm shouldered Phillips #00 screws from the optical side of the computer.
The screws are 5.4 mm
threads are on the tips
Found it necessary to remove the corner one.
-
-
-
Starting near the display and working around to the front of the computer, pry up on the upper case. It is held with clips on the right above the optical drive. These will release with some firm lifting pressure.
-
Be careful when prying up the upper case. It's very easy to slice open a fingertip and thus provide the blood sacrifice the Mac gods sometimes require of those who insist on doing their own repairs.
Danger Will Robinson!! My upper case did NOT want to come out on the right side. I just trusted to cameronmoll and kept lifting straight up. Finally, it came loose, but it wasn't easy. Meanwhile, while I was dealing with the cable -- just had to pull up a black tab hooked to it -- I somehow managed to chip the front, top edge of the upper case -- the edge farthest from the screen -- in two places, one on the right, one on the left. So, watch that edge, it is thin!
Regarding the right side, there is a series of 3-4 plastic snap in locks on that side along the optical drive, holding the case down in lieu of screws. It takes serious pressure to remove the snapped in pieces (just lift straight up). You should also make sure to line them up when you put the casing back on. Another picture might help show that portion better
My upper case also came off with a little difficulty. There are some plastic tabs that hold the case down (4 of them). They sorta "pinch" onto 4 little bars that are part of the upper case (note, the bars appear to be metal). I worked my upper case to the left a little and it came out easier. One of the these tabs was really tight. Note: if you do this, one or more of the tabs may stay on the upper case, you'll need to move them back in place before putting the upper case back on (pry it off the upper case with a spudger, or very carefully with a flat screwdriver as to not damage it). It will slide back into a slot on the body.
Quote from dougyfresh:
Regarding the right side, there is a series of 3-4 plastic snap in locks on that side along the optical drive, holding the case down in lieu of screws. It takes serious pressure to remove the snapped in pieces (just lift straight up). You should also make sure to line them up when you put the casing back on. Another picture might help show that portion better
Regarding the right side, I found that the 4 clips slide to the left more easily that pull out. However, the front right has a bar which drops into a slots preventing pulling to the left! So ... gently lift the front right (furthest from the screen), pressing just at the front end of the optical slot to bend the faceplate at that point, then gently rock the face plate back and forwards while pulling left, so the that the four clips slide out of their retainers - presto! Remember to bend the faceplate to reassemble.
Step 11 really needs a better description. I started undoing the tape that holds the case above the optical drive slot to the metal before I read the comments and realized what I needed to do. Once you start to pull the top case up from the front, you'll reveal enough of an opening to get a spudger all the way under the metal portion of the top case next to the first snap. Once you have the spudger in, it's easy to release the snap without worrying about bending the whole topcase. Just repeat for the remaining three snaps. Once I got this technique down, it really didn't feel like I was doing anything that might damage the case.
By the way... don't worry if you undo the tape. It will go right back together with a little pressure. I didn't even need to go out and buy some adhesive to fix it.
I recently replaced the inverter cable. Now the power button doesn't work anymore.. but the keyboard and trackpad still do work. I already replaced the uppercase cable with no success. Does somebody have an answer to this problem?
There are 4 plastic locks on the right side which prevent the keyboard from lifting up. They slide out easily if the keyboard is moved to the left. To move the keyboard to the left you first have to release the left and front side. On the left and front side there are metal strips that are snapped in. They should release when you push the metal strips with a spudger towards the center of the computer. We had much trouble releasing one metal snap as we didn't know how to do it.
When you reinstall the keyboard put the plastic bars in the frame at the right side of the case, then snap in the keyboard on the left and front side and finally snap the keyboard into the plastic snaps to the right. Be careful so they don't fall out before you snap them in.
A metal piece fell out of the computer. It was a shielding of a connector on the left side.
A tiny plastic disc (4 mm diameter) with a hole in the middle also fell out. I had little hope to find out where it belonged and it didn't seem too important, so I left it, but kept it in a minigrip bag. Does anyone know what it's for?
Be really careful! I broke the connector easily and had to replace it.
It is out of stock on iFixit. I found it there: https://www.amazon.it/gp/product/B01MSH3...
-
-
-
While holding up the upper case (from the bottom or the top), use a spudger to pry up the orange trackpad and keyboard cable from its connector.
It lifts straight up.
Quote from cameronmoll:
It lifts straight up.
I'd suggest being careful and perhaps having help with step 12, as I have broken the connector piece at the end of the cable by pulling too hard/fast and having the connector stuck in the board and the ribbon dangling without purpose.
Does anybody know of a good way to repair such a ribbon, or am I stuck buying new upper case units?
An extra picture or warning should be added about this... The same as you, I broke the connector. I didn't even use any force, but the pins got off the cable and now I'm forced into buying a new one. Trying to buy one from ebay as we speak. It might have been due to metal fatigue after 7 years, but it got broken none the less.
The computer serial number and network IDs are on the underside of the top case (visible in the battery compartment.) In order to prevent misidentification in the future (for instance, while on the phone with Apple tech support), I print the info from the old top case on a sticker and affix it over the label on the new top case.
A lot of top case replacements are due to the front edge being broken by the bumpers on the lid of the MacBook. I stick a couple of felt dots on either side of these bumpers to absorb some of the shock when the lid is slapped shut, to prevent damage to the new top case.
I think that one extra picture should be added here. That is to say, the purpose of using the spudger (which I do suggest you should buy so that you don't risk ruining the orange cable), is to unplug a little connection. Basically your are "popping" it open. Had I known this it would have made th4e process feel a little less risky. In any case the mission was successful... Job completed in 45 minutes and my computer has wireless internet once again!!
The image is misleading. Don't pry it up from the front, but from the sides. Personally I used a small flathead screwdriver, but sadly - only after ripping apart the soldering on the wire/plug.
Also, be careful to lift the white plastic plug, not the circuitboard/wire attached to it
After reading everyone's comments, I used the narrow spudger and slid it around from the front to the right then the front to the left and it lifted up easily..
It is not clear from the repair description nor the comments if the brown cable connected keyboard is compatible with the silver cable connected keyboard. Can someone indicate clearly please what this difference means to us wishing to replace the keyboard? Does it mean there are two distinctly different keyboards, one with a brown cable and one with a silver cable?
This is the most critical stage of removing the cable either silver or orange. It is difficult to hold the keyboard away far enough to be able to reach in and with a spludger clearly see where to pry open. iFixit of course sell these cables but if the image of the cable being prized open then fewer people would rip the cable and have to order more parts from iFixit…..we have to keep our eyes on our own ranks, in case we are tempted to again take advantage of ‘inside knowledge’. Yes, I make a good photo but here there is no place to upload to help you all. I can imagine that that cable is the source of most keyboard problems, so take it out only when very well illuminated and everything is steady so you can get the spudger into the exact place to do its job. My next repair job is a MacBook Retina 12” early 2015 - the screen blisters when left in the sunshine leaving a large black hole which expands and contracts daily. 2019 02 16
If you have a better photo, click the ‘Edit’ button at the top right and add it to the step. iFixit guides are collaborative wikis.
Once you have the keyboard removed, check your inverter cable plug. Mine wasn’t seated properly (hardly at all), so I reconnected the display cable and keyboard, then I turned on the power. My display was back up! I didn’t actually need the new cable after all.
Before you move on to the next steps, just check that inverter cable plug. It’s in Step 31. It may save you some time and a big headache.
-
-
-
Grasp the white plastic tab attached to the hard drive and pull it to the left, removing the hard drive from the computer.
I've done several of these without removing the optical drive, etc, and just gone directly to replacing the hinges from here.
Quote from bradleydad:
I've done several of these without removing the optical drive, etc, and just gone directly to replacing the hinges from here.
Agreed! There is no need to remove the optical drive to get the LCD out at this point.You do need to remove the hinge screws and retainers, but just long enough to pop off the plastic cover to expose the inverter. You do need to support the lid assemble a bit while doing this (an extra hand is nice if available) but it only take a second to remove the inverter cover. Then I'd put the hinges partially back together with two screws and proceed with removing the LCD panel from the frame at this point. Saves quite a bit of time and headache not having to remove the optical drive and everything in the remaining steps.
Important thing about this repair is to take your time, moveslowly and be very organized with all your screws and parts. I use a multi-compartment organizer for all my laptop repairs and label each compartment with tape (ie. LCD frame, hinges, Bottom Panel, Inverter cover...) Makes re-assembly easy and no leftover screws in the end!!
I have no need to remove the HDD. They probably suggest it so theres no data loss or something but that wont happen if the macbook has been powered off and the power supply is remove for about 2 minute. Like bradley i usually go for the hinges but usually i remove the disk drive or cd or cd rom drive. Then i unscrew all the pieces around the hinges supporting the LCD then go for the hinges. Basically thats how i replace the lcd
-
-
-
Remove the two Phillips screws from the front edge of the optical drive.
had trouble getting the screw on the right back in, make sure the drive is sufficiently pushed back into the case when inserting the screw
The left screw is 3.3 mm, the right 3.8 mm
-
-
-
Remove the 2.8 mm Phillips screw securing the optical drive.
-
After removing the screw, push the metal tab backwards, towards the fan, to release the front of the optical drive.
The screw is 2.7 mm
While trying to remove the screw with no luck I've though of turning the laptop upside down and use the power of gravity, a small black plastic item fell down and couldn't figure out where is belong (see link)
http://img18.imageshack.us/img18/566/353...
Any one have an idea where this belong to ?
Thanks
Quote from ahammadi:
While trying to remove the screw with no luck I've though of turning the laptop upside down and use the power of gravity, a small black plastic item fell down and couldn't figure out where is belong (see link) http://img18.imageshack.us/img18/566/353... Any one have an idea where this belong to ? Thanks
IT GOES ON THE RIGHT SIDE TO COVER THE DISPLAY CABLE.BY THE RIGHT HINGE.
Remember that the metal piece on the dvd-drive where the screw should go threw is moveable! Just move it into position with your screw-driver or the pointed end of your spudger.
Replacing the optical drive screw was the hardest step of the entire procedure for me. The eyelet for the screw can't be moved into position until the drive is in place, buried under cables, and in friction against the case. Sliding it into position makes a protrusion that has to be lined up with a little notch in the case at the mouth of the optical drive.
If anyone has tips on making this go smoothly, please add; it took me probably ten minutes of gentle wiggling, removing and replacing and trying again.
-
-
-
-
Lift the Bluetooth antenna board from the right side of the optical drive.
pay attention of litting up the bluetooth antenna, there is one very thin cable ..
-
-
-
Lift the front edge of the optical drive and slide it up and out of the computer.
When you put the drive back in, there is a sliding bar on the far edge of it (per perspective in photo) that goes into a notch in the computer case. The opposite end of the bar has the hole mount for a screw. So, if you're having trouble lining up that screw hole with the hole in the case, make sure the bar is sliding into place. (It's the drive screw that's covered in cables)
I couldn't get the optical drive screw hole under the cables (IE: eyelet which is part of the bar) to line up for about 15 minutes... Then I read your comment.
Be careful, if the eyelet doesn't line up, don't try to force the drive into position toward the opening. It's probably because the eyelet, which is not fixed, needs to be slid into position. It slides with the bar on the right side of the drive. Trying to push it in, I bent the bar slightly at the front so it would never line up properly. I gently straightened the bar and because of these instructions, understood how it was supposed to line up and fit - and it slipped right in. As long as you get the bar lined up right, you can gently push the eyelet forward and the bar will go into the slot and everything will line up properly. That is, you gently push the eyelet forward until it lines up with the screw hole.
My Mail -
Also mind the plastic grey clips that are on the "chassis". These clips are referenced in step 11 (the 1st bullet point). My clips fell out. I had no idea what they were at first or where they belonged. When sliding out the optical drive, the clips can fall out into the space that was previously occupied by the optical drive. They are easy to slide back into the "frame" of the computer. There are four of these plastic clips.
Found two gray plastic pieces loose when I got the Drive out, any idea what they are, where they go and if they are important? Great site, very helpful, love you guys.
-
-
-
Remove the following 3 screws:
-
Two 3 mm Phillips near the right speaker.
-
One 6 mm Phillips threaded through a hole in a plastic finger above the subwoofer.
Quote from zsadler13:
there was only the subwoofer screw, other 2 appear to be missing.
Stranger things have happened inside MacBooks I have dealt with. Just be glad it isn't the screws holding your desk chair together.
Quote from zsadler13:
there was only the subwoofer screw, other 2 appear to be missing.
This guide is for the Core Duo MacBook, you may be referring to the screws which exist inside Penryn/Santa Rosa machine.
I can't seem to get the subwoofer screw out. It's stuck. There were other tough screws but I managed to get them out. For this one, it won't even budge. I'm afraid of stripping the screw completely.
-
-
-
Using a spudger, gently pry up the white plastic slot and slide the metal c-channel to the right and away from the display.
Quote from zsadler13:
c-channel is missing
Your computer is missing the c-channel?
Quote from brady:
Your computer is missing the c-channel?
This guide is for the Core Duo MacBook, you may be referring to the Penryn/Santa Rosa MacBook which does not have the c-channel.
Be careful, the plastic slot breaks easily. Mine broke, but it went back together okay. Seems stable.
-
-
-
Use a spudger to carefully disconnect the microphone cable from the logic board. You'll want to work from side to side, and slowly wiggle the connector out of its socket.
VERY IMPORTANT!!!! The plug backs out of its jack along the plane of the logic board, away from the front of the computer, toward the screen. YOU DO NOT PULL IT STRAIGHT UP FROM THE BOARD! The photo is ambiguous, and I ended up ripping away from the logic board the jack the microphone cable plugs into. I doubt I'll be able to solder it back on again, so bye-bye internal mic.
-
-
-
Lift up on the black right speaker cable with one hand, and deroute the silver microphone cable from the silver metal clip just above the right RAM slot.
Step 29: In order to deroute this cable, is it necessary to unscrew the screw below the subwoofer?
There is no clip in my MacBook 2009 and the mic cable is black, not silver and is easy to deroute.
-
-
-
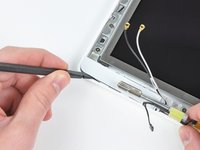
Remove the single 3.2 mm Phillips screw securing the ground loop in the display data cable located just above the Bluetooth board.
-
-
-
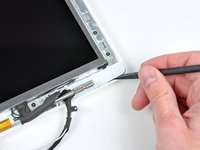
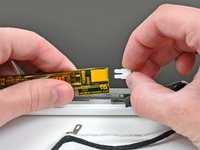
Disconnect the two antenna cables from the Airport card, and the black inverter cable from the logic board. (Pull vertically on all three.)
Quote from John098:
seems my laptop has 3 antenna cables... a black, blue and grey cabled one. Does this mean I have a 'Penryn/Santa Rosa MacBook' and do I need to look at a different guide..?
on the back cover there should be in small print that should tell you the model type of ur mac. its right between the two screews and shouldnt be that hard to find unless you somehow scratched it off
%%@^. I ripped out one of the antenna's connectors. Any idea how to fix this?
Make sure to pull vertically on the inverter cable to remove it from the motherboard.
First the black, same place, in the middle the blue one and the grey at the end same place, just change the blue in the middle
-
-
-
Remove the following 2 screws from the right hinge mount:
-
One 6 mm Phillips on the left side of the hinge mount.
-
One 10 mm Phillips on the right side of the hinge mount.
-
Lift the right hinge mount out of the computer.
Quote from zsadler13:
There is a 3rd screw on the right hinge mount also.
This guide is for the Core Duo MacBook, you may be referring to the Penryn/Santa Rosa MacBook which has 3 screws here.
-
-
-
Hold the display with one hand while removing the screws from the left hinge mount.
-
Remove the following 3 screws from the left hinge mount:
-
One 6 mm smaller diameter Phillips from the right side.
-
One 6 mm larger diameter Phillips from the middle.
-
One 10 mm Phillips from the left side.
-
Lift the left hinge mount out of the computer.
Take a good look at where all the cables and wires are routed in the next couple steps! You might even want to take a few pictures. They must be routed exactly the same way going back together. Either stuff will not fit, or you'll get intermittent video.
-
-
Tool used on this step:Plastic Cards$2.99
-
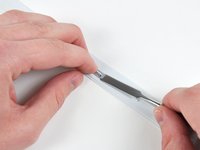
Use a thin plastic card to release the tabs and their clips holding the front display bezel to the display assembly. There are five tabs along the left side of the display bezel.
When you go to replace the bezel, look at the back side and disconnect any of the little snap-on tabs that may not have stayed in the metal bracket around the LCD. On a white MacBook they were grey, about 4mm x 8mm. They work best if you put them into the metal frame separate from the bezel and then snap the bezel into them.
The best way to remove them seemed to be by placing my thumb over one edge (so they didn’t fly off) and prying with a thin, flat screwdriver flat against the bezel tab.
Hello I've seen a video on Youtube where the guy skipped all the previous steps and got to the inverter without taking the screen off. Seems like it saves a lot of time and potential problems, since I have never done anything like this. Does anyone recommend doing it? I see it's more accessible to just try to get to the inverter without taking the screen off first.
-
-
-
Lift up the front display bezel from the top and use your plastic card to free the tabs along the bottom edge of the display bezel.
-
After freeing all holding tabs, lift the front display bezel away from the display assembly.
A note for anyone panicking because they can't get their front bezel back on:
It is common for the grey clips holding the bezel to the display to come up along with the bezel. If you have ANY grey clips attached to the back of your bezel, in order to replace the bezel you need to first remove the clips from the bezel and reinsert them into the holes in the display panel manually first! Once all of these clips are back in place, the bezel can be reattached.
These clips are very fragile and if you are having this problem odds are you have already severely bent some of them. Check the tiny plastic clasps and if they are squashed down, gently pry them back up with your fingernail. Again these grey clips are very fragile, so use care in reattaching them.
This was a very helpful tip. I made the mistake at first when reading your note, thinking that the gray clips were supposed to be on the bezel, not the display, but quickly corrected that.
For anyone confused, the bezel is the thin plastic part surrounded the display, and the display of course houses the LCD.
Another note:
The easiest way to remove the clips from the bezel is from the side and pry up. To reattach them to the display, put one end of the clip in first, and then use tweezers to poke in the other end of the clip.
Quote from WillyDavidK:
A note for anyone panicking because they can't get their front bezel back on:
It is common for the grey clips holding the bezel to the display to come up along with the bezel. If you have ANY grey clips attached to the back of your bezel, in order to replace the bezel you need to first remove the clips from the bezel and reinsert them into the holes in the display panel manually first! Once all of these clips are back in place, the bezel can be reattached.
These clips are very fragile and if you are having this problem odds are you have already severely bent some of them. Check the tiny plastic clasps and if they are squashed down, gently pry them back up with your fingernail. Again these grey clips are very fragile, so use care in reattaching them.
-
-
-
Use a metal spudger or another thin tool to carefully pry the gray plastic clips off the tabs molded into the front display bezel. A 0.8mm flat screwdriver may be useful for this step. You may find that it's easier to remove some of these clips by prying up on their long sides.
I found that an easy way to remove the clips from the bezel is to use a plastic knife (knife as in the utensil). Sliding the knife under one of the clip's long sides and prying upwards worked well for me. Thanks MC25 and WillyDavidK for the tips, they worked great!
The plastic clips deform easily, making it difficult to reuse them. The tabs on the back of the bezel that fit into the clips also break off easily.
If any of the tabs or clips are omitted, the bezel will not lie flush nor will it hold the cables that run beneath it in place.
Wear gloves while wrangling with the white bezel—like the white topcase, the matte-finish plastic is very porous and quickly gets grubby.
-
-
-
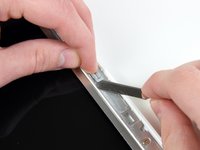
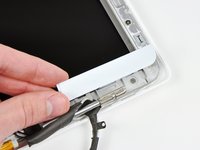
Remove the three 4.2 mm Phillips screws securing the clutch cover.
In this picture you can see that it is a Nikon camera that was used for this guide. :)
-
-
-
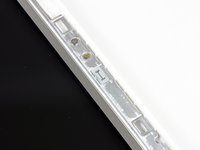
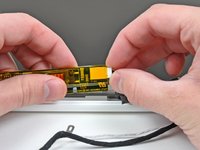
While holding the display down with one hand, use your other hand to lift the left end of the clutch cover off the clutch hinge and guide the inverter cable and AirPort cables through the gap in the clutch cover. If the cables snag on the two hooked tabs on the inside end of the clutch cover, free them carefully.
There are little clips at each end of the clutch cover, and I found it helpful first to lift the clutch cover off the metal rod first, and after that squeeze the cables at each end between the clips, so you can lift the cover off.
-
-
-
Lift up the right end of the clutch cover while guiding the display data and iSight cables through the gap and the two hooked tabs at the right end of the clutch cover. If the cables snag on the two hooked tabs, free them carefully.
-
Lift the clutch cover off of the display assembly.
Pay attention here. I missed the part about pinching the cable and that's exactly what I did. It helps to pull the video and mic cables tight to fit the clutch cover on. I also had to make sure the pink/white cables were up and out of the way. When I did it correctly, it slid in pretty easily. It would help to really look at how things are arranged when you are taking it apart, too. There's some tabs that interconnect with the plastic sliding things you removed in steps 46-47.
-
-
-
Remove the small piece of foam tape stuck down above each of the bezel covers, at the lower left and right corners.
-
-
-
Remove the twelve 4.2 mm Phillips screws securing the LCD assembly to the rear display bezel.
For the re-install, the cables that run along the sides of the LCD display do not follow the entire length of the display on either side. Both the iSight cable and the Airport antenna cables come away from the sides of the display about 3" from the corner where the hinges are. They move to the outside around the aluminum hinge supports. This is important so the cables do not get pinched and the bezel can snap into place.
Finding the correct route for these cables took some head scratching but the end result worked fine. In hindsight some more detailed pictures of the cable positioning when re-installing would be helpful. I also found that previous Apple authorised repairers had lost screws and removed tape, and charged me £400 for the priviledge.
Keir -
What size are these screws? 4.2x? Is there a link to these that would help please?
Thanks
To answer Keir's request for more detailed photos of the routing for the cables near the lower left and right corners of the display: click on the photo of the display in this step, which will open a higher-resolution version of the photo in a new tab, where you can click on this photo to magnify it so you can see the cable routing in the corners in larger detail.
-
-
“Make sure to replace the sleep magnet with the shorter edge facing up.”
Hi, could you please explain to me how and where exactly should be placed this small magnet? I didn’t noticed it when I dismounted and now, from the image, I do not understand where it should be. If you can also explain to me what is it for I’ll double thank you …
-
-
Turn the LCD panel assembly over so that the screen is face down. You may want to use a cloth on your worksurface to prevent scratching the screen.
-
Peel up all the yellow tape securing the display data and iSight cables to the back of the LCD panel.
-
-
-
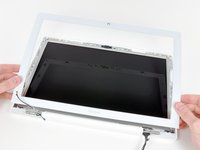
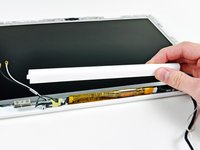
Lift up the LCD panel by its bottom edge and slide it out of the metal mounting brackets.
If you're replacing the display then take the time to make sure you've trasfered anything across that you may need. For example there are two sticky foam blocks at the bottom corners. You can see them in the picture above
I was able to successfully complete this guide and go all the way back putting the machine back together with a new LCD from iFixIt. Unfortunately the LCD was DOA. I tried the old broken LCD (it was cracked, but showed some graphics, so I know it worked as it should). Because the repair job was a rush job, I had to get a new LCD from elsewhere and completed it the first time. Needless to say, doing this guide 6 times I learned a lot about this little guy. Bad LCD purchase, but I think I'd still buy from iFixIt again--we just had bad luck with one part here.
-


To reassemble your device, follow these instructions in reverse order.
To reassemble your device, follow these instructions in reverse order.
Cancel: I did not complete this guide.
122 other people completed this guide.

One Comment
Fantastic directions!!! Saved me hundreds and gave new life to Macbook. Thanks!
This is a difficult project. It is imperative that you read the entire guide before you proceed. Have a system in place to keep track of the screws so you know what goes where. Budget several hours for this.
jonathan55 - Reply
I found this to be the easiest upgrade I have ever done. New HDD and memory in ten minutes, start to finish. The hardest part was getting the #8 Torx screwdriver. Booted from the OSX disk, formatted the drive, (use the GUID scheme) and we're screaming along.
This is a great guide.
steve52 - Reply
Brilliant guide from you guys. I tackled a cd drive replacement on my Dad's MacBook a little while ago, but my skills were really tested when I accidentally stood on my laptop - new LCD needed. A visit to Ebay (don't forget duties when importing!), and this LCD Display replacement guide are all I needed. Yes it took a while (2-3 hours), but as long as you remember you need to do everything backwards then it's straightforward. I wouldn't have known where to start without this guide so thanks for creating them.
Laurence
lglew - Reply
The guide is fantastic and the Airport Extreme Card upgrade took me less than an hour to complete. It wasn't very difficult. Some pointers: read the entire guide before undertaking the project; keep the screws from each step separated in labeled containers; buy a spludger if you don't already have one; keep a tweezer handy for the tiny screws; and take your time separating the keyboard from the computer so as to not crack/break the plastic bezel.
bvancott - Reply
Nonsense! Even a non-technical person could follow this guide and do the job in 15 minutes. Anyone who's done any work on any kind of computer will be able to do this in 5-10 minutes.
eflyguy - Reply
i agree, me and my friend (both) 14, took this underway to clean out the inside of my computer for recreational purposes, piece of cake!
keeganmerom - Reply
This nontechnical person took about two hours to get the optical drive out and stripped down enough to take it apart and look for fragments of a CD. and then reassemble it. I'm sure other people are faster than me, they usually are, but newbees should set aside the time just in case. Also, jonathan55 is right about those screws, keep track of them and the other in which they come out as there are several different lengths.
adamorth - Reply
Umm, that's the ORDER in which they came out. Sheesh.
adamorth - Reply
Great guide. Very easy to follow. I put in a replacement hard drive in less than 30 minutes.
prax5487 - Reply
Extremely useful guide. Just replaced the topcase/trackpad/keyboard assembly in ~15 minutes. I've had a moderate amount of previous experience with computer repairs, but even so, anyone should be able to do this project successfully.
snharris - Reply
The replacement takes about 10 minutes from start to finish. The longest part is the OS Backup/Restore...
BTW, you might want to know before you begin: if you have a similar size backup hard drive that you originally have in your computer, you should "Restore" the contents of the original hard drive onto it before starting this manual, using the Disk Utility. (Yes it's called Restore. You restore the original to the backup. lol.)
Your other alternative is to get an external enclosure for your SATA Laptop hard drive that has a Firewire port on it.
After the swap, you connect either the backup drive or the original drive in the external enclosure using Firewire, then boot while pressing the Option key. The backup drive will show up (possibly as the only boot option.) (In fact, now that I think about it, you might not even have to press the Option key, since the external drive should be the only boot option unless there is something in your DVD drive...)
Boot to the backup drive, then "Restore" its contents to the new internal hard drive using the Disk Utility. You should be set with your original OS, settings, etc.
Gyuri Ordody - Reply
Overall I'd say this was easy if you've taken apart any computer-like device before. Total time was a little less than hour for me, and the most difficult part was getting all of the tiny screws back in; fan installation was a breeze.
paul46 - Reply
There is a simpler way of installing the operating system than described in the notes. First do a time machine backup to a new external drive. This will force a total back-up and prevent problems of restoring everything as it was. Follow steps 1-8. Instead of quitting disk utility as described in step 9, go back into disk utility menu and on the very last line you will see the option to restore the operating system and all its files via the time machine option. It was a breeze, and I did not have to deal with steps 10-28
newsletter68 - Reply
I am so grateful for this website! This is the first time I have opened a computer and the instillation is now done, 45 minutes later.
The key, as many others have written is the organization of the screws. It was very helpful for me to print out the individual pictures of the steps to follow. I then laid the screws, as I took them out, on the printed pictures that I placed on a table.
The key is a little mindfulness...relax... and it is fun! Enjoy!
juztino - Reply
This is a terrific guide. Thank you very much for providing it.
Some of the screws may be different sizes in different 'books. Keeping them separated, or measuring as you remove them, helps. Also, a few of the rubber spacers, etc are not the same in mine as in the photos, and some connectors also differ. I found it helpful to take notes at each Step when they differed from the picture. A guitar pick helps when trying to get the top case free.
RichR - Reply
Not quite sure what this guy is smoking, but he didn't share with the class. The hard drive replacement takes less than 5 minutes and is absolutely within the ability of anyone over the age of 7.
paul9 - Reply
I'm not a super techy guy, but this as much easier than I expected it to be. Just make sure you've got the Torx and mini-screw drivers handy.
BillB - Reply
The instructions were excellent and the job of removing & replacing the hard-drive went like clockwork. A novice could handle this task easily with modest mechanical skills. Someone previously suggested putting aside several hours to do this..... I disagree as I replaced the HD & both RAM chips in approx. 10 minutes & I was pacing myself. As far as hardware is concerned, I found a total of 7 screws to deal with! You don't have to be too anal to keep track of 7 screws especially when 3 of them are captive in the memory cover. Unless you are mechanically inept, go ahead and do this simple job!
RAIB - Reply
Several HOURS?!? It took me 10 minutes.
Scott - Reply
I just finished this installation, and it went very smoothly. Your instructions were excellent, as were your step-by-step pictures. I couldn't be happier....I saved alot of money because of IFixit, and really appreciate it!
Amy - Reply
Muchas Grazias, i did the steps to replug the isight cable. And its working again. Maybe doing all the steps was a bit overdressed for my problem. My only tool was a knife. Now only two parts aren´t reassemled: a little screw and a magnet. Thanks a lot again, the camera is working again!
seb - Reply
This was an easy installation. I am NOT a tech type, just a mom who wants a better hard drive.
I installed the new hard drive into the MacBook and moved the old hard drive into the new housing in less time than it took my husband to put the baby to bed. Yeah, his bedtime routine with her takes longer than mine, but it's still less than half an hour.
I just cleared off part of the dining room table, put down a towel to keep all the parts from rolling around and followed the step-by-step directions provided here. Sooo easy. Almost too easy.
I look forward to my next MacBook repair, and I will absolutely come back to ifixit.com to get the parts and learn how to do it. I'll be here for support on my iPhone and iPods, too.
momside - Reply
Just did an LCD replacement on a white old model MacBook. Followed this guide to a the letter. IT WORKS! I'm commenting on my fixed mac now. Excellent guide. Things I would suggest are to read through everything first and keep a note of screws labeling etc. you'll be grateful on the return trip. Also watch the routing of the cables when working on the lcd housing and right hand side of the lower laptop. Not only have I fixed my problem. I've realized that customizing macs and doing your own repairs is relatively straight forward if you follow instructions.
This website really empowers the apple product user. Shop around for parts, ebay is a good place to start. I got my screen for £65 (UK).
Final word take your time and if you are replacing LCD screens expect it to take up to 6 hours.
Also if you are replacing Samsung LCD screen it has a test port (on left back) which most replacements do not. Don't worry about it, it is nothing to do with a Mac.
thanks again ifixit.com!
alex Bayly - Reply
Best way I've found to keep track of the screws is to use an ice cube tray. Just make sure you don't knock it over by mistake ;P
maccentric - Reply
thursday: made the order on ifixit.com for ldc, spudger, size 0 screwdriver.
monday: items delivered to my place in NY.
monday night: new LCD installed.
thank you ifixit. parts ordered were perfect LCD crisper than the original one. spudger came in handy. this manual was spot on.
thanks again.
-j
NY, NY.
jose - Reply
The instructions were more than helpful. Very well written. I just need to be better about following them. It was a easy process, it took me about 20 minutes all together. The only thing I ran across it was putting the keyboard back in place. Make sure it's all line up before you start putting screws back in place.
pdeoliveira - Reply
Thanks a lot for this guide. It would have been much more difficult without knowing what to do.
When I was done, the LCD backlight flickered somewhat occasionally. The owner said that had not happened before. I cleaned the LCD plug by blowing with a straw into it but the flickering still happened. Dunno if this was related to my work.
darsie - Reply
Doe's anybody know if its possible to install a second generation logic board with the core 2 duo in the first generation MacBook?
off course I'm looking to upgrade my first gen MacBook 1,1 using the newer generation MacBook logic board, so may be one of you know whether this process is possible...
Thank you :-)
Dudi - Reply
One note on the fan replacement, or really any MacBook repairs. If you fire your MacBook up and nothing happens but the sleep light is blinking then make sure your memory is seated correctly. I freaked out after installing my new fan but it turns out that all I needed to do was reseat the memory.
jeffbacher - Reply
THANK YOU for that great guideline! I did it step by step with my iPhone next to the workbench and it went well. One hour to open, one hour to close for me as a complete beginner.
annokluss - Reply
Jonathon55 was referring to the whole pram replacement. I tore apart an ibook years ago and it had less steps then this and I am quite technically adept. Going to pay for apple store to replace, not going to waste half a day doing.
Bill Conners - Reply
Thank you for this guide. I appreciate the time you took to photograph this and document it.
Don't take notice of the I did it in 10 minutes brigade, replacing the HDd might take 10 minutes but the other jobs will take longer.
Also those that are dissing the author re screws etc. The screws are different lengths. Take the commentators hint and use an ice cube tray, label it 1, 2, 3, .... and put the screws in there. THe difference if 1-2 mm is enough to have a slightly long screw go through a component and kill it.
Again thanks.
Flugan - Reply
The second time i replace the heat sink glue with new stuff.
Today, my over 10 year old mac is still running like a young rabbit. Maybe this glue replacement was helpful to keep it young.
Keep on running for some more years my friend and big thanx to IFIXIT for all these well-made tutorials!
Fabien - Reply
Most of these comments DO NOT refer to the PRAM Battery Replacement — a process which does take two full hours and requires skill and patience to dismantle the MacBook to get to the point of flipping the logicboard to access (and swap out) the bizarre, old-fashioned battery.
The real question has to be: What is this battery? Specifically, does anyone have a part number/voltage specification for it?
If you know, please post the answer here.
Thank you so much!
Steve Arkwright - Reply