MacBook Pro 13" Unibody Mid 2012 RAM Replacement

MacBook Pro 13" Unibody Mid 2012 RAM Replacement

Andrew Optimus Goldheart

Andrew Optimus Goldheart and 4 other contributors

Last updated on April 2, 2021

15 - 30 minutes
Easy
Featured Guide

Introduction

Go to step 1

Upgrade the RAM in your Mid 2012 MacBook Pro 13" Unibody.

What you need

Fix Kit

This kit contains all the parts and tools needed to complete this guide.

Parts

Tools

  • Phillips #00 Screwdriver
    Phillips #00 Screwdriver
  • Spudger
    Spudger

Show more…

  1. MacBook Pro 13" Unibody Mid 2012 RAM Replacement, Lower Case: step 1, image 1 of 1
    • Remove the following ten screws:

    • Three 14.4 mm Phillips #00 screws

    • Three 3.5 mm Phillips #00 screws

    • Four 3.5 mm shouldered Phillips #00 screws

    • When replacing the small screws, align them perpendicular to the slight curvature of the case (they don't go straight down).

  2. MacBook Pro 13" Unibody Mid 2012 RAM Replacement: step 2, image 1 of 2 MacBook Pro 13" Unibody Mid 2012 RAM Replacement: step 2, image 2 of 2
    • Use your fingers to pry the lower case away from the body of the MacBook near the vent.

    • Remove the lower case.

  3. MacBook Pro 13" Unibody Mid 2012 RAM Replacement, Battery Connection: step 3, image 1 of 2 MacBook Pro 13" Unibody Mid 2012 RAM Replacement, Battery Connection: step 3, image 2 of 2
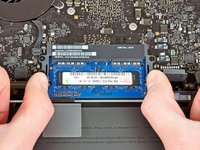
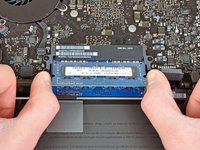
    • Use the edge of a spudger to pry the battery connector upwards from its socket on the logic board.

    • It is useful to pry upward on both short sides of the connector to "walk" it out of its socket. Be careful with the corners of the connectors, they can be easily broken off.

  4. MacBook Pro 13" Unibody Mid 2012 RAM Replacement: step 4, image 1 of 1
    • Bend the battery cable slightly away from its socket on the logic board so it does not accidentally connect itself while you work.

  5. MacBook Pro 13" Unibody Mid 2012 RAM Replacement, RAM: step 5, image 1 of 2 MacBook Pro 13" Unibody Mid 2012 RAM Replacement, RAM: step 5, image 2 of 2
    • Pull the two RAM retaining arms away from the center of the RAM chip.

    • The RAM chip should "pop" up slightly from its socket.

  6. MacBook Pro 13" Unibody Mid 2012 RAM Replacement: step 6, image 1 of 1
    • Pull the RAM stick out of its socket.

    • Repeat this process to remove the second RAM chip.

Conclusion

To reassemble your device, follow these instructions in reverse order.

602 other people completed this guide.

Andrew Optimus Goldheart

Member since: 10/17/09

508,922 Reputation

407 Guides authored

Team

iFixit Member of iFixit

Staff

118 Members

19,547 Guides authored

48 Comments

My mid-2012 2.5 i5 works perfectly with 16 Gb of 1600Mhz DDR3.

nix - Reply

Just replaced my 4GB with 16GB of PNY from Best Buy. AWESOME difference in performance!!

Michael Chandler -

Could you please specify the memory chip that you bought? I need more details in order to get the right one, thanks!

Lin -

Any memory kit that is either validated by Apple or that has the proper channel configuration (9-9-9-24) is okay to use. If you are looking for pure performance RAM, a kit of Corsair Vengeance RAM is okay to use (again, check the channel configuration), but most people will benefit from a kit of Corsair Mac Memory or the kit that iFixit provides in the volume of your choice.

Seji the veggie -

Add Comment

View Statistics:

Past 24 Hours: 35

Past 7 Days: 174

Past 30 Days: 866

All Time: 423,519