Introduction
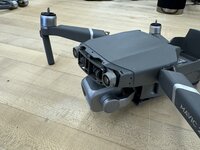
This guide will cover how to replace a broken front arm on the DJI Mavic 2 Pro. Before beginning, you'll need to purchase a replacement arm. There are many different online stores for this. Make sure to get the correct arm. The front left arm is different from the front right arm. The replacement process is virtually identical; thus, this guide can be used for either front arm.
You'll also need a set of allen keys, a screwdriver, and, if possible, a plastic pry tool.
What you need
-
-
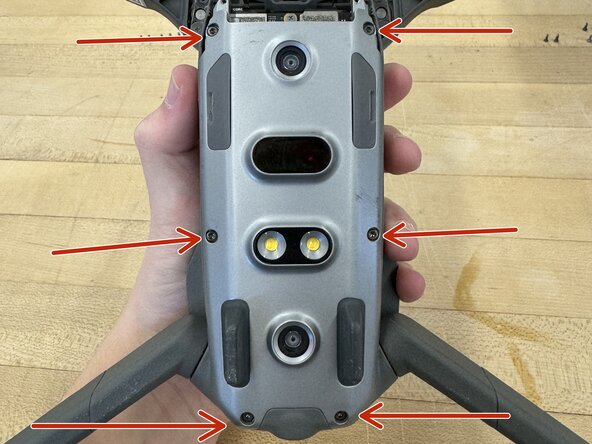
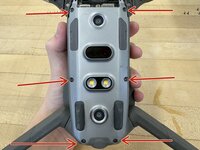
Unscrew and remove these 4 screws.
-
Most of the screws on the Mavic 2 Pro are universal. There are a few unique screws. I will explicitly mention if a screw is unique and should be set aside from the rest. These 4 screws are not unique.
-
-
-
Unscrew and remove these 6 screws.
-
The 2 blue arrows are pointing to unique screws. These two should be set aside in their own pile/container.
-
-
-
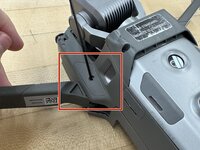
Now you need to remove this front piece. This is done by simply wedging a thin object, preferably a plastic pry tool, into the gap shown. Once you do it on both sides, the entire piece should come off easily with little resistance.
-
If you're struggling, be patient. It is very easy to bend & deform the plastic. Just slowly try to pry it off from different locations.
-
-
-
-
Now you need to remove these plastic coverings on the bottom of the drone. I recommend using a small allen key and inserting it into the screw hole as shown. You should be able to pop the plate off from underneath very easily.
-
Alternatively, you can try to use a plastic pry tool along the edges of the plate. However, I have found this method to be more difficult and far more likely to damage the plastic.
-
After removing the plates, unscrew and remove both of the screws indicated by the arrows.
-
-
-
In my opinion, this is the worst & most difficult part. You need to remove the entire top cover of the drone. This process is very similar to removing the front piece before. Just insert a small object, preferably a plastic pry tool and try to pop it off.
-
I recommend starting at the front of the drone and working your way along the red line shown. Once you reach the back, go back to the front and work your way down the opposite side of the drone.
-
NOTE: Just like before, it is incredibly easy to damage the plastic in this process. Be careful, be patient, take your time. It should have a little bit of resistance, but if you find yourself pushing/pulling as hard as you can; then you're doing something wrong.
-
-
-
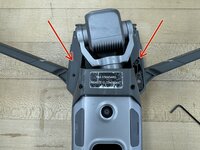
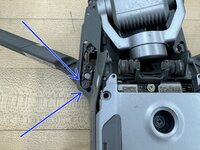
Now you need to remove the screw that holds the front arm in place. This screw is unique and should be set aside from all other screws.
-
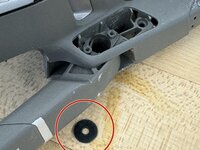
Once you remove the screw, you should be able to pull the arm bearing out (2nd picture). This can be done by wedging something underneath of it and prying up. Alternatively, you can grab it with a pair of needle-nose pliers and pull it out.
-
Once the bearing is removed, the arm should become completely detached (aside from the wires). If you pull it out, you should notice a small rubber washer like the one in the red circle. Do not lose this washer.
-
NOTE: There is 1 of these screws on each side of the drone. You only need to remove the screw corresponding to the arm you are replacing.
-
-
-
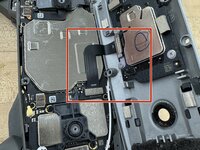
First, remove the plate shown in the 1st image. If you've been following the guide, you should have already removed the screws holding this plate in place.
-
Simply, pull it off of the drone. It should come off relatively easy.
-
With the plate removed, you should see the 6 screws shown in the 2nd image. Unscrew and remove these screws.
-
With the screws removed, the bottom plate should basically just fall off on its own. DO NOT PULL IT OFF. The wire shown in the 3rd image is still attached, if you pull the plate off, you will break it. We do not need to remove the plate entirely so you can just leave it attached.
-
-
-
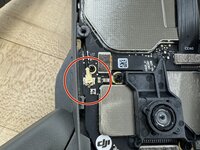
On the bottom of the drone, find the black cable shown in the red circle. If you're removing the front right arm: look for the black cable. If you're removing the front left arm: look for the white cable. Both cables are relatively close to each other.
-
Once you've found the cable corresponding to the arm you're replacing, remove it. I find it easiest to use needle-nose pliers and pull straight upwards on the connector. The cable should come off easily.
-
-
-
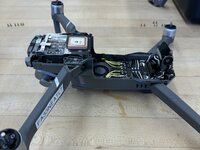
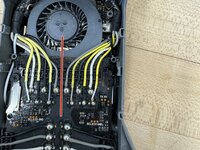
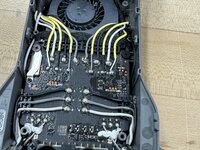
On the top of the drone, you should notice the 12 wires shown in the 1st image. These wires control the front right & left arms. You will need to de-solder the wires corresponding to the arm you are replacing.
-
The red line shown in the image separates the wires into two groups. The wires on the left, power the left arm; the wires on the right, power the right arm.
-
Once you de-solder the wires (and assuming you've disconnected the antenna cable), the arm should be completely removable.
-
-
-
NOTE: Depending on the retailer you purchased your replacement arm from, this step may be entirely unneeded.
-
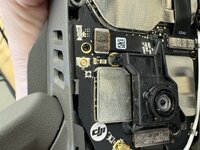
Check your replacement arm. It likely is missing the black plate that screws into the top of the motor. This plate can be transferred from the faulty arm to the new arm by unscrewing the 3 screws shown. If your plate is damaged or unusable, you'll need to purchase a new one.
-
-
-
Now it is time to solder the new arm and reassemble the drone.
-
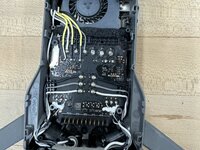
When soldering, pay attention to the colors of the wires. You can use my image as a reference. Alternatively, DJI has printed small letters on the PCB to indicate which wire goes where. All of the wires are unique in color so it should be easy to distinguish between them.
-
Don't forget to reconnect the antenna cable. It should be easy. Just put the cable back through the same hole it came out of; then press the connector into place. It should be secure and completely flat when seated correctly.
-
At this point, you should be done. You can completely re-assemble the drone. However, I recommend testing it prior to re-assembly. This can be done by just inserting a battery into the connector as shown in the 2nd image. Once it is inserted, ensure no propellers are attached; then arm the drone and run the motors.
-
If you get an error code: it is most likely due to your soldering. Double check that your solders are good, wires are where they are supposed to be, no 2 solders are touching, etc.
-


To reassemble your device, follow these instructions in reverse order.
To reassemble your device, follow these instructions in reverse order.