Dexter 800W Corded Angle Grinder - 800AG2-125.5 Carbon Replacement

What you need

  1. Dexter 800W Corded Angle Grinder - 800AG2-125.5 Carbon Replacement, Unplug: step 1, image 1 of 1
    • Before you begin, remember to disconnect the mains plug.

  2. Dexter 800W Corded Angle Grinder - 800AG2-125.5 Carbon Replacement: step 2, image 1 of 2 Dexter 800W Corded Angle Grinder - 800AG2-125.5 Carbon Replacement: step 2, image 2 of 2
    • Remove the side handle and the protective cover.

  3. Dexter 800W Corded Angle Grinder - 800AG2-125.5 Carbon Replacement: step 3, image 1 of 2 Dexter 800W Corded Angle Grinder - 800AG2-125.5 Carbon Replacement: step 3, image 2 of 2
    • Unscrew the 4 screws to open the machine.

  4. Dexter 800W Corded Angle Grinder - 800AG2-125.5 Carbon Replacement: step 4, image 1 of 1
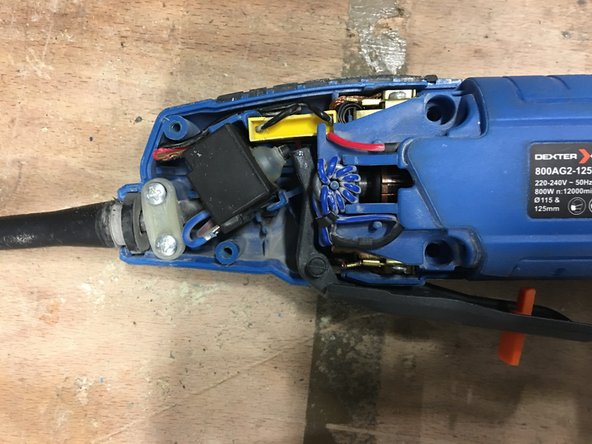
    • Remove the paddle switch for better access.

    • Remove the two pods.

    • Relax the blade springs.

    • Take out the carbons.

  5. Dexter 800W Corded Angle Grinder - 800AG2-125.5 Carbon Replacement: step 8, image 1 of 2 Dexter 800W Corded Angle Grinder - 800AG2-125.5 Carbon Replacement: step 8, image 2 of 2
    • Replace the new carbons.

    • Pay attention to the direction: the cable coming out of the carbon must be on the side of the head of the device and not towards the power cable.

  6. Dexter 800W Corded Angle Grinder - 800AG2-125.5 Carbon Replacement: step 9, image 1 of 3 Dexter 800W Corded Angle Grinder - 800AG2-125.5 Carbon Replacement: step 9, image 2 of 3 Dexter 800W Corded Angle Grinder - 800AG2-125.5 Carbon Replacement: step 9, image 3 of 3
    • Reconnect the carbons.

  7. Dexter 800W Corded Angle Grinder - 800AG2-125.5 Carbon Replacement: step 10, image 1 of 1
    • Replace the paddle switch.

  8. Dexter 800W Corded Angle Grinder - 800AG2-125.5 Carbon Replacement: step 11, image 1 of 1
    • Tighten the 4 screws to close.

  9. Dexter 800W Corded Angle Grinder - 800AG2-125.5 Carbon Replacement: step 12, image 1 of 2 Dexter 800W Corded Angle Grinder - 800AG2-125.5 Carbon Replacement: step 12, image 2 of 2
    • Replace the outer flange, protective cover and side handle.

Conclusion

by the end of the guide you will have replaced the carbon in your device

One other person completed this guide.

Special thanks to these translators:

fr en

100%

HelloMacOS is helping us fix the world! Want to contribute?
Start translating ›

Céline Chemineau

Member since: 01/29/20

16,698 Reputation

95 Guides authored

Team

Leroy Merlin Member of Leroy Merlin

Community

38 Members

241 Guides authored

0 Comments

Add Comment

View Statistics:

Past 24 Hours: 8

Past 7 Days: 36

Past 30 Days: 99

All Time: 1,209