
Motorola Edge Earpiece Speaker Replacement

Introduction
Go to step 1Follow this guide to remove and replace the earpiece speaker on a Motorola Edge.
Before you begin, download the Rescue and Smart Assistant app to backup your device and diagnose whether your problem is software or hardware related.
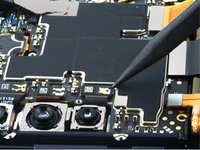
The cameras attached to the motherboard can be removed in any order.
For your safety, discharge the battery below 25% before disassembling your phone. This reduces the risk of fire if the battery is accidentally damaged during the repair. If your battery is swollen, take appropriate precautions.
What you need
Parts

Tools


Show more…
-
-
Insert a SIM eject tool or SIM eject bit into the small hole in the SIM card tray.
-
Press to eject the tray.
-
-
-
Heat an iOpener, then apply it along the bottom edge of the back cover for two minutes.
-
-
-
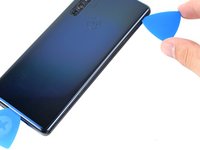
Apply a suction cup to the back of the phone, as close to the center of the bottom edge as possible.
-
Pull up on the suction cup with strong, steady force to create a gap between the back cover and the frame.
-
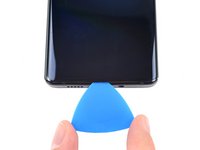
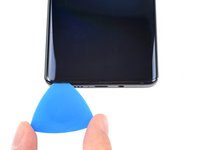
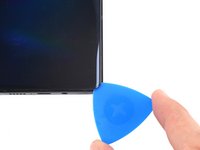
Insert an opening pick into the gap.
-
-
-
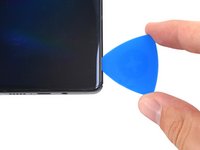
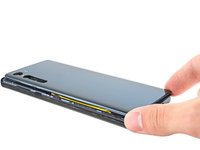
Slide the pick back and forth along the bottom edge to slice through the adhesive.
-
Leave the pick in to prevent the adhesive from resealing.
-
-
-
Apply a heated iOpener to the back cover's right edge for two minutes.
-
-
-
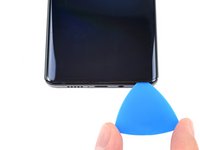
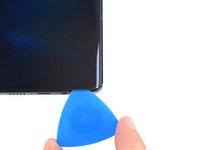
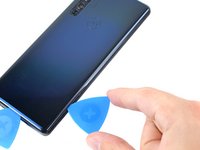
Rotate the opening pick around the bottom-right corner of the phone.
-
-
-
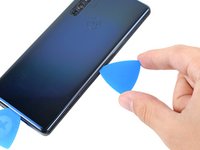
Insert a new opening pick into the gap you just created.
-
Slide the pick along the right edge of the phone to separate the adhesive.
-
Repeat the heating, slicing, and leaving opening picks for the remaining edges of the device.
-
-
-
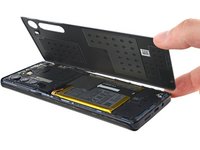
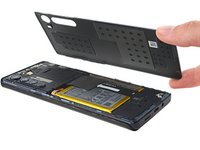
Remove the back cover, taking care not to damage the components inside the phone.
-
-
-
Use a T5 Torx screwdriver to remove the twelve 3.4 mm-long screws securing the motherboard cover.
-
-
Tool used on this step:Tweezers$4.99
-
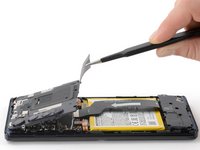
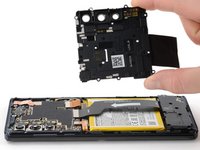
Use a pair of blunt tweezers or your fingers to lift up and remove the motherboard cover.
-
-
-
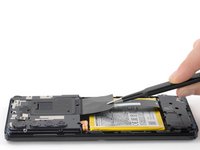
Use a spudger to pry up and disconnect the battery cable's press connector from the motherboard.
-
-
-
Use a spudger to pry up and disconnect the interconnect cable's press connector from the motherboard.
-
-
-
Use a spudger to pry up and disconnect the screen ribbon cable's press connector from the motherboard.
-
-
Tool used on this step:Tweezers$4.99
-
Use a pair of blunt tweezers to peel up and remove the copper tape covering the front camera ribbon cable.
-
-
-
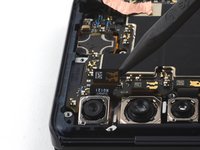
Use a spudger to pry up the front camera cable's press connector and disconnect it from the motherboard.
-
Remove the front camera.
-
-
-
Use a spudger to pry up the wide angle camera cable's press connector and disconnect it from the motherboard.
-
Remove the wide angle camera.
-
-
-
Use a spudger to pry up the main camera cable's press connector and disconnect it from the motherboard.
-
Remove the main camera.
-
-
-
Use a spudger to pry up and disconnect the telephoto camera cable's press connector from the motherboard.
-
Remove the telephoto camera.
-
-
-
Use a spudger to pry up the black coaxial cable and detach it from the motherboard.
-
-
-
Use a spudger to pry up the white coaxial cable and detach it from the motherboard.
-
-
-
Apply a drop or two of isopropyl alcohol to weaken the adhesive securing the earpiece speaker.
-
Wait thirty seconds for the isopropyl alcohol to weaken the adhesive.
-
-
-
Use an opening pick to disconnect the earpiece speaker cable from the midframe.
-
-
-
Pry at the edge of the earpiece speaker with a spudger to detach it from the frame.
-


To reassemble your device, follow these instructions in reverse order.
For optimal performance, calibrate your newly installed battery after completing this guide.
Take your e-waste to an R2 or e-Stewards certified recycler.
Repair didn’t go as planned? Try some basic troubleshooting, or ask our Answers Community for help.
Compare your new replacement part to the original part—you may need to transfer remaining components or remove adhesive backings from the new part before you install it.
