Introduction
The Motorola Moto G7 Plus (model XT1965) features a 3000 mAh Li-Ion battery. If a user has had the phone for a long time, the phone will lose its charge at a much faster rate than when it was new and the battery may need to be replaced. If troubleshooting doesn’t work, use this guide to remove the battery from the Motorola Moto G7 Plus. This guide shows you how to remove the battery with a prerequisite for taking out the screen. Before beginning the repair, make sure the device is turned off, disconnected from any external power sources and discharged to 25% of the device’s battery life for safety. Gather the suggested tools listed below and a new Motorola Moto G7 Plus battery. Heating is optional, but makes adhesive removal easier.
Before you begin, download the Rescue and Smart Assistant app to backup your device and diagnose whether your problem is software or hardware related.
What you need
-
-
Insert an opening tool pick under the screen, starting at the top of the phone.
-
Slide the pick around the entire perimeter of the display to break the adhesive.
-
Once enough adhesive has been removed, you should be able to separate the screen by gently lifting it from the left side of the phone.
-
-
-
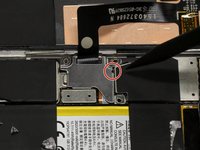
Remove the three 2.7 mm screws that surround the base of the display cable using the Torx T5 screwdriver.
-
Gently remove the metal piece that covers the base of the display cable.
-
-
-
-
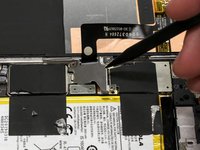
Underneath this metal piece is the base of the cable. Use a spudger to vertically lift the connection out of its port.
-
-
Tool used on this step:Halberd Spudger$2.99
-
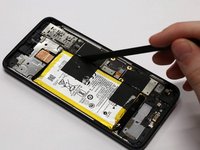
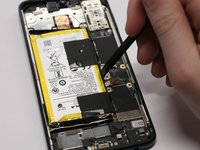
Use the blade end of a Halberd Spudger to cut through the two strips of black tape attached to the battery.
-
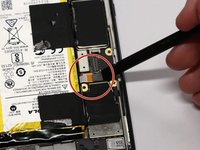
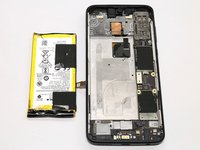
Use the flat end of a spudger to disconnect the battery from the phone.
-


To reassemble your device, follow these instructions in reverse order.
To reassemble your device, follow these instructions in reverse order.
Cancel: I did not complete this guide.
15 other people completed this guide.

Team

Cal Poly, Team S22-G5, Regan Winter 2020 Member of Cal Poly, Team S22-G5, Regan Winter 2020
CPSU-REGAN-W20S22G5
5 Members
19 Guides authored
4 Comments
Went as smoothly as possible, thanks very much. Only the glue under the battery was a serious pain in the butt.
Followed the steps, and now my phone is working again. Thanks for the guide.