Introduction
Your New Nintendo 2DS XL may need to have its motherboard replaced at some point in its life. This guide aims to provide step by step instructions on how to safely and effectively replace the motherboard. Before working on your New Nintendo 2DS XL, make sure the AC adapter is disconnected from the New Nintendo 2DS XL and that it is completely powered off.
What you need
-
-
Before starting the disassembly, remove
-
The stylus
-
Any game cartridge
-
The SD card
-
-
-
Unscrew the four 6mm tri-point screws located at the four corners of the bottom panel.
-
-
-
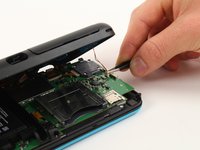
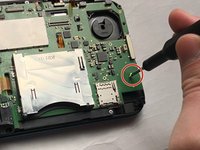
Using a spudger, separate the back panel from the front casing by gently prying around the panel.
-
There are many clips along the hinge of the case, so it is recommended to work your way along one short side and the two long sides before finishing the last short side.
-
-
-
-
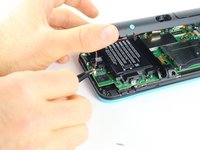
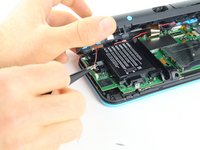
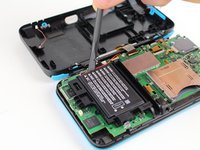
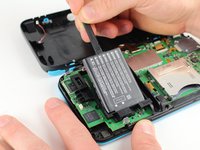
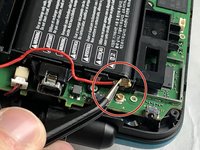
Using a spudger, lift out the battery.
-
Be aware that there is a sticky pad holding the battery into its tray. It may be necessary to use multiple tools to gently pry the battery away from the tray and motherboard.
-
-
Tool used on this step:Tweezers$4.99
-
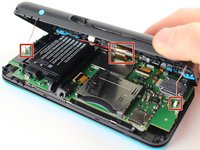
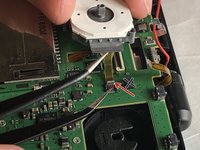
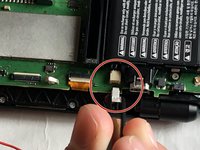
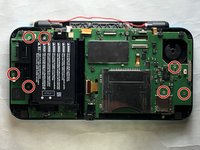
There are 8 ribbon cables that need to be removed as shown in the picture.
-
For the remaining 6 (in red), use a pair of tweezers to flip the latches up and pull the ribbon cable out.
-
Note that the second picture shows a broken ribbon connector next to the joystick ribbon connector (to the right of the red arrow). Do not attempt to unlatch this connector as shown in the picture!
-


To reassemble your device, follow these instructions in reverse order.
To reassemble your device, follow these instructions in reverse order.
Cancel: I did not complete this guide.
12 other people completed this guide.
Team

IUPUI, Team S1-G4, Harley Fall 2019 Member of IUPUI, Team S1-G4, Harley Fall 2019
IUPUI-HARLEY-F19S1G4
3 Members
8 Guides authored
6 Comments
On step 6, what is the top left circled connector for?
The screen on the device I am repairing keeping going black and this connector is damaged. (it doesn’t clamp shut)
Can anyone recommend where to buy a replacement board connector?
This doesn’t actually give ALL the tools you need. You can’t use a Tri point screwdriver on the CROSS screws that are in the pictures on the motherboard.
I know this might be a year too late, but the tri point is required for removing the back plate of the system. If you don't have a small philips head laying around your house, idk what to tell ya
Followed on a 2ds having bad input feedback, no major issue. screws on motherboard are cross so you need a small one (most diy nintendo kits have one) and a small clamp (like the one in pictures) is mandatory for the 7 small cables. there is something a bit tricky regarding volume button which is a bit hard to get back in place when you reassemble the console, take care of pushing the inner slider to the most far position for easier mounting.
I opened the friction fit connectors before reading this, but I pushed them back down and now my 2ds won't boot. I even tried holding them down to make contact but it still just flashes the backlight and shuts off...