
Nvidia Shield Pro Android TV Fan/Heat Sink Replacement
Introduction
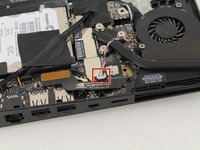
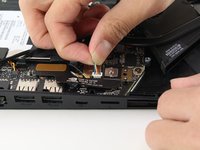
Go to step 1If your Nvidia Shield Pro Android TV is overheating, or you begin to hear a loud clicking noise when launching and using your device, use this guide to remove and replace your fan/heat sink. All you will need is a T6 Torx screwdriver and a plastic opening tool. You will not need to perform any difficult steps, but carefully detach the multi-colored wire.
What you need


-
-
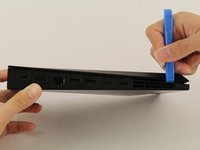
Flip to the back side of your Nvidia Shield Pro Android TV.
-
To open the bottom cover of the Nvidia Shield, start from the corner and slide your plastic opening tool across the gap.
-
If using a plastic opening tool to open the bottom cover is difficult, try using a metal spudger.
-


To reassemble your device, follow these instructions in reverse order.
To reassemble your device, follow these instructions in reverse order.
Cancel: I did not complete this guide.
2 other people completed this guide.
Team

Cal Poly, Team S18-G2, White Winter 2020 Member of Cal Poly, Team S18-G2, White Winter 2020
CPSU-WHITE-W20S18G2
4 Members
12 Guides authored
4 Comments
Hello can you tell me where to buy the fan and the plastic case opener?
This is the 500GB 2015 version they're showing.
I have the Shield TV Pro Model: P2897 (2019 version)-> The latest model, even though it's 7 years old as of 2/1/25.
The pictures shown here looks nothing like the model I have.
You would think that even though these instructions provide detailed information on how to replace the abnormally noisy Fan that they would include information on what MODEL they're using here, unbelievable.