Optical Drive Enclosure Faceplate

Optical Drive Enclosure Faceplate

Brittany McCrigler

Brittany McCrigler and 6 other contributors

Last updated on January 9, 2023

No estimate
Moderate
Prerequisite Only
This guide is only intended to be used as a prerequisite for other guides. It's incomplete by itself.

Introduction

Go to step 1

Pre-req for removing the faceplate from Optical Bay Enclosures #78, 79, 80

What you need

Tools

  1. Optical Drive Enclosure Faceplate, Optical Drive Enclosure Faceplate: step 1, image 1 of 1
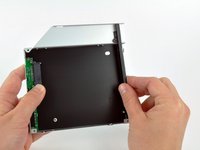
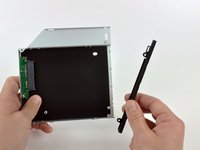
    • Remove the three 3.0 mm Phillips screws from the optical bay enclosure.

  2. Optical Drive Enclosure Faceplate: step 2, image 1 of 3 Optical Drive Enclosure Faceplate: step 2, image 2 of 3 Optical Drive Enclosure Faceplate: step 2, image 3 of 3
    • Starting from the left edge, gently pull open the optical bay enclosure.

    • Continue to pull open the two halves of the enclosure until they separate.

  3. Optical Drive Enclosure Faceplate: step 3, image 1 of 1
    • Remove the two 3.0 mm Phillips screws securing the faceplate to the optical bay enclosure.

  4. Optical Drive Enclosure Faceplate: step 4, image 1 of 3 Optical Drive Enclosure Faceplate: step 4, image 2 of 3 Optical Drive Enclosure Faceplate: step 4, image 3 of 3
    • Lift the black plastic faceplate out of the optical bay enclosure.

    • You will no longer need the faceplate or the two Phillips screws that held it in place. Set those parts aside if you ever wish to put the faceplate back into the enclosure.

    • Reassemble the optical bay enclosure without the faceplate, reusing the original three 3.0 mm Phillips screws to keep it intact.

Conclusion

To reassemble your device, follow these instructions in reverse order.

Brittany McCrigler

Member since: 03/05/12

89,745 Reputation

142 Guides authored

Team

iFixit Member of iFixit

Staff

118 Members

19,455 Guides authored

0 Comments

Add Comment

View Statistics:

Past 24 Hours: 0

Past 7 Days: 6

Past 30 Days: 11

All Time: 749