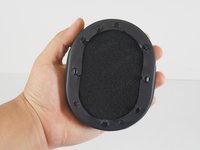
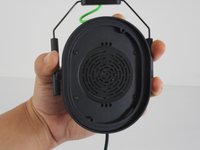
Razer BlackShark V2 Ear Cushion Replacement

What you need

  1. Razer BlackShark V2 Ear Cushion Replacement, Ear Cushion: step 1, image 1 of 1
    • Place the headset so that the left side is facing you.

    • The left side of the headset has the cable attachment and the volume control knob.

  2. Razer BlackShark V2 Ear Cushion Replacement: step 2, image 1 of 1
    • Scoop your middle and ring finger underneath the top or bottom inner portion of the ear cushion.

    • You should feel a hard plastic ridge.

    • Pull from the hard plastic ridge, being sure not to pull from the soft cushion.

    • Slowly apply pressure to prevent damage.

  3. Razer BlackShark V2 Ear Cushion Replacement: step 3, image 1 of 1
    • Pull from the hard plastic ridge, being sure not to pull from the soft cushion.

    • Slowly apply pressure to prevent damage.

  4. Razer BlackShark V2 Ear Cushion Replacement: step 4, image 1 of 2 Razer BlackShark V2 Ear Cushion Replacement: step 4, image 2 of 2
    • Once the cushion is removed, make sure the hard plastic base with the clips is attached to it.

    • If you are replacing both ear cushions, repeat Steps 1-4 for the other side. Then, insert the new ear cushions by lining up the clips in their respective holes and applying even pressure until they audibly click.

Finish Line

2 other people completed this guide.

2 Comments

Thanks - this was very helpful. It was difficult to remove the retainer clip using my fingers - I found it much easier to use the back of a spoon (with a rounded edge) and getting more leverage that way.

Peter Gu - Reply

can someone pls tell me what's the size or mm of the foam?

Lorraine Corda - Reply

Add Comment

View Statistics:

Past 24 Hours: 7

Past 7 Days: 31

Past 30 Days: 134

All Time: 3,235