
Samsung Galaxy A11 Fingerprint Sensor Replacement

What you need

  1. Samsung Galaxy A11 Fingerprint Sensor Replacement, Back Cover: step 1, image 1 of 3 Samsung Galaxy A11 Fingerprint Sensor Replacement, Back Cover: step 1, image 2 of 3 Samsung Galaxy A11 Fingerprint Sensor Replacement, Back Cover: step 1, image 3 of 3
    • Place the SIM eject tool in the hole of the sim tray.

    • Push until part of the SIM tray is pushed out.

    • Pull out the rest of the SIM tray.

  2. Samsung Galaxy A11 Fingerprint Sensor Replacement: step 2, image 1 of 3 Samsung Galaxy A11 Fingerprint Sensor Replacement: step 2, image 2 of 3 Samsung Galaxy A11 Fingerprint Sensor Replacement: step 2, image 3 of 3
    • Gently pry open the area of the back cover near the SIM tray using an iFixit opening pick.

    • Gently move the pick along the gap and pry open the clips holding it together.

    • If possible, use multiple picks to prevent the back cover from closing.

  3. Samsung Galaxy A11 Fingerprint Sensor Replacement: step 3, image 1 of 3 Samsung Galaxy A11 Fingerprint Sensor Replacement: step 3, image 2 of 3 Samsung Galaxy A11 Fingerprint Sensor Replacement: step 3, image 3 of 3
    • Using a hair dryer on low heat, heat the fingerprint sensor in increments of 30 seconds to loosen the surrounding adhesive.

    • Gently push the fingerprint sensor until it detaches from the back cover.

    • If needed, remove the button by prying it from the bottom of the device.

  4. Samsung Galaxy A11 Fingerprint Sensor Replacement, Battery: step 4, image 1 of 3 Samsung Galaxy A11 Fingerprint Sensor Replacement, Battery: step 4, image 2 of 3 Samsung Galaxy A11 Fingerprint Sensor Replacement, Battery: step 4, image 3 of 3
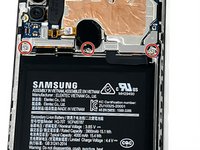
    • Remove the three 3 mm screws from the shield using a Phillips #000 screwdriver.

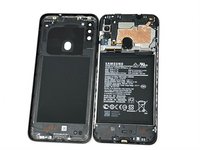
    • Remove the shield from the phone.

  5. Samsung Galaxy A11 Fingerprint Sensor Replacement: step 5, image 1 of 3 Samsung Galaxy A11 Fingerprint Sensor Replacement: step 5, image 2 of 3 Samsung Galaxy A11 Fingerprint Sensor Replacement: step 5, image 3 of 3
    • Using tweezers, a spudger, or your fingers, disconnect the battery press connector from the phone.

  6. Samsung Galaxy A11 Fingerprint Sensor Replacement: step 6, image 1 of 3 Samsung Galaxy A11 Fingerprint Sensor Replacement: step 6, image 2 of 3 Samsung Galaxy A11 Fingerprint Sensor Replacement: step 6, image 3 of 3
    • If needed, use a hairdryer on low heat to soften the adhesive under the battery.

    • Use an iFixit pry tool to dig under the battery edge.

    • If needed, use multiple pry tools to hold the battery in place.

    • Continue to cut the adhesive under the battery until you are able to pry the battery away from the phone.

    • Remove the battery from the phone.

  7. Samsung Galaxy A11 Fingerprint Sensor Replacement, Fingerprint Sensor: step 7, image 1 of 3 Samsung Galaxy A11 Fingerprint Sensor Replacement, Fingerprint Sensor: step 7, image 2 of 3 Samsung Galaxy A11 Fingerprint Sensor Replacement, Fingerprint Sensor: step 7, image 3 of 3
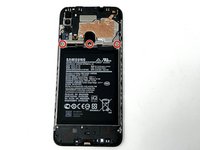
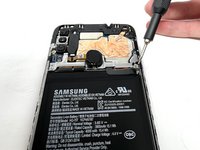
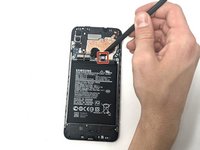
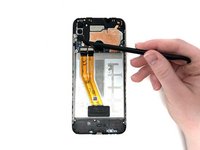
    • Using a spudger, detach the ribbon cable connected to the fingerprint sensor.

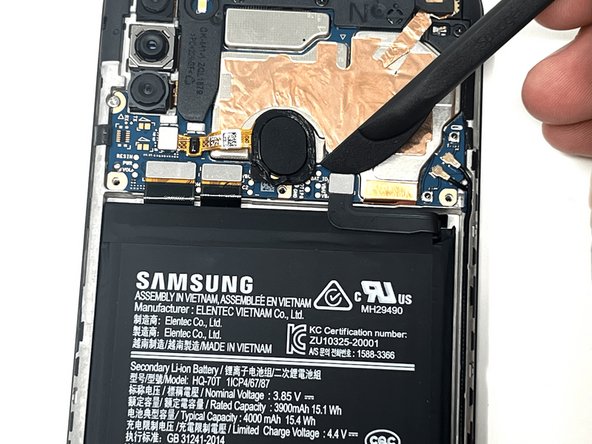
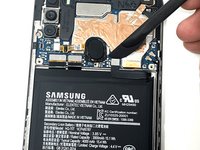
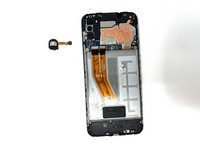
    • Remove the fingerprint sensor from the device.
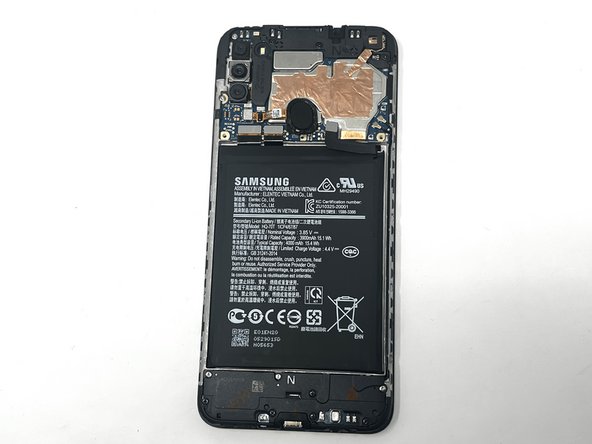
Conclusion

To reassemble your device, follow these instructions in reverse order.

Kristen Gismondi

Member since: 11/12/14

91,808 Reputation

241 Guides authored

Team

iFixit Member of iFixit

Staff

118 Members

19,409 Guides authored

0 Comments

Add Comment

View Statistics:

Past 24 Hours: 1

Past 7 Days: 4

Past 30 Days: 14

All Time: 50