
Samsung Galaxy Note 3 Display Assembly Replacement
Introduction
Go to step 1This guide shows how to remove everything from the display assembly.
What you need
Parts


Tools


Show more…
-
-
Insert a fingernail or plastic opening tool in the gap between the rear case and the base of the phone.
-
-
-
Slide your fingernail or plastic opening tool along the edge of the rear case.
-
Lift the case gently from the base.
-
-
-
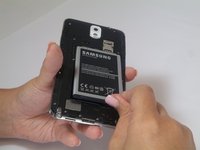
Insert a fingernail or plastic opening tool into the small gap between the battery and the phone base.
-
Lift the battery out of its recess.
-
-
-
Place your fingernail in the groove of the stylus pen.
-
Pull the stylus pen away from the phone.
-
-
-
Insert the plastic opening tool into the Stylus Pen placement holder.
-
Lift the plastic opening tool so that the midframe separates from the base.
-
-
-
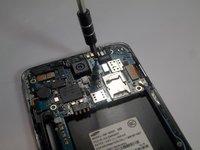
Remove the single screw beside headphone jack.
You can skip this step, it is usseles as this screw doesn’t attach the mother board at all
-
-
Tool used on this step:Tweezers$4.99
-
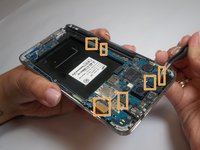
Use tweezers to remove both antenna clips.
-
Use a spudger to disconnect six cable connectors.
-
-
-
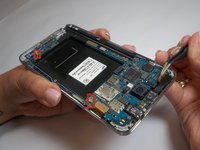
Pull up on the motherboard with tweezers.
My mother board is not working what should I do I can't use Bluetooth, WiFi,hotspot or insert sim
My wifi hotspot is not working
-
-
-
Lift the spudger to separate the jack assembly from the motherboard.
-
Pull to remove.
-
-
-
Remove the metal bracket located in the top left hand corner.
-
-
Tool used on this step:Tweezers$4.99
-
Remove the vibrating motor by pulling up on it carefully with the tweezers.
-
-
-
Lift USB port from the front assembly using the tweezers.
-
-
-
You are now left with the display assembly.
Wonderful description.
-


To reassemble your device, follow these instructions in reverse order.
To reassemble your device, follow these instructions in reverse order.
Cancel: I did not complete this guide.
146 other people completed this guide.
Team

USF Tampa, Team 2-2, Blackwell Fall 2014 Member of USF Tampa, Team 2-2, Blackwell Fall 2014
USFT-BLACKWELL-F14S2G2
4 Members
25 Guides authored
10 Comments
This tutorial is incomplete, for instance the 'vibrator motor' removal does not specifies that this also removes the power button, and the removal of the front camera and light sensor is omitted, and the fact that heating the usb port part is very helpful if not mandatory before lifting it. I followed the video tutorial here which is complete: Samsung Galaxy Note 3 Display Assembly Video Tutorial Replacement
warning :
on the new part (display assembly) don’t forget to remove plastic protection on the radiator of cpu !!
I have successfully replaced the display with a new display, at which point the power button wasn’t working properly because I didn’t install it properly - fixed that, and I have now noticed that the phone will charge with the back plate on, only, however if I screw the back plate in this stops it from charging. What am I doing wrong?