
Samsung Galaxy S23 Ultra Wireless Charging Coil and Loudspeaker Replacement

Prerequisite Only
This guide is only intended to be used as a prerequisite for other guides. It's incomplete by itself.

What you need

  1. Samsung Galaxy S23 Ultra Wireless Charging Coil and Loudspeaker Replacement, Disconnect the NFC antenna and charging coil: step 1, image 1 of 3 Samsung Galaxy S23 Ultra Wireless Charging Coil and Loudspeaker Replacement, Disconnect the NFC antenna and charging coil: step 1, image 2 of 3 Samsung Galaxy S23 Ultra Wireless Charging Coil and Loudspeaker Replacement, Disconnect the NFC antenna and charging coil: step 1, image 3 of 3
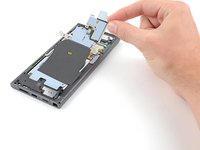
    • Use the pointed end of a spudger to pry up and disconnect the NFC antenna press connector from the motherboard.

    • Repeat for the wireless charging coil press connector.

    • To re-attach press connectors, carefully align and press down on one side until it clicks into place, then repeat on the other side. Don't press down on the middle. If the connector is misaligned, the pins can bend and cause permanent damage.

  2. Samsung Galaxy S23 Ultra Wireless Charging Coil and Loudspeaker Replacement, Separate the coil adhesive: step 2, image 1 of 3 Samsung Galaxy S23 Ultra Wireless Charging Coil and Loudspeaker Replacement, Separate the coil adhesive: step 2, image 2 of 3 Samsung Galaxy S23 Ultra Wireless Charging Coil and Loudspeaker Replacement, Separate the coil adhesive: step 2, image 3 of 3
    • The wireless charging coil is lightly adhered to the battery.

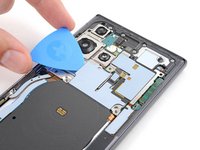
    • Insert an opening pick between the right edge of the wireless charging coil and the battery.

    • Slide the pick along the right edge to separate the adhesive.

  3. Samsung Galaxy S23 Ultra Wireless Charging Coil and Loudspeaker Replacement: step 3, image 1 of 2 Samsung Galaxy S23 Ultra Wireless Charging Coil and Loudspeaker Replacement: step 3, image 2 of 2
    • Insert an opening pick between the top edge of the wireless charging coil and the frame.

    • Slide the pick toward the right edge to separate the remaining adhesive.

  4. Samsung Galaxy S23 Ultra Wireless Charging Coil and Loudspeaker Replacement, Unfasten the NFC antenna and charging coil: step 4, image 1 of 1
    • Use a Phillips screwdriver to remove the five 3.5 mm-long screws securing the NFC antenna and charging coil.

  5. Samsung Galaxy S23 Ultra Wireless Charging Coil and Loudspeaker Replacement, Unfasten the loudspeaker: step 5, image 1 of 1
    • Use a Phillips screwdriver to remove the six 3.5 mm screws securing the loudspeaker.

  6. Samsung Galaxy S23 Ultra Wireless Charging Coil and Loudspeaker Replacement, Unclip the loudspeaker: step 6, image 1 of 2 Samsung Galaxy S23 Ultra Wireless Charging Coil and Loudspeaker Replacement, Unclip the loudspeaker: step 6, image 2 of 2
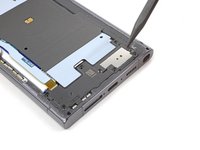
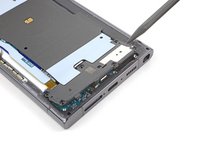
    • Insert the pointed end of your spudger between the upper right corner of the loudspeaker and the frame.

    • Pry up to unclip the loudspeaker from the frame.

    • Don't pry against the battery. Use protrusions in the frame for leverage.

    • During reassembly, press around the perimeter of the loudspeaker to clip it to the frame.

  7. Samsung Galaxy S23 Ultra Wireless Charging Coil and Loudspeaker Replacement, Remove the charging coil and loudspeaker assembly: step 7, image 1 of 3 Samsung Galaxy S23 Ultra Wireless Charging Coil and Loudspeaker Replacement, Remove the charging coil and loudspeaker assembly: step 7, image 2 of 3 Samsung Galaxy S23 Ultra Wireless Charging Coil and Loudspeaker Replacement, Remove the charging coil and loudspeaker assembly: step 7, image 3 of 3
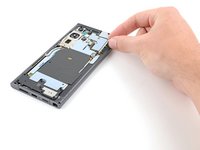
    • Grab and remove the NFC, wireless charging coil, and loudspeaker from the frame.

Conclusion

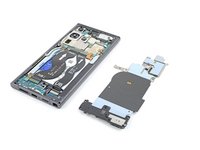
To reassemble your device, follow these instructions in reverse order.

Alex Diaz-Kokaisl

Member since: 01/16/22

127,654 Reputation

592 Guides authored

Team

iFixit Member of iFixit

Staff

141 Members

17,892 Guides authored

0 Comments

Add Comment

View Statistics:

Past 24 Hours: 0

Past 7 Days: 0

Past 30 Days: 4

All Time: 22