Introduction
Follow this guide to replace a dead or low-capacity battery for the Samsung Galaxy S7 Edge.
Note: The curved edge and strong adhesive make the initial opening procedure very challenging. Be patient, repeat multiple heat and pull cycles, and the adhesive will eventually loosen.
Before disassembling your phone, discharge the battery below 25%. A charged lithium-ion battery can catch fire and/or explode if accidentally punctured.
If your battery is swollen, take appropriate precautions. Do not heat your phone. If needed, you can use a dropper or syringe to inject isopropyl alcohol (90+%) around the edges of the back cover to weaken the adhesive. Swollen batteries can be very dangerous, so wear eye protection and exercise due caution, or take it to a professional if you're not sure how to proceed.
What you need
-
-
Heat an iOpener and apply it to a long edge of the phone for about two minutes.
-
-
-
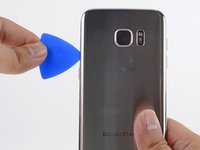
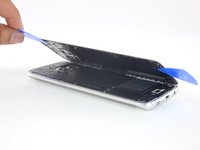
Once the back panel is warm to the touch, apply a suction cup as close to the heated edge of the phone as you can while avoiding the curved edge.
-
Lift on the suction cup and insert an opening pick under the rear glass.
Suction cup does not seem to work.
Makes it sound ridiculously easy, when in reality you have to be pulling with tons of force while also holding the phone down and on top of that you have to insert the pick in a relatively small amount of time.
I was getting no where with the iOpener and picks alone, so I followed a YouTube video and used the iOpener as well as a hairdryer. I had to make the first cut in the ahesive with a utility/razor knife, then as soon as I was through the first part I inserted the plastic picks. The back of the phone has to be too hot to touch, ideally all around, so the iOpener alone is not enough.
Thanks for the above comments. I was also getting nowhere with the iOpener then used a hairdryer on the non-camera end until it was hot to the touch and managed to get a Stanley knife into the gap and lifted enough to get a pick in. Plain sailing from there with patient heating and working the picks in to cut the glue. Eventually success and the back came off.
-
-
-
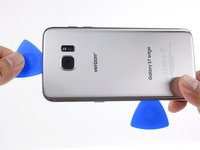
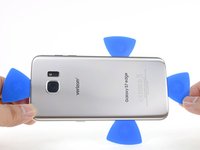
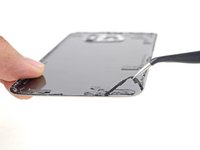
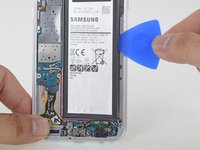
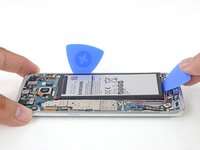
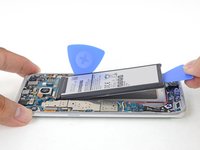
Slide the opening pick up along the side of the phone, separating the adhesive.
-
Leave the pick in place and grab a second pick as you proceed to the next step. Leaving the pick inserted can help prevent the glue you just separated from re-adhering.
This is far easier if you have a thin metal guitar pick. After creating the initial gap, rotate the pick like a saw blade. Use the plastic picks to keep the gap open. Be careful by the volume buttons as you may snag stuff that’s needed for the wireless charging capability. Overall good design by Samsung not so tough to get to the battery on this model.
-
-
-
Tool used on this step:Tweezers$4.99
-
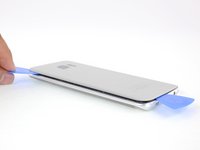
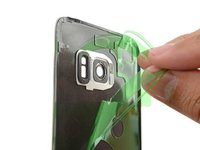
Use tweezers to peel away any remaining adhesive from the phone's chassis. Then clean the adhesion areas with high concentration isopropyl alcohol (at least 90%) and a lint-free cloth to prep the surface for the new adhesive.
-
Peel the adhesive backing off of the new rear glass, carefully line up one edge of the glass against the phone chassis, and firmly press the glass onto the phone.
-
-
-
Remove the twelve 3.5 mm Phillips screws.
So nice having all the screws the same size. No need to keep track just put them all in a pile for later reassembly.
-
-
-
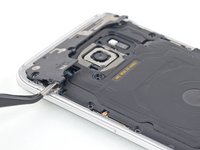
Prepare an iOpener and apply it directly to the battery.
-
Alternatively, apply 1-2 drops of high-concentration (>90%) isopropyl alcohol under each corner of the battery and allow it to penetrate for several minutes to help weaken the adhesive.
-
-
-
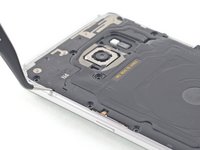
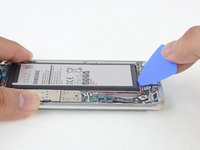
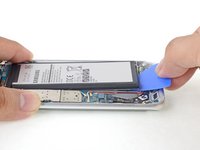
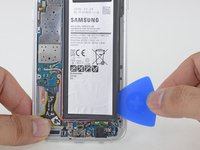
Use an opening pick to pry up the battery from the bottom using firm, constant pressure.
I used propanol to soften the glue and it worked well. Every time I lifeted the battery a bit (you can hear the glue tearing) I added a few more drops of propanol. Be careful, the heat sink is below the centre of the battery, and I scratched mine a bit as I levered against it.
Yep 91% IPA alcohol and heat together make this a lot easier. Also it’s a lot safer as the battery came out without bending. Be sure to NEVER use sharp anything on this step or you may puncture the battery which can then catch fire.
-


To reassemble your device, follow these instructions in reverse order.
After completing this guide, calibrate your newly-installed battery.
To reassemble your device, follow these instructions in reverse order.
After completing this guide, calibrate your newly-installed battery.
Cancel: I did not complete this guide.
133 other people completed this guide.


12 Comments
How.. in the bloody !&&*.. do you use the battery adhesive? Don’t just stop with the removal. Reapplication of the adhesive is an IMPORTANT STEP!
Hi Doug,
I’ve written up a short guide for the battery adhesive. You can find it here. It’s now added into the last step. Hope that helps!
1-2 hours…acturally about 30 mins! excellent tutorial
How do you replace battery with the waterproof feature still possible?
Received the package before the delivery date. Very neatly packed and good instructions. Hopefully, the battery will last a while…
How do you reattached the battery connection? The replacement battery won’t fit. I can snap the old battery back in but the new battery is very loose and keeps popping free.
An important question: if i replaced the S7 Edge battery with the S7 one is there any possible issue? I plan to change it as soon as possible but I want to better understand if there can be any issue with the phone.
I had problems! I came across your post after the repair was complete! You gave more information than the YouTube videos I was using! I struggled removing the battery since it was oversecured with glue! And I kept powering the phone back on by accident pushing the side switch during reassembly! And I got the back of the phone on but not watertight! I feel like I should have used some blue for the back, but didn't have any on hand! But it's together and working! There were better ideas from your article that would have made it less painful for me!
Thank you for a great, clear guide. Great kit from iFixit too including tools and new battery.
The only tricky part was getting the back off. Ditched the iOpener and used a hairdryer (left comment on that section). Once the back was off, took about 30 mins to dismantle, replace the battery and reassemble. Confirmed all working properly then used some B7000 glue to secure the back. Done and phone life extended another few years. Excellent.