
MacBook Pro 13" Unibody Mid 2012 Hard Drive Replacement
Introduction
Go to step 1Use this guide to replace a dead hard drive.
If your new hard drive seems slow or doesn’t work correctly, try replacing the hard drive cable. The cable is a common point of failure that can slow down or prevent data transfer to and from a hard drive. This is commonly found to be an issue with SSDs due to their high read/write speeds.
What you need
Fix Kit
This kit contains all the parts and tools needed to complete this guide.

Parts


Tools


Show more…
Video Overview
-
-
Remove the following ten screws:
-
Three 14.4 mm Phillips #00 screws
-
Three 3.5 mm Phillips #00 screws
-
Four 3.5 mm shouldered Phillips #00 screws
-
-
-
Use the edge of a spudger to pry the battery connector upwards from its socket on the logic board.
-
-
-
Remove the two Phillips screws securing the hard drive bracket to the upper case.
-
-
-
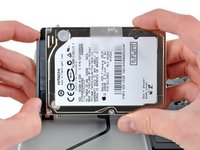
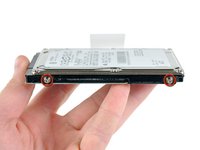
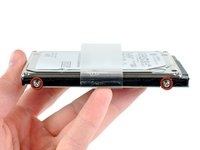
Remove the four 6.0 mm T6 Torx hard drive retaining posts from the sides of the hard drive.
-
Transfer the hard drive retaining posts to your new hard drive.
-


To reassemble your device, follow these instructions in reverse order.
To reassemble your device, follow these instructions in reverse order.
Cancel: I did not complete this guide.
841 other people completed this guide.

44 Comments
In case you need to install/reinstall your OS, the new MBPs no longer come with an install disc. To install your OS you will need to hold down CMD + R while booting up until it chimes. It will then walk you through the process.
After holding command + R during start up I ran into a problem using Time Machine trying to restore all the files in my system. Apparently the Samsung solid state SSD 859 EVO drive I put in first needs to be formatted before Time Machine can even recognize it! No error message appeared, but no destination disk could be located. Apparently that's what happens with an unformatted hard drive. The solution is to select Disk Utilities in the first window seen after pressing command +R. Then In the left sidebar I could see all the drives including the external hard drive with my Time Machine back up and also the Samsung solid state hard drive I installed. With the newly installed hard drive selected, use the default erase and re-formating options and click on ERASE (this will also format the erased drive). This operation was very quick. I then returned to Time Machine and voila, the hard drive was locatable as a destination disk.
To the people that this still doesn’t work, try pressing cmd+alt+R, after connecting to WiFi go to Disk Utilities, format the new hard drive, and then you can proceed to restore or clean install iOS.
I needed to install the OS X in the new HD using a USB (manual in applesfera), then I was surprised when after do all this guide I see a message "Can't verified the copy...." I fixed reinstalling my old HD, and run the old OS, changed the date and time, I change again the HD, but (this is the important) don't pull off the battery connector. If you disconnect the battery, the system lost the date and time and yo can't install the OS X with and USB. I don't test the cmd + R option.