Introduction
The caster wheel of the R75 is the single wheel in the front of the robot that is capable of rotating freely. This is a simple guide on the removal of the wheel for replacement or cleaning. Remember to periodically check the caster wheel for signs of damage and wear. The wheel should be replaced every year or so.
What you need
-
-
-
Using a plastic opening tool, pry first one side of the wheel, then the other out of the caster.
-
Remove the wheel.
Note that you’re using a plastic opening tool, not a screwdriver. Be sure to appropriately identify tools. Proofread all guide text for clarity and end punctuation. For all remaining “remove” steps, if something can be done in multiple ways, then you need to indicate how. Remove is good for screws because there’s only one way to do that. For everything else, use more detail or a stronger verb.
-
-
-
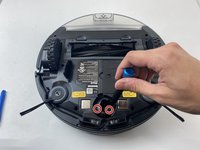
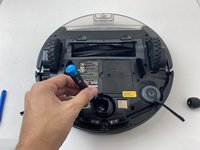
Using a Torx TR9 screwdriver, remove both screws from the caster assembly beneath the wheel.
-
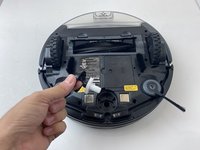
Pull the caster assembly up from its slot in the device.
Hi I have the same model but the screws are not on the outside and there is what appears to be like a ring like part that held the caster assembly in the slot I cant pop the assembly back in and nor does that white part come out can you please help me with that
-


To reassemble your device, follow these instructions in reverse order.
To reassemble your device, follow these instructions in reverse order.
Team

Embry-Riddle Aeronautical University, Team S3-G6, Watkins Spring 2020 Member of Embry-Riddle Aeronautical University, Team S3-G6, Watkins Spring 2020
ERAU-WATKINS-S20S3G6
4 Members
14 Guides authored
One Comment
Thanks, my compliments to your clear, simple instructions. And I love my shark AV2500 self-emptying machine--but when will manufactures realize small buy normal Philips screwheads doesn't cost more than chump change on a unit but make it A WHOLE LOT EASYER ON THEIR CUTOMERS.
This photo is not helpful. Is removing the whole assembly correct procedure, or could it break the device?
Alex Watkins - Reply