Introduction
Because these devices are relatively simple, problems are fairly easy to identify. Take the time however, to learn how to carry out repairs in a good way. Following these two tutorials on function and how they work will maximize your chances for success. In the first and second guides, we look at sources of failure within the base. Then in this third guide, we consider those related to the iron itself.
-
-
The name iron comes from the actual metal that the appliance is made from. The shape of the iron, pointed at its tip, allows you to iron all the corners of the clothes, while its weight smoothes the fabric.
-
The part of the iron that makes direct contact with the fabric is called the "sole (plate)". In order for the iron to be effective, the device needs to be heated. This iron also makes use of a steam system, which makes it possible to moisten the fabric while ironing.
-
Ironing helps loosen the bonds between the long chains of molecules that make up polymer fiber materials. The heat and weight of the iron stretches the fibers while the fabric retains its new shape once it's cooled. Some materials, like cotton, require the use of water to loosen intermolecular bonds.
-
-
-
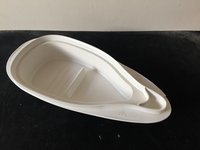
The iron rests on a reservoir with a heat-resistant base.
-
At the front of the water tank, a removable spout serves as a funnel to allow a user to fill the reservoir with water (1.7l)
-
There is a button on the top of the device, which locks the iron to the reservoir base.
-
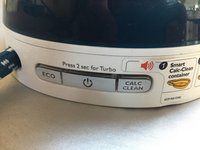
At the rear is a control panel made up of three buttons.
-
-
-
The control panel has three buttons. Middle button = On/Off, Left button = Eco Mode, Right button = Anti-limescale function
-
The middle button: allows the iron to operate with a short press. When the button is pressed a steady blue light comes on. After approximately 2 minutes, the appliance beeps to signal that the selected temperature has been reached and the iron is ready for use.
-
Left button: pressing this button while ironing both decreases the volume of steam and the temperature of the iron.
-
Right button: This functions to help prevent lime deposits. Place the iron on an appropriate container to collect the resultant steam. Then press this button; the iron will generate steam continuously for 2 minutes in Turbo mode.
-
-
-
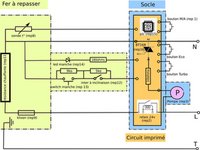
When the Start button is pressed (Ref. 1), a circuit is closed which powers, via a relay (Ref. 2), the resistive heating element placed in the sole or plate of the iron (Ref. 6). When the desired temperature is reached, a beep is heard (after about 2 minutes)
-
After the beep, steam can be produced by pressing the button in the iron's handle (Ref. 5) Thus, a circuit is closed which turns on a pump placed in the frame beneath the water tank. (Ref. 3) This pump, placed between the tank (Ref. 4) and the iron makes water flow from one to the other.
-
The water, reaching the iron's sole through flexible tubing, turns to steam on contact with the heating element. Indeed, the heat (about 130°C-160°C), turns the water to steam which escapes through the holes in the sole. Releasing the button stops both pump and steam.
-
-
-
-
The device is composed of several subassemblies that we will look at seperately. We begin with the water pump.
-
This kind of pump, called a suction or vacuum pump, is frequently found in devices requiring pressurization of liquids, usually water. We can therefor find them in espresso coffee makers (pressurized hot water for steam extraction), and in iron steam generators.
-
The axial movement of a metallic piston (Ref. A), open at both ends so as to allow the flow of water, creates the pressure in the system. The 'back and forth' is produced by a magnetic field created by a coil. You can see these parts by following the link at the end of this step.
-
The coil contains a diode in series with the winding, which allows power from a single-phase, full-wave rectified voltage. Put simply, the piston follows the electrical current (50hz) and oscillates with 25 'backs' and 25 'forths' per second.
-
This pronounced vibration is the source of the very characteristc sound of a functioning pump.
-
Water enters one side of the pump (yellow arrow), passes via the cylinder (Ref. A) arrives in the pink chamber. This chamber alternately closed by two valves, pink (Ref. B) and blue (Ref. C). The pink one allows water to enter the chamber when the piston is 'back', the blue one being automatically closed (due to back-pressure).
-
When the piston is driven 'forth', the pink valve closes, the chamber is pressurized, forcing the blue valve open and letting the water through. This cycle repeats 25 times per second.
-
-
-
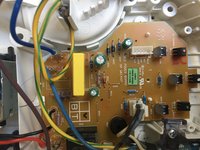
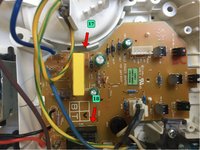
The device has a printed circuit board (PCB) located in the base of the tank. The operation of the device is entrusted to a microcontroller (Ref. 15)(PIC16F1820). This manages the inputs-outputs of the device connected to the various elements, probe, sensor, pump and control panel in order to ensure proper heating of the iron and steam generation.
-
Iron sole-plate temperature management. Is carried out by means of a probe placed in contact with the sole-plate. This iron does not have a manual thermostat to adjust the temperature of the iron. The temp is fixed and is controlled by the probe (see next step in Ref. 8) The temp measured on the sole-plate of the iron is 160°C.
-
Pump flow management using a BT168 GW thyristor (Ref. 16)(BT168 GW). This allows the volume of steam to be reduced in ECO mode or increased in TURBO mode and the descaling function. (see the tutorial for various functions the device controls)
-
Iron Tilt management. This iron has a tilt or motion sensor (Ref. 12). This, in the form of a capsule containing a metal ball. When the iron is horizontal, the ball closes a contact, allowing the heating element to heat up. When the iron is tilted (on its base for example), the circuit is open, and the heating element turned off.
-
Descaling management By pressing the descale button, the pump operates for 2 minutes uninterrupted at the maximum flow rate. The iron signals when descaling is needed. The micro-controller is programmed to manage this alert and will block the pump from working if the operation is not started.
-
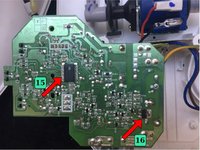
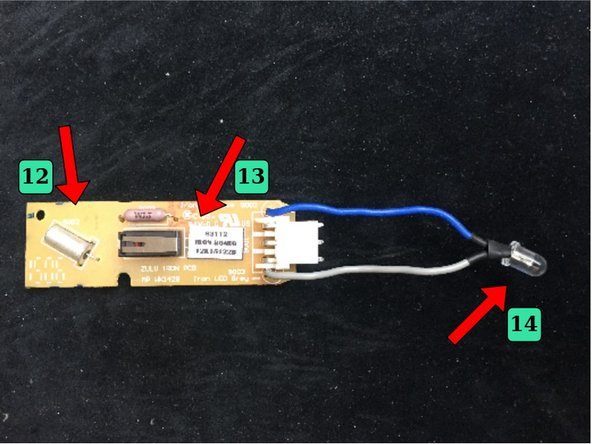
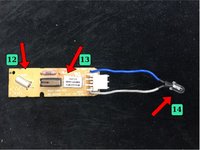
Light and sound signal management. 3 LEDs are placed on the printed circuit opposite each button of the control panel as well as a buzzer. The signals emitted by these components are described in step 3 of the "different functions" tutorial. Another led (Ref. 14) is connected to a small PCB board placed in the handle of the iron.
-
This small PCB board also supports the steam switch (Ref. 13) which is activated by the steam button (Ref. 5) and the tilt sensor (Ref. 12).
-
-
-
The electrical circuit is made up of a power cord with 3 conductors: Phase (brown), Neutral (blue), and Ground (green/yellow). These three wires are connected to the electronic board. The ground wire is connected to the iron through a protective sheath.
-
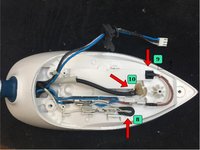
In this sheath are also the wires that will power the heating element (Ref. 11) via the Klixon protection (Ref. 9) and the temperature probe (Ref. 8) as well as the control wires (ON button, LED, etc.) which are in the handle of the iron. The tube through which water flows (Ref 10). is here too.
-
The attached diagram shows the main components and their connections.
-
-
-
The hydraulic (water) system is as follows (red): the water is stored in the reservoir (Ref. 4) When the user requests steam by pressing the button placed in the handle of the iron (Ref. 5), the pump (Ref 3) is started. The water is then sucked up and sent through the tube (Ref. 10) to the sole of the iron (Ref. 6).
-
A safety bypass is located at the pump outlet (Ref. 17) If the water cannot be ejected (clogged tube) it returns to the tank (green).
-
-
-
One source of failure on this type device is the pump which moves the water stored in the tank to the iron. It's easy to tell if the pump is working. Just listen! The pump makes a noise, an easily audible hum. The noise is produced by the vibration of the core in the coil. See § operating principle.
-
1- Disconnect the power supply to the pump. 2- Attach a tube to the pump inlet and immerse the other end in a container of water. 3- Disconnect the pump outlet and attach a second tube and (empty) container 4- Using an electrical cord, connect the pump terminals directly to the mains.
-
5- The pump should move the water. 6- If the pump does not start, the cause is either a break in the coil or a clogged pump, water leak, scale, or intensive descaling with unsuitable solution concentrations.
-
-
-
The iron is controlled by a micro-controller (Ref. 15). Here it's data sheet: PIC16F1820 In case of malfunction of the iron unexplained, it is likely that the PIC is questionable. In that case, unfortunately, there's little we can do without the firmware from the manufacturer.
-
Control of the heating element is entrusted to a relay (Ref. 18). It's possible this component is the cause if the element doesn't heat up. When the PIC sends the resistive heating element "commands", the relay sticks. You may hear a slight "click" when this happens. If so, the "command" are being sent.
-
If the relay clicks, the contact has been closed and the current should flow to supply the (resistive) heating element. To test this, you must measure the voltage supplied to the element.
-
If no voltage is measured, the relay is faulty (contact HS). If the voltage (≈220V A.C.) is present, the heating element must be the cause.
-
Another common cause of failure can be the capacitor (Ref. 17) This part is very common in small household appliances. This is a class X2 polyester capacitor. The value is close to 1 uF and the voltage > 220V. If in doubt, test it with a multimeter with 'capacitance' function.
-
Pump control is entrusted to a thyristor (Ref. 16) Here is a data sheet for it: BT168GW It may be questionable if the pump doesn't start. You must, obviously, start by testing the pump first. (see step 1)
-
-
-
In this step we review the different parts found in the iron itself that might cause a failure.
-
To check the condition of the resistive heating element (Ref. 11) simply measure the resistance with the ohmmeter. Knowing that the power, per the manufacturer is 2400W; the resistance value should be close to 20 ohms. R =U²/P R=R=220²/2400=20 ohms
-
The probe (Ref. 8) which captures the temperature of the sole is also checked by measuring its resistance. Here are the values measured at ambient and operating temperatures: t°=20°C > R= 300Ko - T°160°C > R= 3.5Ko
-
Concerning the klixon or safety thermostat (Ref. 9) it is necessary to ensure the "continuity" of the circuit with the multimeter. There are several types of klixon (resettable or not). The one installed in this iron automatically resets.
-
To learn more about safety probes and thermostats, see this page
-
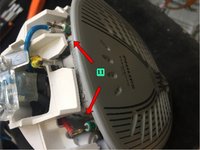
The push button (Ref. 13) which controls the steam spray, and the tilt switch (REF. 12) are tested for continuity as well.
-
Another potential problem can be the sheath connecting the iron to the fixed base. Inside this sheath pass the tube that carries the water from the tank to the iron as well as the electrical wires. This sheath is subject to twisting and may be damaged. To test it; measure the electrical continuity of the wires with a multimeter
-


Voilà! (So!) Having studied the first two guides on steam irons, functions, and various sub-assemblies that comprise them... we have just reviewed the main causes of their breakdowns.
We hope this has provided you greater knowledge of your device and thus enabled you to repair it yourself.
If you liked it (or not!) don’t hesitate to leave us a comment. And if you are in the area of ’Atelier Soudé, come see us. We organize co-repair workshops, simplification sessions and many other things....
Cancel: I did not complete this guide.
6 other people completed this guide.
Special thanks to these translators:
100%


These translators are helping us fix the world! Want to contribute?
Start translating ›

Team
