
You're viewing a previously published version of this guide.  View latest version

Older Newer
Toro Cement Mixer 68009HD 2018 Pulley Replacement

Toro Cement Mixer 68009HD 2018 Pulley Replacement

Arthur Shi

Arthur Shi

Last updated on December 9, 2020

20 - 30 minutes
Moderate
Prerequisite Only
This guide is only intended to be used as a prerequisite for other guides. It's incomplete by itself.

Introduction

Go to step 1

This guide shows how to remove and replace the pulley or sheave for the Toro Cement Mixer 68009HD.

  1. Toro Cement Mixer 68009HD 2018 Pulley Replacement, Safety precautions: step 1, image 1 of 2 Toro Cement Mixer 68009HD 2018 Pulley Replacement, Safety precautions: step 1, image 2 of 2
    • Before you begin, press the engine-stop switch to turn off the engine.

  2. Toro Cement Mixer 68009HD 2018 Pulley Replacement: step 2, image 1 of 3 Toro Cement Mixer 68009HD 2018 Pulley Replacement: step 2, image 2 of 3 Toro Cement Mixer 68009HD 2018 Pulley Replacement: step 2, image 3 of 3
    • Unlatch the three rubber straps securing the cowl.

  3. Toro Cement Mixer 68009HD 2018 Pulley Replacement: step 3, image 1 of 3 Toro Cement Mixer 68009HD 2018 Pulley Replacement: step 3, image 2 of 3 Toro Cement Mixer 68009HD 2018 Pulley Replacement: step 3, image 3 of 3
    • Swing the cowl up until it rests securely on the frame.

  4. Toro Cement Mixer 68009HD 2018 Pulley Replacement: step 4, image 1 of 2 Toro Cement Mixer 68009HD 2018 Pulley Replacement: step 4, image 2 of 2
    • Slide the fuel cutoff lever to the left to cut the fuel supply to the engine.

  5. Toro Cement Mixer 68009HD 2018 Pulley Replacement: step 5, image 1 of 2 Toro Cement Mixer 68009HD 2018 Pulley Replacement: step 5, image 2 of 2
    • Grab the plastic housing at the end of the spark plug wire.

    • Pull firmly to disconnect the wire from the spark plug.

  6. Toro Cement Mixer 68009HD 2018 Pulley Replacement, Remove the engine plate: step 6, image 1 of 2 Toro Cement Mixer 68009HD 2018 Pulley Replacement, Remove the engine plate: step 6, image 2 of 2
    • Remove the four fasteners securing the engine plate:

    • Two 14 mm bolts

    • Two 3/4 inch nuts

  7. Toro Cement Mixer 68009HD 2018 Pulley Replacement: step 7, image 1 of 3 Toro Cement Mixer 68009HD 2018 Pulley Replacement: step 7, image 2 of 3 Toro Cement Mixer 68009HD 2018 Pulley Replacement: step 7, image 3 of 3
    • Slide the engine plate up and out of the device to remove it.

  8. Toro Cement Mixer 68009HD 2018 Pulley Replacement, Remove the V-belts: step 8, image 1 of 2 Toro Cement Mixer 68009HD 2018 Pulley Replacement, Remove the V-belts: step 8, image 2 of 2
    • Use a 3/4 inch wrench to loosen the four bolts securing the engine to the frame.

    • You don't need to fully remove these bolts—loosen them enough to create slack in order to remove and replace the belts.

  9. Toro Cement Mixer 68009HD 2018 Pulley Replacement: step 9, image 1 of 3 Toro Cement Mixer 68009HD 2018 Pulley Replacement: step 9, image 2 of 3 Toro Cement Mixer 68009HD 2018 Pulley Replacement: step 9, image 3 of 3
    • If you are replacing the belts, you can choose to cut the old ones to remove them.

    • Slide the belts off from the pulleys and remove them.

    • If you have trouble sliding the belts off, further loosen the four engine bolts to create more slack.

  10. Toro Cement Mixer 68009HD 2018 Pulley Replacement, Remove the pulley: step 10, image 1 of 2 Toro Cement Mixer 68009HD 2018 Pulley Replacement, Remove the pulley: step 10, image 2 of 2
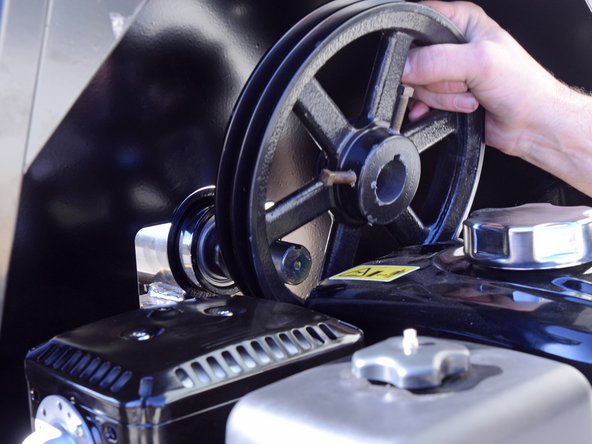
    • Use a crescent wrench to loosen the two set screws on the pulley.

    • Reassembly tip: The pulley is keyed to install in only one position.

  11. Toro Cement Mixer 68009HD 2018 Pulley Replacement: step 11, image 1 of 3 Toro Cement Mixer 68009HD 2018 Pulley Replacement: step 11, image 2 of 3 Toro Cement Mixer 68009HD 2018 Pulley Replacement: step 11, image 3 of 3
    • Slide the pulley off the axle and remove it.

  12. Toro Cement Mixer 68009HD 2018 Pulley Replacement: step 12, image 1 of 2 Toro Cement Mixer 68009HD 2018 Pulley Replacement: step 12, image 2 of 2
    • Remove the key from the axle.

Arthur Shi

Member since: 01/03/18

283,033 Reputation

587 Guides authored

Team

iFixit Member of iFixit

Staff

118 Members

19,533 Guides authored

View Statistics:

Past 24 Hours: 0

Past 7 Days: 1

Past 30 Days: 1

All Time: 14