
Toshiba Satellite A105-S4011 Touchpad Replacement
Introduction
Go to step 1This guide will help you remove and replace the Toshiba Satellite A105-S4011 touchpad. The touchpad is responsible for the cursor input. If your touchpad is experiencing the cursor drifting, unresponsive input, erratic input, or any input that is continuously not intended by the user, it may need replaced. First, check the user manual for any troubleshooting steps. If that does not help, a new touchpad may be advisable.
Toshiba Satellite A105-S4011 User Manual
”TouchPad™ Enable/Disable (FN+F9 or by help of software)” (Pg. 1)
Please make sure to turn off the Toshiba Satellite A105-S4011, unplug the device, and remove the battery before starting any other disassembly.


-
-
Turn the laptop over and locate the lock and battery release switches. Unlock the battery by changing the switch on the right from locked to unlocked by sliding the switch outward.
-
-
-
Open the laptop so the display screen is bent fully back with the display facing upward, parallel to the surface you are working on.
-
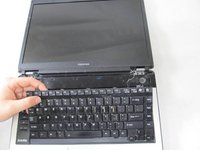
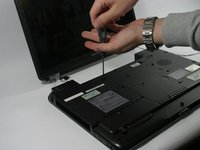
Wedge the Phillips 00 screwdriver above the F1 key, and separate the top piece of plastic from the body of the laptop. Don't worry about breaking it! You will need to forcefully wedge the screwdriver under the plastic, simultaneously pushing upward and forward.
-
Once that section has popped up, work on pulling the rest of the plastic piece up and out, alternating from left to right.
-
-
-
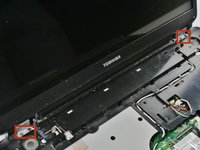
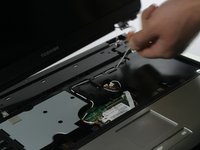
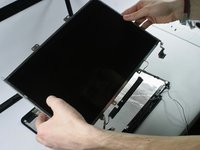
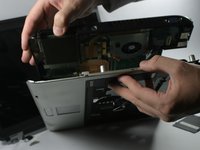
Now you need to detach the screen from the rest of the laptop. Start by removing the screws on the hinge (indicated in picture one).
-
After removing the screws look to the right side of the laptop. Remove the white wire in the channel found there. To do this you only need to move the wire around the plastic pieces holding it down.
-
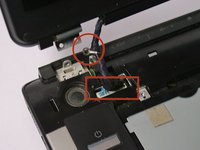
You will also find a connector on the left side of the laptop (indicated in picture two in the square). Pull gently on it to detach it. You may now pull the display completely off.
-
The eyelet in the circle is a necessary grounding wire for the LCD, when you reattached the hinges to the base you will need to put a screw through this eyelet.
-
-
-
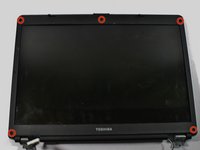
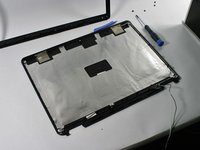
The next step is to remove the plastic from around the display. First you must remove the 5 screws found around the plastic part of the display (indicated in picture 1).
-
Note: There may be a rubber pieces covering the screws. You can just pry these off with your screwdriver or your fingernails.
-
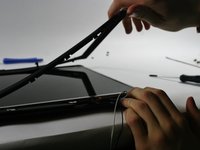
After the screws are removed you can pry the plastic part off. This may require a bit of force, but be careful not to snap the plastic. Always start in one place and slowly lift around the screen.
-
-
-
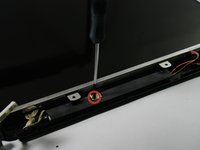
The last step is to remove the lcd from the plastic. To do this you must remove one screw found directly below the screen (indicated in picture one).
-
After the screw is removed lift the display up. It should come free easily. You can now replace the LCD with a new one. The assembly is the reverse of the removal.
-
-
-
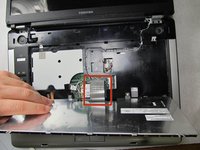
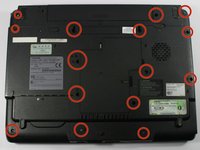
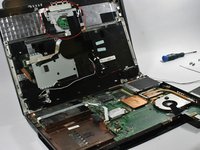
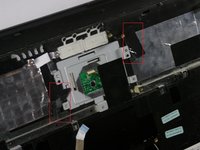
This step requires removal of the screws under the laptop. Locate the screws that are embedded within a hole on the underside of the laptop. These are the screws that require removal.
-
Screws that support a plate are not required to be removed.
-
All necessary crews to be removed are highlighted with red circles (in the final picture).
-
-
-
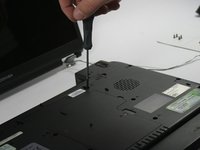
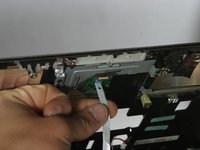
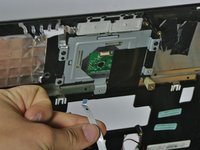
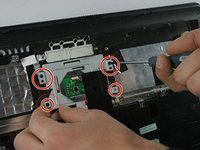
Locate the five (5) screws that support the touch-pad and remove them.
-
The screws may be covered by tape. If the tape is present, peel it so that the screws are exposed for removal.
-
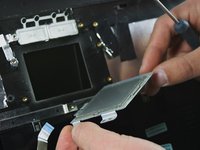
Once the screws are removed and the tape is peeled back , the touch-pad should be able to be removed without any issues.
-
Finally, a new touch-pad can be installed. To re-assemble the laptop, follow the reverse order of the disassembly.
-


To reassemble your device, follow these instructions in reverse order.
To reassemble your device, follow these instructions in reverse order.
Cancel: I did not complete this guide.
3 other people completed this guide.
Team

UMass Dartmouth, Team 4-6, Calaway Spring 2014 Member of UMass Dartmouth, Team 4-6, Calaway Spring 2014
UMASSD-CALAWAY-S14S4G6
4 Members
12 Guides authored